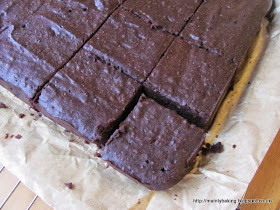
I've made a sort of resolution to use up all the odds and ends in my baking store cupboard before I buy anything new. You know the sort of thing - half used packets of nuts, packs of dried fruit bought on special offer, but now approaching the 'best-before' date, and things bought on a whim but never used. I don't expect the resolution to last long if I really feel the need to make something for which I don't have the right ingredients, but for the moment, there's a ban on new purchases.
This flapjack is a perfect example of the sort of baking I should be doing - it used oats from a source which I won't use again, as the flakes are too small, chocolate which was past it's 'best-before' date (but still in good condition), and a whole pack of dried cherries which had been in the store cupboard for ages.
I adapted my usual flapjack recipe, reducing it to 2/3, so that I could make a smaller batch. I reduced the butter and added melted chocolate, and also added some desiccated coconut along with the oats, as the total (increased) amount of butter and chocolate would take a larger amount of absorbent ingredients.
Ingredients
100g chocolate (I used 30g of 100% cacao and 70g of 85% plain chocolate)
100g unsalted butter
65g golden syrup
100g light muscovado sugar
240g rolled oats
100g dried cherries - roughly chopped
50g desiccated coconut
Method
Pre-heat oven to 180C and line a 20cm (8") square shallow tin with baking parchment.
Melt the chocolate, butter, golden syrup and sugar together in a large saucepan, stirring until smooth and hot, but not allowing to boil.
Stir in the remaining dry ingredients and mix well to distribute the fruit and coconut evenly. Tip the mixture into the baking tin and spread to an even layer, pressing down well with the back of a spoon.
Bake for 25 minutes, then cool slightly before marking into 16 squares with a sharp knife. Cool completely before removing from tin.
These flapjacks tasted really good - using such dark, bitter chocolate cut through the sweetness of the sugar and syrup, and the dried cherries were quite tart too. The flapjacks were just the way I like them - chewy and not too crisp. If you prefer crisp flapjacks, then a few minutes longer baking time usually works.
Wednesday, 28 January 2015
Tuesday, 20 January 2015
Apple and Apricot Cake
I got carried away by the success of the Cranberry-Date Crumble Squares, and tried another baking recipe, using cooked red lentils, from the same website. Unfortunately, this time I produced something with the density and appearance of a house brick, which was even rejected by the garden birds, and ended up in the food waste recycling.
After that disaster, I needed a fast, fool proof recipe to restore my confidence - this cake is very fast to put together, although it does need quite a long baking time - plus I've been making it for years and it never fails. It was ideal for fitting into a day when I hadn't planned any baking time.
Ingredients
150g unsalted butter
200g caster sugar - divided 150/50
1 large egg
300g SR flour
30g chopped toasted hazelnuts
80g soft dried apricots, cut into slices with scissors
2 or 3 apples - I used 2 small coxes and a Bramley cooking apple - peeled, cored and sliced.
icing sugar to serve - about 1 teaspoon
Method
Preheat oven to 180C, and grease and base-line a 20cm springform tin.
Melt the butter in a large bowl in the microwave. If it becomes really hot, leave to cool until it's not much hotter than hand-hot.
Mix in the 150g portion of sugar and the egg, stirring until well mixed.
Add the flour and mix to a soft smooth dough.
Put 1/3 of the dough into a separate bowl and mix in the chopped hazelnuts.
Place the larger plain portion of dough into the baking tin and spread evenly over the base and also creating a small wall of dough around the edge, to hold in any fruit juices.
In a small bowl, mix the apples, dried apricots and remaining 50g sugar. Put the fruit in an even layer over the dough base.
The remaining dough, with the added nuts, needs to be crumbled and spread over the fruit to make a thin topping layer. It may not be possible to fill all the gaps, but it's best not to leave any large gaps around the edges. (See this photo from a previous recipe) The dough spreads as it bakes, but gaps around the edge may leak fruit juice and cause the cake to stick in the tin.
Bake for 50-60 minutes until the cake is golden brown and feels solid. Cool in the tin, then remove and dust with icing sugar to serve
The cake dough for this recipe bakes to something between pastry and a cookie. It's also a little scone-like and is what I imagine an American Strawberry Shortcake recipe to be like. This makes the cake crumb quite dense and dry, and not oversweet, but the cake is kept moist by the layer of fresh fruit in the centre. The combination of apples, dried apricots and hazelnuts was very tasty.
This cake makes a good dessert, as well as a tea-time cake, and almost any fruit can be used in the centre, although you might want to add a little ground rice or cornflour to any fruit which produces a lot of juice as it cooks.
Wednesday, 14 January 2015
Lemon Blueberry Ricotta Cake
However much you like the traditional winter treats that use dried fruit, spices and chocolate, there are times when you really crave something lighter and fresher tasting. This Lemon Blueberry Ricotta Cake fitted the bill nicely, for a New Year tea party, as I thought everyone else would probably be tired of mince pies and Christmas cake by then, too. As it turned out, not much of it got eaten, as everyone went for the chocolate cake, but my niece was happy to take most of it home for her large family, leaving myself and my husband just a couple of slices each.
I can't remember now, why I chose this recipe; I think it was probably to use up the rest of the ricotta cheese that I'd bought for my Christmas Day dessert. The only change I made to the recipe was that my punnet of blueberries weighed 170g, and I used them all. I didn't have a loaf tin of the required dimensions, so I baked the cake in my 30cm long loaf tin. Although it is long, it has the cross section of a small 1lb tin, so gives a lot of dainty slices from one loaf.
The batter was quite wet, so I was worried that the blueberries would sink, but everything was OK in the end. Despite a shallower, narrower baking tin, the cake still took the full suggested time to cook, and didn't need covering.
I was in two minds about this cake - it tasted great but I thought the texture was too moist and dense. It didn't have the light crumb that you expect from a cake of this type. I think it would have made a better dessert than a tea table treat, served with a blueberry coulis and some cream. It did make a refreshing change to all the Christmas treats still lying around though!
Thursday, 8 January 2015
Cranberry-Date Crumble Squares...
...with an unusual added ingredient!
The AlphaBakes challenge (rules here) is hosted jointly by Ros from The More Than Occasional Baker and Caroline from Caroline Makes. This month the challenge is hosted by Ros, and the random letter generator has thrown up the letter L. That means baking something whose name begins with L, such as Linzertorte, or something containing a significant ingredient beginning with L.
In a bid to find something really different from the most obvious ingredients, such as lemon or lime, I came up with Lentils. At first I was going to make something savoury, but then I found this really awesome Canadian site which throws lentils into cookies, desserts, brownies and cakes with wild abandon. I was really spoilt for choice, but in the end chose these crumble topped squares filled with dates and cranberries.
I followed the recipe as written, but I rubbed the chilled butter into the flour and oat mixture rather than mixing it in with a fork (how would that work?). I used a 50:50 mixture of spelt and wholemeal flour, as I didn't have enough spelt flour on it's own. When it came to making the filling, the instructions weren't really clear, so I chopped the dates into pieces the size of the cranberries. I used a mixture of fresh juice (from one small orange) and water, and added the zest of the orange too.
These squares were outstandingly tasty! I think this was mainly due to the thick filling of dates and cranberries, which cooked together to make something really different from either on their own! It's a combination of fresh and dried fruit that I've never seen before, and wouldn't ever have thought of on my own, but I'm really glad I tried it. The base was quite soft, although the topping was crisp and crunchy, and you would never guess that lentils were involved in any way. Despite the amount of sugar used, in both the crumb and the filling, the squares did not seem over-sweet.
Adding lentils has all sorts of health benefits - lentils have a low GI value, contain protein and fibre and are rich in several minerals such as potassium and iron. When cooked they add moisture to baked goods in the same way as fruit or vegetable purées, which means you can often cut down on the butter in the recipe, as in this one. A comparable oat square recipe would perhaps use double the amount of butter.
In addition to the health benefits of lentils, there are other ingredients in these squares which have health benefits - oats contain fibre and may help reduce cholesterol; wholemeal flour has more fibre than white; dates contain fibre and minerals and have natural sweetness; cranberries are packed with antioxidants and sometimes called a superfood. The squares are high in sugar, which can be worrying, but most people are happy to eat some sugar as an occasional treat. The other lower GI ingredients here balance the effects of sugar and would help keep blood sugar levels steady.
I think these health benefits probably also qualify these cranberry-date crumble squares for this month's Tea Time Treats challenge, which is to make something healthy (or thrifty) for a lunchbox. I'd certainly appreciate the energy and nutrients packed into a piece of this, when balanced with a low carb salad, or something similar. Tea Time Treats (rules here) is hosted alternately by Karen from Lavender and Lovage, and Jane from The Hedge Combers, who is this month's host.
Sunday, 4 January 2015
Another Version of Chestnut Brownies
When I decided to make these I had three requirements of my chosen recipe - that it contained chocolate, that it was reasonably portable and that it used up the half tin of chestnut purée in the fridge. I was making a dessert for New Year's Day, but the children would be taking home any leftovers, as we still have tons of Christmas goodies to finish up!
Brownies seemed the obvious answer, but my previous attempt at chestnut brownies (Dan Lepard's recipe) used whole chestnuts rather than purée, and weren't loved by everyone here. Choclette, at Chocolate Log Blog, had adapted Dan's recipe to use chestnut purée, and I made slight adaptations to her recipe which I hoped would make the result more chewy and brownie-like, rather than melt in the mouth.
I upped the sugar content, as I like sweet chewy brownies (and I was using unsweetened purée) and reduced the chestnut purée (to use the amount I had available!). Choclette often bakes with duck eggs, but I used large hen's eggs, keeping the number at two, in the interests of getting the more cake-like
texture I wanted. I also baked in a smaller pan to give deeper brownies. So, I used:
175g butter, 200g 70% plain chocolate, 225g dark muscovado sugar, 200g unsweetened chestnut purée, 2 large eggs, 100g spelt flour
I followed Choclette's standard method for making brownies, melting the chocolate and butter together, then beating in the sugar and chestnut purée until the batter was smooth. The eggs were then beaten in, one at a time, and lastly, the spelt flour was folded in. The batter was quite thick by this stage and needed spreading and levelling in the baking tin. (This batter didn't spread or flow as it started to warm up in the oven, so I recommend smoothing the top carefully to avoid unsightly lumps and bumps on the finished brownies.) I baked in a 8"(20cm) tin, for 25minutes at 170C, by which time only damp crumbs clung to a test probe. After cooling in the tin, I cut the cake into 16 portions. (I cut the brownies while they were still slightly warm, to try and get a photo or two before the light was too bad, and they were quite fragile while still warm)
The brownies weren't quite the texture I'd hoped for - I'd call them truffle-like - so I didn't quite achieve what I wanted, but they made a great dessert, eaten with whipped cream! After cutting, I was worried that they would be too fragile to pack up and transport, but they firmed up a lot as they cooled completely. I don't think unsweetened chestnut purée has as strong a flavour as sweetened, so here the chestnut was very much a subtle backnote, rather than a predominant flavour.
I still didn't manage to get many good photos, and all the leftovers went home with FB and CT, so there was nothing to photograph the next day, either! Poor light is one of the curses of winter baking!
Thursday, 1 January 2015
Chocolate Speckled Sponge Cake
I made this cake for the small children who visited over the Christmas period, but it was the adults who seemed to appreciate it more. Several remarked on the flavour of both the cake and the frosting.
The cake was a simple 'all-in-one' 3-egg Victoria Sandwich mixture with 75g of chopped chocolate flake bars (3 bars from a multi-pack) folded in. I baked it is a 9" square tin, but I think it would have been better in an 8" tin to give a slightly deeper cake. The cake took about 45 minutes to bake at 160C. The frosting was a basic butter cream - 100g softened butter, 200g sifted icing sugar, 30g cocoa, 1 tablespoon milk - beaten until light and fluffy with a hand-held mixer. This gave a thin layer of frosting over the cake - I find too much buttercream can make a cake too sweet and feel too fatty in the mouth. I sprinkled over some sugar coated chocolate balls and some seasonal sugar snowflakes, but any decoration would be suitable; the cake would make a good children's birthday cake as it's not too rich with chocolate.