For me, there isn't a much better culinary sight than the first harvest of our home grown rhubarb! It's one of the few foods that is still seasonal for me, as I don't freeze any, so I really look forward to watching the stems grow large enough for harvesting. I'm lucky in that the variety we're growing stays quite pink after cooking, which seems unusual for unforced rhubarb - it makes desserts look much more attractive. (I've no idea what variety it is - it was already growing when we moved here.) At the moment, I'm cooking rhubarb at least once a week, even if it's just cooked fruit to eat with yogurt, rather than a full dessert.
After making the tiffin loaf last week, I had a half a pack of gingernut biscuits leftover. As they weren't the best quality, and not very nice to eat on their own, I decided to incorporate what was left of them into another dessert. I also had about 80g of condensed milk left from the same recipe, which needed using up as well. I took my inspiration for this cake from this recipe on the Delicious magazine website, but I changed the base a lot, and added crushed gingernuts to the topping, as well as extra ginger.
Rhubarb: Cut 250g rhubarb into 2.5cm lengths and mix with 50g caster sugar and 2 teaspoons of plain flour. Stand for 15 minutes, during which time most of the sugar and flour will stick to the juices seeping from the fruit.
Streusel topping: Melt 50g butter with 25g light muscovado sugar and 40g caster sugar, then stir in 100g of plain flour and 1 teaspoon ground ginger to make a stiff dough. Leave to cool. Break 60g of gingernut biscuits into coarse crumbs.
Base: 175g SR flour, 1/2 teaspoon baking powder, 2 large eggs, 50g softened butter, 50g caster sugar, 75g condensed milk, 1 teaspoon vanilla extract, 2 tablespoons full fat natural yogurt. Beat everything together in a large bowl to give a smooth cake batter with a dropping consistency.
Assembly: Heat the oven to 180C and line a 23cm loose-bottom round cake tin with baking parchment. Spread the base mixture evenly into the tin, and top with the fruit. If there is any dry sugar mixture left in the bowl that contained the fruit, sprinkle it evenly over the fruit in the cake tin. Break up the topping dough into crumbs and stir in the crushed biscuits. (The recipe suggested that the topping could be broken into quite large pieces, but mine just turned to fine crumbs as soon as I touched it - I think it needed more butter!) Sprinkle the streusel mixture evenly over the cake. Bake for 45 minutes, or until a test probe comes out clean of any damp cake batter, then cool in the tin.
I served this with oven-roasted rhubarb and natural yogurt. I used more fruit when serving as I felt that there wasn't enough in the recipe. 250g didn't completely cover the surface of the cake batter; I think at least another 100g of fruit could be used, if available, but this is certainly a good way to use up small quantities of fruit, if you are buying forced rhubarb.
The base was heavier than I expected - it had more of the texture of shortcake than a sponge cake - but it held up the fruit and streusel layers well. The flavour of ginger, and the extra crunch from the crushed biscuits, gave the streusel layer a good contrast to the base.
I'm sending this to the celebration of rhubarb taking place, until the end of the month, at Lavender and Lovage and Farmersgirl Kitchen - The Great British Rhubarb Recipe Round-Up.
Sunday, 26 April 2015
Wednesday, 22 April 2015
Ginger Tiffin Loaf
First off, I have to say I'm not keen on tiffin, or refrigerator cake, as it's also called. It seems to fall uncomfortably between cake and dessert, but never seems to be quite right for either. As a cake, it suffers from needing to be kept cool, as a dessert it suffers from being too hard, when cold, to eat with a spoon. The best refrigerator cake I've made was this Delia Smith recipe, which I cut into single bite size pieces, to eat after dinner, with coffee - that was very rich, though, as it had rum and cream in it, and only suitable for adults
Still, I'm always up for a challenge, and this month the We Should Cocoa (rules here) challenge, set by Choclette at the newly re-vamped Chocolate Log Blog, now called Tin and Thyme, is for no-bake chocolate treats.
I based my recipe on one for Javanese Ginger Squares, from Green and Black's Chocolate Recipes (Unwrapped). I adapted it slightly to both make it smaller and make it in a loaf shape with a 'built-in' frosting. This was the first time I've made a refrigerator cake with condensed milk - my recipes usually use butter and golden syrup melted with the chocolate - but I was pleased with the texture when the chocolate mixture set.
Ingredients
300g plain chocolate (I used about 70g of 85% and the rest was 74%)
90g unsalted butter
310g condensed milk
125g gingernut biscuits, broken into rough pieces
100g crystallised ginger, chopped into small pieces
40g flaked coconut
Another 30-50g crystallised ginger, cut into thin slices, to line the base of the loaf tin. The exact amount you need will depend on how thin you slice the pieces, how closely you pack them together and the size of your tin! I used a 2lb loaf tin.
Method
Melt the chocolate in a large bowl, over a pan of simmering water.
While this is happening, grease the loaf tin and line with baking parchment; greasing the tin first helps to hold the paper in place.
In the base of the tin, lay the slices of crystallised ginger - either in a neat pattern, or just packed fairly closely together. These will show on the top of the tiffin when it is turned out of the tin.
Add the butter to the melted chocolate, remove from the heat and stir until the butter has melted. Stir in the condensed milk.
Put the loaf tin onto your scales and carefully spoon in 200g of the chocolate mixture, helping it to spread evenly without disturbing the slices of ginger. Make sure the chocolate spreads right to the sides of the tin. Chill for ten minutes.
Add the biscuit pieces, coconut and ginger pieces to the rest of the chocolate mixture, mixing well, then carefully spoon it onto the chilled chocolate mixture already in the loaf tin, spreading it evenly and packing down well to avoid air gaps. Chill for at least 8 hours - overnight is best.
Remove the tiffin from the tin, turning it top down onto a serving plate. Carefully remove the baking parchment.
Cut in slices to serve. Store in the refrigerator, covered with foil.
I thought the tiffin was better if the slices were allowed to warm up a little before being eaten. The ginger flavour was quite muted when the tiffin was really cold, but got stronger as it warmed up.
The mosaic of ginger slices on top of the tiffin, along with the layer of chocolate mixture without any additions gave the appearance of fudge frosting when the loaf was sliced. I liked this effect, so it was worth putting in the extra effort. I think I crushed the biscuits a bit too finely - more bigger pieces would have looked better.
My husband really liked this, so at least one of us was pleased with it! I liked the flavour combination of chocolate, ginger and coconut and was pleased that even with the condensed milk, it wasn't too sweet, thanks to the proportion of 85% chocolate used, but unfortunately it didn't make me like the concept of tiffin more.
Friday, 17 April 2015
Date Cake with Middle Eastern Flavours
or Kaikat al Khaleej
I love the flavours used in Middle East desserts and sweets, so was quite confident of finding something to make for the Bahrain round of Formula 1 Foods, the new blog challenge from Caroline, at Caroline Makes. The idea is to follow the Grand Prix racing season and cook something inspired by the country in which each race is held.
My confidence lasted until I started searching, when I discovered that almost all recipes for cooked pastries from the Gulf States involve deep frying. It's understandable - a desert lifestyle isn't conducive to building or using ovens, so most traditional recipes, even for breads, are cooked over open fires (or on the hob for more modern cooks). Unfortunately, I have an uneasy relationship with deep frying, dating back to setting fire to the kitchen over 30 years ago, so didn't really want to deal with fried desserts.
However, on this great blog about Middle Eastern food, called Ya Salam Cooking, I found a recipe for a baked date cake in the Bahraini section. I'm not sure how authentic it is - it may be that the author is just combining Middle Eastern flavours with a Western style of cooking, but I found a few similar recipes, often called Arabic Date Cakes, on Google. That was good enough for me!
This cake combines dates with rose water, cardamom, saffron and sesame seeds to give a wonderfully fragrant and moist cake. The quality of the dates is important, and I found some delicious soft and sticky dates in the snack food section in Waitrose. I didn't need to pre-soak them, as suggested in the recipe. They were so sticky that I tossed them in a tablespoon of flour from the recipe quantity, to make sure the pieces didn't stick together or sink in the cake batter.
I followed the recipe almost exactly; the only difference was the amount of water I used. By the time I'd added 150mls of water I already had a batter with a soft dropping consistency. At this point I was worried that a sloppier batter wouldn't cook properly, or support the chopped dates, so decided not to add any more water. My loaf took quite a bit longer to cook than the recipe suggested, but the picture with the recipe suggests a much larger 'loaf' tin was used, as the cake looks much shallower than the one I produced in a 2lb loaf tin.
As the recipe only used 1 egg, a relatively small proportion of butter and only water to mix the batter, I wasn't sure how well it would turn out. I needn't have worried - it was light and moist, with a close crumb. The chewy, sweet dates, which stayed soft, made the cake seem rich to eat, and the rosewater and cardamom added fragrant and spicy notes. I really love the flavour of rose in cakes and desserts but even small quantities can be quite strong, so use with caution! The only thing I wasn't sure about was the saffron - it didn't seem to add anything to either the colour or the flavour of this cake (and my saffron was new, so I can't blame old stock that had lost it's quality). As it's so expensive, I don't think I'd use it, if I made this cake again.
Sunday, 12 April 2015
Brownies with Hazelnut Praline Crust
I sometimes go to great lengths not to waste food. I've been known to decide on dinner on the basis of half a tin of tomatoes in the fridge. So when I tried making hazelnut praline to decorate last week's chocolate cheesecake, and ground it too finely, there was no chance it would be thrown away.
I thought about incorporating it into a chocolate refrigerator cake (tiffin), but decided it would end up like finely chopped hazelnuts, and the flavour of the praline would be lost. I tried making balls of praline mixed with Biscoff spread, which I would place in brownie batter so that each square had a nutty 'truffle', but the mixture was just too sweet to be pleasant. In the end I decided just to sprinkle it over a tray of brownie batter and hope that the sugar didn't dissolve quickly, leaving just chopped nuts on the surface, or even worse, that the praline didn't just sink.
The plan worked just fine - the praline made a crisp crust on top of the brownie, which was a nice contrast in texture, and the crust still had the praline flavour of caramel and toasted hazelnuts. I used my favourite brownie recipe, which I don't feel quite as guilty about since I reduced the sugar content by 25%, scaled down to an 8" square baking tin. *The praline was made from 50g chopped toasted hazelnuts mixed into 50g of caramelised sugar which was spread out on a piece of baking parchment to cool, then broken into pieces and ground to a fine crumb after it had set.
Ingredients
140g unsalted butter
140g 74% plain chocolate
300g light muscovado sugar
1 teaspoon vanilla extract
3 medium eggs
160g plain flour
3 tablespoons cocoa
100g praline (see above*)
Method
Melt the butter and chocolate together in a large bowl - I prefer to do it over hot water, but the microwave also works. Cool to lukewarm, if necessary, then mix in the sugar and vanilla extract, stirring until the sugar has dissolved. Beat in the eggs, one at a time, then sift in the flour and cocoa and fold in.
Transfer the batter to an 8" (20cm) baking tin, lined with parchment paper, and sprinkle over the praline to give an even layer on top. Bake at 180C for 25-30 minutes until a test probe comes out with a few damp crumbs still clinging.
Cool in the tin then cut into as many pieces as you think fit. I make 16 pieces out of this size tin.
The only criticism I had of these brownies was that they were slightly overcooked. I didn't check until 30 minutes had passed, and they were past the optimum point for a really moist brownie by then. It doesn't spoil the flavour but it does make them slightly drier than I really like.
I will also be interested to see if the praline stays crisp for longer than a day or two - it takes us a while to get through a whole batch of brownies.
I'm entering these into the Tea Time Treats April link-up party - this month, with Easter in mind, the theme is chocolate. Tea Time Treats is co-hosted by The Hedge Combers and Lavender and Lovage, and this month's host is Karen at Lavender and Lovage.
As I'm short of baking time this month (I don't often bake more than once a week now, because we're both weight watching), these brownies will also be my entry into this month's AlphaBakes Challenge, which is the letter B. I realise brownies aren't very original, but it's better than no entry at all! AlphaBakes is co-hosted by Caroline at Caroline Makes and Ros at The More Than Occasional Baker, and Caroline is this month's host.
Sunday, 5 April 2015
Chocolate Cheesecake
An Easter Eggstravaganza!
Easter wouldn't be Easter, in this household, without chocolate. Not Easter Eggs though - our children quickly caught on that you didn't get much chocolate for your money in an Easter Egg, so our tradition became a Terry's chocolate orange (or something similar) and a chocolate dessert for the weekend. Now that they are adults we've stopped buying chocolate presents, but the tradition of a chocolate dessert lingers on.
I decided on a baked cheesecake because it's fairly light on added sugar, compared to some of the desserts I could have chosen. I picked this recipe from Good Food, because it sounded quite light (despite some of the reviews claiming it was too rich!). The recipe uses cocoa and relatively small amount of plain chocolate to get a good flavour, rather than a lot of chocolate.
As usual, I only used the recipe as a guide to the correct quantities for the cheesecake mixture. I introduced a hint of nuts by adding finely chopped toasted hazelnuts to the biscuit base, and Amaretto liqueur to the cheesecake mix instead of a coffee liqueur. I also used plain chocolate instead of one with coffee flavour.
The base was made from 170g of chocolate and oat biscuits from IKEA, 50g toasted hazelnuts and 60g butter. I reduced the butter a little from the usual 50% of the weight of biscuit because I wasn't sure how absorbent the biscuits would be, and I didn't want the base to be too heavy - I prefer a slightly crumbly base rather than one which is dense and crisp. I followed the recipe for the cheesecake mixture as far as quantities of ingredients were concerned, just making the changes I've already mentioned.
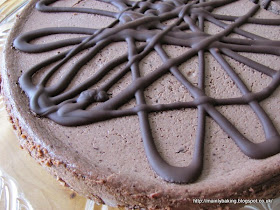
I was rather concerned about how liquid my cheesecake mixture was - the recipe said to smooth the top after pouring it onto the base, but my mixture flowed like custard and certainly didn't need any help from me to become smooth and level. Perhaps because of this, the cheesecake took a little longer to cook than stated in the recipe. It also cracked badly, with one deep crack going right down to the base (which explains why there's no photograph of the whole cheesecake!). When cold, I decorated the top with a drizzle of plain chocolate, rather than the cream and chocolate sauce suggested in the recipe. I thought it better to serve cream as an optional extra, rather than force everyone to eat some.
Although I'd expected this cheesecake to be light, it was very different in texture to what I had hoped for. It was more like a set cheesecake or a mousse than other baked cheesecakes I've made. It still tasted good though, which is the main consideration. The hint of nuttiness was just right, and the chocolate flavour was strong enough without being too rich at the end of a meal.
I didn't really manage to get any good photographs after the cheesecake was cut. By the following morning the remnants were a bit worse for wear - the chocolate topping was a bit weepy, and the cheesecake was crumbly to cut straight from the fridge. I think this bottom photo shows the texture quite well, despite all that.
I'm entering this cheesecake into the April 'Simply Eggcellent' link-up set by Dom (of Belleau Kitchen); with due consideration for our priorities at Easter, his theme for this month is chocolate.