In over 40 years of baking, I've never made a caraway seed cake, so it's a little strange that the notion of making one suddenly came to me. The traditional seed cake is usually made by adding a few teaspoons of caraway seeds to a Madeira Cake recipe, instead of the lemon, but while looking through one of my recipe books I found a recipe called Nun's Seed Cake, which added a little cinnamon and orange flower water too. The author of 'Ultimate Cake', Barbara Maher, said that her recipe is adapted from Hannah Glasses's recipe in 'The Art of Cookery Made Plain and Easy', written in 1747.
The version I made used 200g butter and 150g caster sugar, creamed together, followed by the addition of three eggs. 200g SR flour, 1 teaspoon cinnamon, 2 teaspoons of orange flower water and 2-3 teaspoons of caraway seeds are folded in, before baking in a 2lb loaf tin for an hour at 180C, or until a test probe comes out clean and dry.
Barbara Maher was particularly pleased with how caraway and orange flower water complimented each other, and I have to agree with her. Caraway seeds are not to everyone's taste but as long as they are used in moderation they don't overwhelm this particular cake. The three flavours of cinnamon, caraway and orange flower water blended together very subtly and harmoniously in a moist, close-textured cake.
Wednesday 27 May 2015
Thursday 21 May 2015
Aniseed and Orange Frangipane Jalousie
Or ...... my homage to the elusive Monegasque fougasse!
Monaco is a tiny principality nestled on the coast between France and Italy, so as you'd expect, the traditional foods of the country take their inspiration from both those countries, and from the sea. There are very few foods that are unique to Monaco; I found references to a salt cod dish, sweet and sour onions, and a sweet fougasse, but not much else.
Naturally, the sweet fougasse is what grabbed my attention when it came to making something for the Formula 1 Foods challenge over on Caroline Makes blog. The idea is to make a recipe inspired by the country where each round of the F1 Grand Prix is taking place. The Monaco GP stands out from the others - it's a street race in very glamourous surroundings. Even if you're not interested in the race, you can admire the super-yachts as the cars race past the marina, or wait for the inevitable collisions as two powerful machines both try to take the same restricted road space at the same time!
At first, I thought the Monegasque fougasse was just a sweetened form of the usual bread recipe, flavoured with almonds, aniseed and orange flower water, but the more I looked for a recipe, the more doubtful I became about this. Many websites referred to pastries, and some to crisp biscuits. Admittedly, the only recipes I could find were for bread (and all the recipes looked as if they came from the same source), but a commentator on one of the recipes I looked at was adamant that the dough should not contain yeast!
Anyway - you know that I don't get on well with yeast doughs, so in the end I decided to take my inspiration from the flavours contained in the sweet fougasse, and make a frangipane filled pastry instead.
I used half a block of ready made all-butter puff pastry, which I rolled out and cut into two rectangles approximately 18 x 12cm. I made a frangipane mixture from 50g ground almonds, 50g caster sugar, the zest of a mandarin orange, 2 teaspoons orange flower water, 1/2 teaspoon of ground aniseed, 1 egg yolk and about half of a lightly beaten egg white, to make a stiff paste.
The frangipane was spread onto one of the pastry rectangles, leaving a 2cm border around the edge, which I brushed with some of the remaining egg white. I rolled the second piece of pastry a little larger, so that it would fit over the mound of frangipane, and placed it on top of the base, pressing down well around the border, then knocking up the edges of the pastry with the back of a knife. Finally I brushed the top with more egg white and sprinkled with a little crushed raw sugar mixed with a pinch of whole aniseeds, and cut some slits across the top of the pastry, through to the frangipane beneath. This was baked for about 20-25 minutes at 200C, until the pastry was well risen and a dark golden colour.
We both really enjoyed the flavour of the filling for this pastry. The aniseed was strong but not overwhelming, although, like caraway, it's a flavour that some people dislike. If you're not sure you like it, I'd recommend using less the first time you try it, especially if it's a sweet recipe. The orange notes were a more subtle backnote to the almonds and aniseed, but still noticeable. I also really liked the way the soft frangipane filling and crisp puff pastry worked together - a match made in heaven as far as I'm concerned!
The next F1 Grand Prix is in Canada - that should be easier to bake for!
Labels:
almonds,
aniseed,
Formula 1 Foods,
mandarin orange,
orange flower water,
pastry
Saturday 16 May 2015
Cheddar and Jalapeno Cornbread,
made with Quark.
I love the AlphaBakes challenge, where we are asked to cook something using a randomly chosen letter of the alphabet, as either the starting letter of a principle ingredient (eg B for bacon), or as part of the name of the dish (eg B for Battenburg Cake). Admittedly, some letters of the alphabet prove more difficult than others, but that's all part of the fun.
Last time the letter Q came around I made a cake using quinoa, which had a fairly unpleasant texture and didn't go on my list of things worth making again; this time I intended to play it safer with a quiche. Except every time I suggested quiche for dinner, my husband vetoed the idea, so I had to think again. Quark seemed the next best idea, and while searching for recipes I came across this cornbread recipe from The Fabulous Baker Brothers.
This is a luxury version of cornbread, compared to recipes I've tried before. It contains lots of cheese, sweetcorn kernels, onion and jalapeno peppers for flavour, and uses quark instead of the sour cream or buttermilk more usually found in cornbread recipes.
This was a straightforward recipe to follow, but my batter was very dry and I needed to add a few tablespoons of milk to give a stiff dropping consistency. The cooked cornbread was quite dry and crumbly, so it wouldn't have hurt to make the batter a little sloppier. The cornbread also took a lot longer to cook than the 40 minutes the recipe suggested - I think mine was in the oven for a touch over an hour!
We both really liked this - it was very cheesey, and well spiced with the jalapenos, which I had chopped quite finely. Most cornbread recipes contain a proportion of wheat flour, which I think lightens the sponge texture; this one was all cornmeal, and also contained coarsely puréed sweetcorn kernels, so it was quite dense. It definitely needed more liquid in the batter though, to reduce the crumbliness a little.
We ate the cornbread, still warm, with a spicy ratatouille. The following night we ate it with a pork and bean chilli, but after two meals I'd only used half the cornbread, so I had to freeze the rest. I hope it doesn't become even more crumbly in the freezer.
This cornbread also fits the brief for Dom's Simply Eggcellent challenge over at Belleau Kitchen. This month he wanted our savoury recipes using eggs. While eggs are not the principle ingredient of a cornbread, it's almost impossible to make any sort of cake without eggs, so I think it's OK to submit this recipe.
AlphaBakes is co-hosted by Ros, at The More Than Occasional Baker and Caroline, at Caroline Makes. This month's challenge, using the letter Q, is hosted by Ros, who will be posting a round-up of entries at the end of the month.
Labels:
AlphaBakes,
cheese,
cornmeal,
eggs,
jalapeno peppers,
onion,
quark,
savoury,
Simply Eggcellent,
sweetcorn
Thursday 14 May 2015
Cauliflower Cake (Yotam Ottolenghi's recipe)
I noticed that there is a bloggers' celebration of cauliflower taking place, co-hosted by Karen at Lavender and Lovage and Choclette at Tin and Thyme.
I love cauliflower as it's extremely versatile and always tasty, however it's cooked. One of my favourite ways to eat it is gently fried with whole spice seeds, such as nigella, black mustard and cumin, and a few flakes of dried chilli. It then makes a delicious accompaniment, alongside rice or bread, to a curry.
Then there's cauliflower cheese, to which I often add pasta, to make a cross between cauliflower and macaroni cheese. And along with numerous others, I'm a fan of cauliflower 'rice' to reduce carbohydrate intake, although I do prefer to mix it with some Basmati rice, so that it will still absorb sauces.
However, the recipe I want to add to this collection of cauliflower recipes is Yotam Ottolenghi's recipe for Cauliflower Cake. This is a delicious, well flavoured cake which is like a frittata. The addition of flour makes it lighter, yet sturdier, than a traditional frittata. The cake is flavoured with cheese, rosemary, onion, basil and sesame and kalonji seeds and can be eaten both hot and cold, which makes it ideal for picnics and parties.
I made and wrote about it back in September 2014, but rather than edit that post for the cauliflower link-up party, I thought it better to write a new post.
Labels:
basil,
cauliflower,
cheese,
kalonji seeds,
onion,
rosemary,
savoury,
sesame seeds
Tuesday 12 May 2015
Savoury Oat Biscuits .....
..... made from leftover shortcrust pastry.
I picked up this ingenious use of leftover pastry scraps from the 'Cook' supplement in the weekend Guardian newspaper. In general I'm not that impressed with this magazine; I had high hopes when it started but I rarely see anything that seems relevant to how and what I cook. This little recipe was one of the exceptions, as I often misjudge how much pastry I'll need, and prefer to err on the side of caution anyway, rather than trying to stretch a small amount further than it really wants to go!
The first time I made these, I think I misunderstood the recipe, as they were far too sweet to be eaten as savoury biscuits; with a reduced amount of sugar the second time, they were just right for me, but the sugar could be reduced even further. Alternatively, with more sugar and perhaps some spices for flavouring, these would make a tasty sweet biscuit too! The baking time suggested was 10-12 minutes but a bit longer gives a crisper biscuit - just don't let the biscuits colour too much!
First weigh the pastry scraps. In a bowl, add the same weight of rolled oats and half that weight of butter. Leave for a few minutes for the butter and pastry to soften a little. Add sugar equal to a quarter of the weight of the original pastry scraps (or less, to taste). Knead everything together by hand or in a food processor to give a uniform dough. On a floured board, roll out the dough to about 5mm thickness, cut into 8cm rounds (or whatever shape you like - fingers or squares would be simpler) and put on a baking tray lined with parchment. Re-roll any scraps and repeat until the dough is all used. Bake at 180C until the biscuits are firm and lightly coloured (10 minutes plus!), then cool on a wire rack.
I had 150g of leftover pastry, and made over a dozen biscuits from this recipe. There are other good ideas for using up pastry scraps on this link to the Guardian article.
Saturday 9 May 2015
Spanish Panellets
The word 'panellet' means 'little bread' in Catalan Spanish, although these little cookies are more often described as a type of marzipan. They are eaten in the Catalan area of Spain (around Barcelona) to celebrate All Saints' Day (1st November). I made them for the Formula 1 Foods challenge, at Caroline Makes, to celebrate the Spanish F1 Grand Prix taking place in Barcelona this weekend
There seem to be many different ways of making panellets, some more complicated than others and although they are traditionally rolled in pine nuts, modern cooks often use cocoa, coconut, or slices of glace fruit to decorate them too. Whether or not to add mashed potato or sweet potato is also an issue; it's said to make the cookies moister but my guess it was originally used to act as a cheap 'padding' for the more expensive sugar and almonds.
The original recipe I found, in a book on Spanish cooking in the local library, made flat biscuits with a few pine nuts or pistachios sprinkled on top, but it didn't take much online research to show that panellets were usually rolled into balls, logs or crescents. After reading many recipes I decided to go with this one, because it worked with the small quantities that I wanted to use, was simple to do (it didn't use boiling sugar syrup, for instance) and had lots of helpful illustrations. Despite that, I think I made my cookies a little larger than they should have been.
I had to adapt the recipe a little, of course. Firstly, I added the zest of a lemon, as many recipes seemed to do this and I had bought a lemon before deciding on the final recipe. The dough was quite wet before adding any egg, so I only added the yolk. I used the remaining lightly beaten egg white to brush the tops of the pine nut covered cookies (rather than use another egg yolk), and because the cookies were so damp, they needed 20 minutes cooking at 180C to get a light golden colour. I didn't add the grilling stage as I was happy with the colour after baking. I ran out of pine nuts after 14 cookies, so the last few were rolled in desiccated coconut.
The colour inside the panellets was quite vivid due to the bright orange of the sweet potato, and the cookies were very moist and soft in texture. The lemon gave an extra lift to the overall flavour of sweet marzipan.
These were more like balls of soft marzipan than cookies, and more suitable as after-dinner sweetmeats than cookies to have with a mid-morning cuppa! When eaten as part of the All Saints celebrations they are often served with sweet white wine. Sweet potatoes and chestnuts are also traditionally eaten during the celebrations.
Labels:
almonds,
biscuits and bars,
coconut,
Formula 1 Foods,
lemon,
pine nuts,
sweet potato
Wednesday 6 May 2015
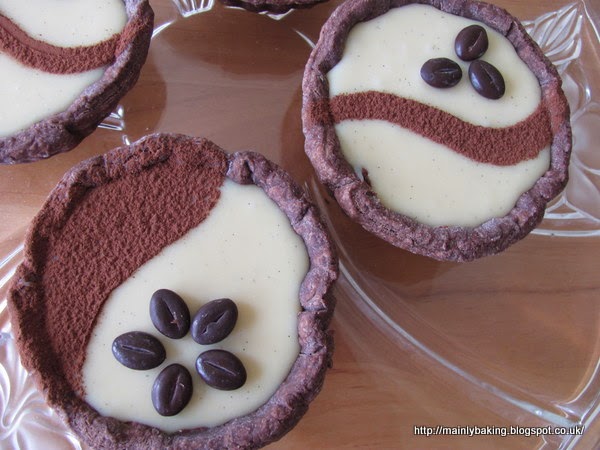
Chocolate Tarts x 2
1) chocolate tarts with Nutella and white chocolate/vanilla ganache
2) chocolate and marzipan tarts.
These chocolate tarts with Nutella and white chocolate/vanilla ganache filling were made our Bank Holiday dessert, but also fit the bill for for this month's We Should Cocoa Challenge. Karen, at Lavender and Lovage, is the guest host for the challenge started by Choclette at Tin and Thyme (formerly Chocolate Log Blog) and has asked us to use vanilla and chocolate together.
I decided to make extra chocolate pastry when making these ganache filled tarts, and used it to make smaller tarts filled with a disc of marzipan and a chocolate frangipane topping.
The recipes for both were just cobbled together as I went along, and I didn't take careful notes, but here's more or less what happened:
I made an unsweetened shortcrust pastry, from 270g plain flour, 30g cocoa, 75g butter and 75g lard. After rubbing the fats into the flour and cocoa, I added 1 teaspoon of instant coffee dissolved in a tablespoon of hot water, followed by enough cold water to make a firm dough. After resting in the fridge, I lined 12 jam tart moulds and four 9cm diameter individual tart moulds with pastry, and baked blind.
I originally intended just to fill the larger tart cases with white chocolate ganache but thought this might not have quite enough flavour, so before pouring in the ganache I spread a tablespoon of Nutella over the base of the pastry. I then chilled the cases for 10 minutes, so that the ganache didn't disturb the Nutella when it was poured on. The ganache was made by heating 125ml of double cream until just at boiling point, then stirring in 170g of good quality white chocolate and a teaspoon of vanilla bean paste with seeds. I allowed this to cool a little before pouring into the pastry cases, then cooled to room temperature before refrigerating. Once cold, the tarts were decorated with cocoa sifted through stencils, and chocolate coffee beans. I brought the tarts up to room temperature before serving.
For the chocolate and marzipan tarts I put a quarter of a teaspoon of apricot jam into each case, with a small disc of marzipan (made from a pea-sized piece) on top. I made the frangipane mixture by beating together 40g ground almonds, 25g SR flour, a heaped teaspoon of cocoa, 50g caster sugar, 1 egg, 50g softened butter and a few drops of almond extract until smooth. This was just enough batter to put a heaped teaspoonful into each tart case. I sprinkled a few flaked almonds on top before baking at 160C until the frangipane felt solid - about 15 minutes.
I was right about the white chocolate tarts needing more flavour than just vanilla. Adding the chocolate hazelnut spread gave them just that bit more interest, but afterwards I wondered if peanut butter might have been even better, as it would have counteracted the sweetness of the ganache too.
I had been a little worried about the ratio of cream to chocolate for the ganache, as recipes I looked at ranged from equal amounts of each (200ml cream to 200g chocolate) down to only adding 50ml of cream to 200g chocolate. The ganache I made was about right for a tart filling - holding it's shape, but not too hard, at room temperature.
The smaller chocolate and marzipan tarts were delicious too, but it's hard to go wrong when combining chocolate and marzipan!
Labels:
almonds,
apricot jam,
chocolate,
cocoa,
dessert,
marzipan,
Nutella,
pastry,
We Should Cocoa,
white chocolate
Sunday 3 May 2015
Blueberry and Citrus Flapjack
I was looking for something quick and easy to make, which would just fill the gap until the bank holiday dessert was made - so nothing too large. Rootling through the storecupboard - in reality a large plastic box - I found dried blueberries and mixed peel which needed using. They seemed ideal additions to a chewy flapjack, and 2/3 of my usual recipe was perfect in size.
Ingredients
100g dried blueberries
finely grated zest and juice of 1 mandarin orange
1 tablespoon boiling water
1 tablespoon limoncello (optional)
50g diced candied mixed peel
160g unsalted butter
65g golden syrup
100g light muscovado sugar
240g rolled oats
Method
Line a 8"(20cm) square baking tin with parchment, and preheat the oven to 180C.
Soak the blueberries and zest in the juice of the mandarin, the boiling water and the limoncello (if using) for a few minutes to plump up the fruit.
Melt the butter, sugar and syrup together, in a saucepan, stirring until the sugar has dissolved.
Put the oats, blueberries and mixed peel into a large bowl and stir in the butter mixture.
Spread the mixture evenly in the baking tin and press down firmly.
Bake for 25 minutes for a chewy flapjack, or a little longer if you prefer the flapjack to be crisp.
Mark into 16 squares while still warm, but cool completely before removing from tin.
These were delicious. The blueberries and mixed citrus flavours went really well together, and both the berries and the peel were soft and chewy.
Labels:
candied peel,
dried blueberries,
limoncello,
mandarin orange,
oats
Subscribe to:
Posts (Atom)