I happened upon this recipe, on the Riverford Organic Farmers website, by chance, while looking for new recipe for a rhubarb cake. I wanted one which didn't use a lot of fruit, as my crowns aren't doing well this year (I think it was the lack of a prolonged cold spell during last winter).
All I can say is that I'm thrilled to have found this recipe; it made a perfect cake! As an added bonus, it couldn't be simpler to make - dry ingredients in one bowl, wet in another then combine the two and mix briefly. The rhubarb was even mixed with the dry ingredients, reducing the steps needed to mix the batter even more, as fruit is often folded in separately at the end. I think it's probably quite important to keep the rhubarb pieces small, so that they don't sink through the cake during baking, but the raw cake batter was thicker than normal, which also helps.
I did make one change to the recipe - I only had vanilla yogurt available, rather than plain, but as I wasn't adding an additional flavour, only a little more sugar, I decided to go ahead anyway. The resulting cake was light but moist, with a really tender crumb, and it wasn't too sweet either (even when using a sweetened yogurt), allowing the tart flavours of the rhubarb and orange zest to show through. It was fantastic while still warm, as a dessert, and almost as good when it was completely cold, eaten as a cake. This is definitely a cake to make again!
Showing posts with label vanilla. Show all posts
Thursday, 11 May 2017
Wednesday, 3 May 2017
Zebra Cheesecake
I decided on cheesecake for an Easter dessert; more specifically, chocolate cheesecake, as I think the family would feel cheated if chocolate didn't make an appearance at Easter! A few weeks ago I saw a link to a recipe for a Zebra Cheesecake in an excerpt from Lorraine Pascale's latest book "Bake: 125 Showstopping Recipes, Made Simple" which looked ideal.The recipe was simple to follow, and involved layering measured quantities of vanilla and chocolate cheesecake mixture onto a biscuit base. As the layers build, the cheesecake mixture gradually spreads to the edges of the baking tin, and this forms an attractive pattern in the baked cheesecake.
That's the theory! In practice it didn't work quite that way.
Firstly, the cheesecake mixture was very reluctant to spread, even with quite vigorous tin tapping. Although I did manage to get the mixture to the edges of the tin eventually, it was still domed in the centre when it went into the oven. Fortunately it levelled out before it set (with a little extra shaking).Secondly, after 35 minutes baking - the time suggested in the recipe - the cheesecake still looked as raw and wobbly as when it went into the oven. It took well over an hour until I was satisfied that the cheesecake was cooked - set at the edges but still wobbly in the middle.
Thirdly, my cut cheesecake didn't look much like the photo accompanying the recipe. I followed the instructions, making each layer with about 2 tablespoons of mixture; this gave me, as far as I can make out from my photos, 14 or 15 alternating layers of vanilla and chocolate. I'm not sure why the layers in my cheesecake look so much thinner than those in the published photo, if that cheesecake was made following the same recipe exactly. Fewer layers - perhaps 8, using a quarter of each mixture in each layer - would give a more attractive result, I think.
After all that, this cheesecake wouldn't feature amongst the best I've ever made in terms of eating quality either! It tasted pleasant enough but it was very solid and quite dry in texture.On the positive side - the pattern does look zebra-ish, and the cheesecake didn't crack during cooking or cooling. You can see from the photos that I made one slight departure from the recipe - I made the base using 200g plain chocolate digestive biscuits and only 80g butter. I've found that using half the quantity of butter to the weight of biscuits can make the base too solid and difficult to cut - I prefer the biscuit layer to be a little looser and crumblier.
I was disappointed that the cheesecake didn't look as attractive inside as the recipe suggested it would but even more disappointed that the baking time was so inaccurate and that the recipe didn't make a better cheesecake. This is the first recipe from Lorraine Pascale that I've tried, and it doesn't give me much confidence to try others!
Friday, 8 July 2016
Rhubarb and Pecan Crumble Cake
We're coming to the end of the rhubarb season now, and many of the stalks are too tough to use, so I'm always on the lookout for recipes which use smaller quantities of fruit. That means I can pick the few tender stems and leave the rest of the leaves to pass goodness back to the crown, to feed the plant for next year's growth.
This recipe, for a simple rhubarb and crumble topped sponge cake, which I found on the Tesco website, looked easy enough, and only used 250g of fruit, but I ended up using four mixing bowls, which is more than I like to use unless I'm cooking for a special occasion. I followed the recipe exactly (except for using pecans instead of walnuts), but made the cake in a 22cm (9") springform tin. The only thing that didn't go according to plan was that it took an hour in the oven before I was satisfied that it was properly cooked - that was a bit of a surprise, as it was quite a hot oven too!
The cake was quite tasty but I didn't think the rhubarb, which should have been the star of the show, really came through in the flavour. The rhubarb was sandwiched between two substantial layers of crumble, and while the bottom layer soaked up the juices from the raw fruit, so that the sponge cake didn't become soggy, the brown sugar in the crumble gave a toffee flavour which overwhelmed the rhubarb.
Overall, probably not worth the effort!
This recipe, for a simple rhubarb and crumble topped sponge cake, which I found on the Tesco website, looked easy enough, and only used 250g of fruit, but I ended up using four mixing bowls, which is more than I like to use unless I'm cooking for a special occasion. I followed the recipe exactly (except for using pecans instead of walnuts), but made the cake in a 22cm (9") springform tin. The only thing that didn't go according to plan was that it took an hour in the oven before I was satisfied that it was properly cooked - that was a bit of a surprise, as it was quite a hot oven too!
The cake was quite tasty but I didn't think the rhubarb, which should have been the star of the show, really came through in the flavour. The rhubarb was sandwiched between two substantial layers of crumble, and while the bottom layer soaked up the juices from the raw fruit, so that the sponge cake didn't become soggy, the brown sugar in the crumble gave a toffee flavour which overwhelmed the rhubarb.
Overall, probably not worth the effort!
Friday, 17 June 2016
Berry and Cherry Cake
This was a hastily thrown together cake, using what was available in my storecupboard, just to make sure there was something in the cake tin, to get us through to the weekend. I used a pack of mixed dried fruit - cranberries, flame raisins, golden raisins, inca berries, tart cherries, bing cherries and blueberries - and added the last of a tub of candied peel and a few drops of lemon extract for a light citrus note.
Ingredients
225g SR flour
110g butter
85g caster sugar
100g mixed dried fruit
2 tablespoons candied peel, finely chopped
1 teaspoon vanilla extract
few drops lemon extract,
1 egg
milk to mix - about 100mls
2 tablespoons demerara sugar for topping (optional)
Method
Preheat the oven to 175C and line a small (1lb/450g) loaf tin.
Rub the butter into the flour, then stir in the sugar, dried fruit and candied peel.
Add the egg, vanilla and lemon extracts and 3 tablespoons of milk. Mix to a smooth batter, adding more milk, as necessary, to give a dropping consistency.
Transfer the batter to the loaf tin, level the top and sprinkle with demerara sugar, if using.
Bake for about 60 minutes, until a test probe comes out clean and dry.
Cool on a wire rack
Because this is a rubbed-in cake, rather than starting with a creamed mixture of fat and sugar, there isn't a really fine crumb, and small holes can often be seen, but for a quickly put together fruit cake, I think this is acceptable. The unusual combination of dried fruits in the mixture, together with the background citrus flavour, made a really tasty cake.
Ingredients
225g SR flour
110g butter
85g caster sugar
100g mixed dried fruit
2 tablespoons candied peel, finely chopped
1 teaspoon vanilla extract
few drops lemon extract,
1 egg
milk to mix - about 100mls
2 tablespoons demerara sugar for topping (optional)
Method
Preheat the oven to 175C and line a small (1lb/450g) loaf tin.
Rub the butter into the flour, then stir in the sugar, dried fruit and candied peel.
Add the egg, vanilla and lemon extracts and 3 tablespoons of milk. Mix to a smooth batter, adding more milk, as necessary, to give a dropping consistency.
Transfer the batter to the loaf tin, level the top and sprinkle with demerara sugar, if using.
Bake for about 60 minutes, until a test probe comes out clean and dry.
Cool on a wire rack
Because this is a rubbed-in cake, rather than starting with a creamed mixture of fat and sugar, there isn't a really fine crumb, and small holes can often be seen, but for a quickly put together fruit cake, I think this is acceptable. The unusual combination of dried fruits in the mixture, together with the background citrus flavour, made a really tasty cake.
Labels:
cake,
candied peel,
lemon extract,
mixed dried fruit,
vanilla
Thursday, 11 February 2016
Brownies with Salted Chocolate Chunks and Caramelised Biscuit Spread Swirl
However, there are, for me, two categories of baked goods where butter cannot be substituted so successfully. One is flapjacks, where you need a hard fat to get final texture right and where butter is much better for flavour once you go down the route of using saturated fat. The second category is brownies, especially if you like dense fudgy brownies, as I do. With growing evidence that butter is healthier than spreads and baking products based on hardened vegetable oils, there's really no reason not to use butter when baking these types of things. In fact, there's a lot of evidence that it is the amount of sugar that we should be worrying about - whether it's refined cane or beet sugar or sugar from more 'natural' sources, such as honey, maple syrup, or fruit molasses.
Having decided to make brownies for this buttery challenge, I looked for ways to make my basic recipe more exciting. I had some Lotus brand Caramelised Biscuit Spread leftover from Christmas, which I thought would make a good addition to brownies, especially if I could swirl it across the top of them. Because this spread is very sweet, I decided to add some salt to the brownies to offset the sweetness a little. I used a bar of sea-salted milk chocolate, chopped into chunks, in the main part of the batter, and sprinkled a little vanilla/sea-salt mixture on top too.
140g plain chocolate - at least 60% cocoa solids (I used 70%)
140g unsalted butter
300g light muscovado sugar
3 large eggs
1 teaspoon vanilla extract
160g plain flour
3 tablespoons cocoa
100g milk chocolate with added sea-salt (I used Green and Black's)
200g caramelised biscuit spread
1/2 teaspoon sea salt flakes*
*I used vanilla sea-salt, made by adding a split vanilla pod to a cup of flaked sea-salt, in a jar, and leaving it for a couple of weeks, shaking occasionally. The vanilla seeds come out into the salt.
Method
Line a shallow 20cm(8") baking tin with parchment and pre-heat oven to 180C.
Melt the chocolate and butter together, in a large mixing bowl, over a pan of simmering water, then remove the bowl from the heat.
Stir in the sugar, until there are no lumps and the mixture is quite smooth.
If the mixture is more than lukewarm at this stage, let it cool a little more, then add the eggs, one at a time, beating well. Add the vanilla extract.
Sift the flour and cocoa into the chocolate mixture and fold in.
Weigh 150g of batter into a small bowl, and stir the chocolate chunks into the larger portion of batter.
Spread the larger amount of batter into the prepared baking tin.
Weigh the biscuit spread into a microwave-proof bowl and heat for 25 seconds on full power to melt. I got the idea of melting the spread from this recipe on the Biscoff site. (This could probably be done in a small pan over a low heat, if a m/wave isn't available.)
Drizzle the melted biscuit spread over the surface of the brownie batter, letting it spread out naturally to cover as much of the surface as possible.
Pour the remaining brownie batter, in three stripes, across the surface of the biscuit spread, then use the end of a spoon to mix the chocolate batter and biscuit spread into swirls, without going too deep into the main brownie mixture. Using a small amount of the brownie batter on top of the biscuit spread layer in this way makes it easier to swirl the two mixtures together.
Sprinkle the sea-salt flakes over the surface, then bake for about 30 minutes until the brownie mixture has set, and a probe comes out with just a few damp crumbs adhering to it. The biscuit spread will crust over but still be liquid at this point, so don't confuse that with wet batter!
Leave until completely cold before cutting into pieces - the biscuit spread stays liquid for a surprisingly long time!
These brownies were delicious! The salted chocolate chunks, and the small amount of salt sprinkled over the top of the brownies was just enough to subdue the sweetness of the biscuit spread, without the brownies becoming overwhelmingly salty. The biscuit spread itself, as it was in such a thin layer, was delicately flavoured with cinnamon and caramel, adding just a hint of extra flavour to the brownies. This variation on my basic brownie recipe is definitely something worth repeating!
Monday, 2 November 2015
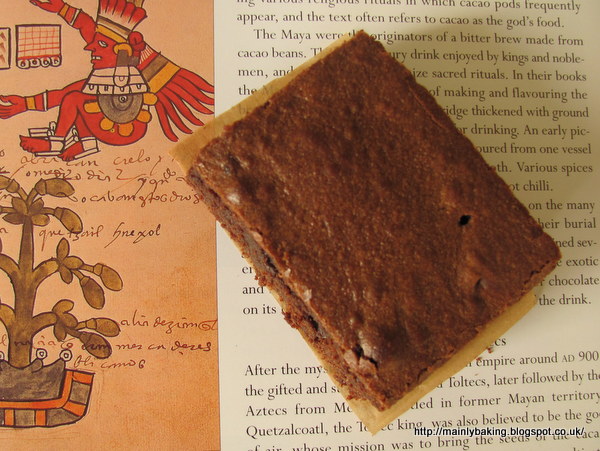
Spiced Brownies
inspired by the history of chocolate in Central America and Mexico
I think most chocolate devotees will know that the first record of cocao trees dates back to the Olmec civilisation, which was to be found in the forests on the Gulf of Mexico as long as three thousand years ago. One of the first known uses for cacao beans was in a spicy bitter drink made by the Mayans, another ancient civilisation in Central America, around AD 300.
The Mayans used local spices to flavour the drink made from the cacao bean; one of the most often used spices was chilli, but vanilla, cloves, allspice, pepper plus nuts and flowers were also used. The sweeter spices such as cinnamon and aniseed started to be used when the drink was sweetened with sugar, around the 16th century. Nowadays, chocolate products flavoured with chilli and cinnamon are often given names alluding to their Mexican or Mayan heritage.
It was with this in mind that I decided that a spiced chocolate brownie was the best thing to make for the Mexican round of the culinary challenge called Formula 1 Foods, over at Caroline Makes. The idea is to make either a traditional dish eaten in that country or something inspired by the culture, traditions and ingredients found in that country.
I made my usual brownie recipe and added some suitable spices. I decided to go with subtle hints of chilli rather than a blast of heat, as well as using some of the less common spices used by the Mayans.
To a brownie batter made by melting 140g each of butter and plain chocolate together, then adding in turn, 300g light muscovado sugar, three eggs, 160g plain flour and 3 tablespoons of cocoa, I added a teaspoon of vanilla extract, 1/2 teaspoon of ground ancho chilli pepper, 1/2 teaspoon ground cinnamon, 1/4 teaspoon ground aniseed and a pinch of ground cloves. This was baked for 25-30 minutes at 180C, in a 20cm square tin.
This combination of spices proved to be just what I intended - warm (my jar of ancho chilli powder was described as warm and earthy rather than hot), and well balanced, with none of the flavours overwhelming the others. I think most people would be hard-pressed to identify any of the individual spices used, unless they had a well trained palate - even the chilli blended well with the other spices used.
I think most chocolate devotees will know that the first record of cocao trees dates back to the Olmec civilisation, which was to be found in the forests on the Gulf of Mexico as long as three thousand years ago. One of the first known uses for cacao beans was in a spicy bitter drink made by the Mayans, another ancient civilisation in Central America, around AD 300.
The Mayans used local spices to flavour the drink made from the cacao bean; one of the most often used spices was chilli, but vanilla, cloves, allspice, pepper plus nuts and flowers were also used. The sweeter spices such as cinnamon and aniseed started to be used when the drink was sweetened with sugar, around the 16th century. Nowadays, chocolate products flavoured with chilli and cinnamon are often given names alluding to their Mexican or Mayan heritage.
It was with this in mind that I decided that a spiced chocolate brownie was the best thing to make for the Mexican round of the culinary challenge called Formula 1 Foods, over at Caroline Makes. The idea is to make either a traditional dish eaten in that country or something inspired by the culture, traditions and ingredients found in that country.
I made my usual brownie recipe and added some suitable spices. I decided to go with subtle hints of chilli rather than a blast of heat, as well as using some of the less common spices used by the Mayans.
To a brownie batter made by melting 140g each of butter and plain chocolate together, then adding in turn, 300g light muscovado sugar, three eggs, 160g plain flour and 3 tablespoons of cocoa, I added a teaspoon of vanilla extract, 1/2 teaspoon of ground ancho chilli pepper, 1/2 teaspoon ground cinnamon, 1/4 teaspoon ground aniseed and a pinch of ground cloves. This was baked for 25-30 minutes at 180C, in a 20cm square tin.
Labels:
aniseed,
brownies/blondies,
chilli,
chocolate,
cinnamon,
cloves,
Formula 1 Foods,
vanilla
Thursday, 24 July 2014
Whipped Cream Cake
Whipped cream cake is a bit of a misnomer to be honest, as my 'cream', which was a mixture of 300mls extra thick double cream and 75mls of semi-skimmed milk, didn't bulk up when whipped. I'd done a rough calculation which suggested the mixture would have roughly the same fat content as the cream needed in the recipe, but obviously that's not the only factor involved in whether cream will whip, or not. I wasn't too worried, as I was only trying the cake as a better alternative to throwing the cream away at the end of it's shelf life, which is something I would be have been very reluctant to do.
I carried on with Rose Levy Beranbaum's recipe (found here, on Martha Stewart's site), regardless, after beating the cream failed. In this particular recipe the cream is used as a complete substitute for any other form of fat or oil, rather than an additional source of fat and moisture, as in many other recipes which look similar at first glance. It's a cake which is very easy to make with a stand mixer, and I think it would be good baked as a sandwich cake, rather than a bundt cake, if preferred.
I think the loss of the extra air, which would have been held in properly whipped cream, made the cake a little denser than it should have been, but it was still relatively light and very moist. The plain vanilla flavour made this cake an ideal accompaniment to summer fruit, for a dessert, but I think if I make it again I would like to try some additional flavour - citrus zest, rose extract or almond extract perhaps. I would like to make it at least once again, with the right cream to see if I could get an improvement in texture.
I carried on with Rose Levy Beranbaum's recipe (found here, on Martha Stewart's site), regardless, after beating the cream failed. In this particular recipe the cream is used as a complete substitute for any other form of fat or oil, rather than an additional source of fat and moisture, as in many other recipes which look similar at first glance. It's a cake which is very easy to make with a stand mixer, and I think it would be good baked as a sandwich cake, rather than a bundt cake, if preferred.
I think the loss of the extra air, which would have been held in properly whipped cream, made the cake a little denser than it should have been, but it was still relatively light and very moist. The plain vanilla flavour made this cake an ideal accompaniment to summer fruit, for a dessert, but I think if I make it again I would like to try some additional flavour - citrus zest, rose extract or almond extract perhaps. I would like to make it at least once again, with the right cream to see if I could get an improvement in texture.
Wednesday, 6 March 2013
Melting Moments - a Random Recipe
I've chosen Belleau Kitchen's Random Recipe challenge for this month for a slightly self indulgent post. Dom's challenge is titled 'Cuttings, memories and clippings' and it's the memories part that I've taken, rather than the cuttings and clippings. Dom explains the process of randomising your choice of recipe much better than I could, so go to the link if you are not familiar with this challenge.
My mother died last month and while all her family and friends were sad to lose her, we all recognised that she had given up fighting her illnesses several months ago and was ready to go, so our grief is tempered with relief that she isn't suffering any more. In the process of clearing her home, I came across the BeRo recipe book that she taught me to bake with, back in the early 1960s. It's dog-eared, stained and even scorched in places, and is barely holding together as a booklet (so probably qualifies for Dom's challenge as a collection of clippings), but it is still usable, with care. Glancing inside, I saw the recipes we made frequently were marked with pencil crosses, so decided the Random Recipe I chose would be the first marked recipe in the book. I was delighted to see that the recipe was for Melting Moments, as these, and the cornflake flapjacks (which don't seem to be on the website) are what I remember best of all.
The only difference I made to the recipe was to use butter instead of margarine; I still included the lard. I also used vanilla paste with seeds, instead of vanilla extract. I rolled the dough balls in rolled oats rather than dessicated coconut, although I have to confess that I thought they should be rolled in crushed cornflakes - another example of my notoriously poor memory, perhaps, or it might have been one of Mum's adaptations. My recipe booklet suggested marble-sized balls of dough, but I still only got 20 biscuits, rather than the 30 suggested on the website or the 40 suggested by the booklet.
These delicate little biscuits are short and crumbly, and melt in the mouth - this texture is due to the lard, I think. They are small, so are gone in a moment too, which accounts for the name! The vanilla flavour was quite intense, and the oats just gave some extra texture, rather than another flavour, as coconut would have done. These would be ideal for afternoon tea, arranged on a cake stand with other little treats.
As another self-indulgent reminiscence, I've shown these biscuits on a lone plate I found at the back of Mum's pantry, and rescued from eventually going into a skip.
My mother died last month and while all her family and friends were sad to lose her, we all recognised that she had given up fighting her illnesses several months ago and was ready to go, so our grief is tempered with relief that she isn't suffering any more. In the process of clearing her home, I came across the BeRo recipe book that she taught me to bake with, back in the early 1960s. It's dog-eared, stained and even scorched in places, and is barely holding together as a booklet (so probably qualifies for Dom's challenge as a collection of clippings), but it is still usable, with care. Glancing inside, I saw the recipes we made frequently were marked with pencil crosses, so decided the Random Recipe I chose would be the first marked recipe in the book. I was delighted to see that the recipe was for Melting Moments, as these, and the cornflake flapjacks (which don't seem to be on the website) are what I remember best of all.
The only difference I made to the recipe was to use butter instead of margarine; I still included the lard. I also used vanilla paste with seeds, instead of vanilla extract. I rolled the dough balls in rolled oats rather than dessicated coconut, although I have to confess that I thought they should be rolled in crushed cornflakes - another example of my notoriously poor memory, perhaps, or it might have been one of Mum's adaptations. My recipe booklet suggested marble-sized balls of dough, but I still only got 20 biscuits, rather than the 30 suggested on the website or the 40 suggested by the booklet.
As another self-indulgent reminiscence, I've shown these biscuits on a lone plate I found at the back of Mum's pantry, and rescued from eventually going into a skip.
Sunday, 11 November 2012
Salted Vanilla Chip Oatmeal Cookies
I have to report that the second recipe I choose to make from the book, Pure Vanilla, which I reviewed recently, was a total disaster. Firstly, the flavour wasn't to my taste - the cookies were far too sweet, and the vanilla salt topping didn't help to offset this. If the recipe had worked well, then I would have just put this down to differences in taste preferences, but the recipe was a complete failure too, and initially I couldn't see anywhere in the method or ingredient quantities where I might have made a mistake.
The cookie dough spread in the oven, as far as it was possible to spread - the cookies were almost thin enough to make tuiles! In addition they didn't cook properly; it appeared to me that the oats hadn't absorbed any of the dough ingredients, leaving the cookies raw-looking and greasy. They were neither crisp nor chewy, just a mess of half-baked goo which fell apart when handled. I left the cookies in an airtight tin overnight and this morning there was just a heap of damp cookies which had slumped and melded together.
The only thing I can see that might have caused the problem, rather than the recipe itself, is that I used whole rolled oats, rather than oats labelled porage oats, which is what I usually use for baking. The recipe itself suggested 'old-fashioned rolled oats'. It might be that in a short baking time these whole oats couldn't absorb enough of the butter, sugar and egg mix, leaving only the smaller quanity of flour to do this, unsuccessfully. Unfortunately, given the cost of the ingredients, and the fact that we didn't really like them, I don't feel inclined to repeat the recipe with different oats. If anyone wants to try the recipe for themselves, get in touch and I'll send you a copy.
The cookie dough spread in the oven, as far as it was possible to spread - the cookies were almost thin enough to make tuiles! In addition they didn't cook properly; it appeared to me that the oats hadn't absorbed any of the dough ingredients, leaving the cookies raw-looking and greasy. They were neither crisp nor chewy, just a mess of half-baked goo which fell apart when handled. I left the cookies in an airtight tin overnight and this morning there was just a heap of damp cookies which had slumped and melded together.
The only thing I can see that might have caused the problem, rather than the recipe itself, is that I used whole rolled oats, rather than oats labelled porage oats, which is what I usually use for baking. The recipe itself suggested 'old-fashioned rolled oats'. It might be that in a short baking time these whole oats couldn't absorb enough of the butter, sugar and egg mix, leaving only the smaller quanity of flour to do this, unsuccessfully. Unfortunately, given the cost of the ingredients, and the fact that we didn't really like them, I don't feel inclined to repeat the recipe with different oats. If anyone wants to try the recipe for themselves, get in touch and I'll send you a copy.
At the moment, I'm trying to dry out the cookies in a low oven, in the hope that I can use the broken morsels for something such as 'compost' cookies, which often use remnants of broken biscuits, potato crisps(chips) and breakfast cereals for added flavour. I do have a photo, but it doesn't really do justice to how bad these were!
I'm really disappointed that this recipe went so badly, but I do realise that I may have used an ingredient which wasn't going to work. I hope this is the case, as the first recipe I tried worked so well, and I want to try other recipes in the book.
Tuesday, 30 October 2012
Lemon-Vanilla Dream Bars
The recipe seemed straightforward, but I had a typical heart-stopping moment that always seems to happen when I work with white chocolate. The first stage of the recipe is to melt white chocolate and butter together over simmering water, and I just couldn't get the two to combine smoothly. In fact I thought the white chocolate had seized completely, and it wasn't until I whisked in the eggs that I realised the mixture was going to come together smoothly.
After that it was plain sailing, although I forgot to fold in the chocolate chunks and had to sprinkle them over the surface of the batter after it had been in the oven a few minutes. Fortunately, the bars seemed none the worse for this!
This recipe is reproduced with permission from the publishers, and I have included the metric weights I used, where appropriate:
Ingredients:
10oz (300g) white chocolate, 50g chopped into chip-sized pieces
6 tablespoons (150g) butter
1/4 cup (50g) granulated sugar (I used caster sugar)
1/2 teaspoon salt
2 large eggs at room temperature
1 teaspoon vanilla extract
1 teaspoon vanilla bean paste
1 cup (130g) all purpose (plain) flour
1/2 cup (125g) lemon curd
Method
Pre-heat the oven to 350F (180C) and line a 8" (20cm) square tin with baking parchment.
Melt the butter and 250g of the white chocolate together in a large bowl, over a pan of simmering water.
Remove the bowl from the heat and stir in the sugar and salt.
Whisk in the eggs, one at a time, then whisk in both the vanilla extract and bean paste.
Gently fold in the flour, followed by the chopped chocolate, and put the batter into the baking tin.
Dollop the lemon curd onto the batter in 5 or 6 equal portions, and swirl into the batter using a knife and a figure of 8 movement.
Bake for around 25 minutes, until a tester comes out clean.
Cool on a wire rack, then cut into 12 bars when completely cold.
These were really delicious! The batter gave the perfect dense texture of a fudgy blondie, and the lemon curd was partly absorbed by the batter and partly remaining in little pockets that were intensely lemony. This lemon note really contrasted well with the sweet base, but still allowed the vanilla flavours to shine through.
My bars don't look perfect, because of sprinkling the chocolate chunks over the batter instead of folding them in. This caused little hollows to form as the larger chunks sank, although these hollows seemed to happen where lemon curd was left on the surface too.
This recipe is worth repeating just for the blondie base, if I can face the trauma of working with white chocolate again, perhaps with dark chocolate or fudge chips added, and Shauna also suggests replacing the lemon curd with any good quality low-sugar jam with a tart flavour, to ring the changes.
I'm so pleased my first recipe from this book was a success; it gives me confidence to tackle some of the more complicated recipes, and endorses my positive review of the book given from the first reading. Although I received a free copy of this book, I was not required to give a positive review of either the book, or the recipes I tried, in return.
Labels:
brownies/blondies,
lemon curd,
sponsored post,
vanilla,
white chocolate
Friday, 26 October 2012
Pure Vanilla - A Book Review
I'm used to getting promotional emails, asking me to take part in competitions, add my blog to other sites, give space to aspiring writers and so on, or offering books or sample ingredients. Most of these are rejected, as I don't want to change the nature of my blog - I write for my own satisfaction, not to gain recognition, make money or further a career (mine or anyone elses!). Occasionally I'm offered a book or a baking ingredient which I think I can use, without compromising that point of view - in the case of books, I always make it clear that I will give an honest opinion, whether it be positive or not so enthusiastic. If I accept a book, I will always try to find a recipe which I can make, so as to get a real feel for how well the book is written and how good the cook is. This is a review of one of the books which has tempted me recently!
'Pure Vanilla - irresitible recipes and essential techniques' by Shauna Sever is about to be published in the UK. Shauna has already published a book called Marshmallow Madness!, and writes a blog called A Piece of Cake. As well as a wide range of recipes covering everything from breakfast to evening cocktails, this book covers the history and production of vanilla, and looks at the characteristics of vanilla pods grown in various regions around the world.
It was fascinating reading and sent me to the kitchen to discover the origins of my vanilla products. My pods, produced by Ndali, come from Uganda, so have a "sweet, winey, raisinlike fragrance and flavour ..... perfect for rich desserts, especially ones containing chocolate" (so that's OK then!). The organic vanilla bean paste was from an Australian company, so may have been produced in Papua New Guinea from Tahitian Vanilla. The bottle of vanilla extract, from one of the leading brands, doesn't state the origins of the beans at all.
Reading about how difficult it is to produce a vanilla bean, and how long the subsequent processing takes, makes it easier to understand why vanilla is one of the most expensive spices on the market, second only to saffron.
After the comprehensive introduction to all aspects of vanilla we come to the recipes. They are not all illustrated, which is always a disappointment, but those that are have beautiful photographs by Leigh Beisch. It can't have been easy to photograph food which is mostly in shades of white, but Leigh has produced some stunning photographs which make all the dishes look very appetising.
In many of the recipes, Shauna uses more than one form of vanilla to produce layers of flavour which are not in competition with other strong flavours. This will probably surprise most cooks, who tend to use vanilla as a background note to other flavours and not as the main feature. As the author is American, the recipes are written in cup measurements, which can be off putting to UK cooks, although cup measures are widely available. I was interested to see that white chocolate is often used to add a vanilla flavour, as I've often said that this is about the only real use for white chocolate!
Most of the recipes are for sweet dishes, although some savoury uses for vanilla are mentioned, including the vanilla salt you can see in my photographs. I intend to use it to top some salted vanilla chip oatmeal cookies, but it can be used to season meat, vegetables or salads too. It's going to take a week for my vanilla salt (a mix of the seeds(caviar) of half a vanilla pod with half a cup of sea salt) to mature, so I'll be writing a review of that recipe separately!
I was surprised that it was initially quite difficult to actually find recipes which I wanted to make straight away. I wasn't really interested in either breakfast foods (although many could double as desserts), drinks or candies and confections which ruled out three of the six recipe chapters. In the other chapters, covering cakes and pies, cookies and bars, and custards and creams, some of the recipes seemed quite complicated, expensive (16 egg whites!) or used ingredients not easily obtained in the UK (marshmallow creme!). Some of the recipes just weren't suitable for the sort of cooking I'm doing at the moment, needing the right occasion to serve them up to a crowd. However, there are enough recipes which I would like to make, when the time is right, to keep me interested in the book, and any cook past the beginnners stage would find some of the more difficult recipes appealing and challenging.
All in all, this is a book which would be a good addition to any cook's library and which challenges our perception that vanilla is synonymous with plain and ordinary!
'Pure Vanilla - irresitible recipes and essential techniques' by Shauna Sever is about to be published in the UK. Shauna has already published a book called Marshmallow Madness!, and writes a blog called A Piece of Cake. As well as a wide range of recipes covering everything from breakfast to evening cocktails, this book covers the history and production of vanilla, and looks at the characteristics of vanilla pods grown in various regions around the world.
It was fascinating reading and sent me to the kitchen to discover the origins of my vanilla products. My pods, produced by Ndali, come from Uganda, so have a "sweet, winey, raisinlike fragrance and flavour ..... perfect for rich desserts, especially ones containing chocolate" (so that's OK then!). The organic vanilla bean paste was from an Australian company, so may have been produced in Papua New Guinea from Tahitian Vanilla. The bottle of vanilla extract, from one of the leading brands, doesn't state the origins of the beans at all.
Reading about how difficult it is to produce a vanilla bean, and how long the subsequent processing takes, makes it easier to understand why vanilla is one of the most expensive spices on the market, second only to saffron.
After the comprehensive introduction to all aspects of vanilla we come to the recipes. They are not all illustrated, which is always a disappointment, but those that are have beautiful photographs by Leigh Beisch. It can't have been easy to photograph food which is mostly in shades of white, but Leigh has produced some stunning photographs which make all the dishes look very appetising.
In many of the recipes, Shauna uses more than one form of vanilla to produce layers of flavour which are not in competition with other strong flavours. This will probably surprise most cooks, who tend to use vanilla as a background note to other flavours and not as the main feature. As the author is American, the recipes are written in cup measurements, which can be off putting to UK cooks, although cup measures are widely available. I was interested to see that white chocolate is often used to add a vanilla flavour, as I've often said that this is about the only real use for white chocolate!
Most of the recipes are for sweet dishes, although some savoury uses for vanilla are mentioned, including the vanilla salt you can see in my photographs. I intend to use it to top some salted vanilla chip oatmeal cookies, but it can be used to season meat, vegetables or salads too. It's going to take a week for my vanilla salt (a mix of the seeds(caviar) of half a vanilla pod with half a cup of sea salt) to mature, so I'll be writing a review of that recipe separately!
I was surprised that it was initially quite difficult to actually find recipes which I wanted to make straight away. I wasn't really interested in either breakfast foods (although many could double as desserts), drinks or candies and confections which ruled out three of the six recipe chapters. In the other chapters, covering cakes and pies, cookies and bars, and custards and creams, some of the recipes seemed quite complicated, expensive (16 egg whites!) or used ingredients not easily obtained in the UK (marshmallow creme!). Some of the recipes just weren't suitable for the sort of cooking I'm doing at the moment, needing the right occasion to serve them up to a crowd. However, there are enough recipes which I would like to make, when the time is right, to keep me interested in the book, and any cook past the beginnners stage would find some of the more difficult recipes appealing and challenging.
All in all, this is a book which would be a good addition to any cook's library and which challenges our perception that vanilla is synonymous with plain and ordinary!
Wednesday, 6 June 2012
Viennese Whirl Cookies
When it comes to baking I've found there aren't many ingredients that begin with V, this month's AlphaBakes randomly chosen letter. There's vanilla, and you might get away with the generic 'vegetable' for a carrot cake, or similar. When looking for a 'name' beginning with V, the index in my cook books started with Victoria sandwich and stopped with Viennese, with nothing in between. I hope the other entrants have a better imagination than me!
Danish pastries are called Viennese pastries in Denmark, but my yeast bakery is a bit hit and miss, and I don't have time for misses at the moment. That left Viennese Whirls, or Melting Moments as they are called in some cookery books. All the available recipes are remarkably similar - some use a little more sugar or vary the proportion of cornflour and plain flour - so I don't really need to give one here. They are usually flavoured with vanilla too, so the letter V gets a double workout!
The dough I used didn't hold it's definition well during baking, but that might be because my piping kit is cheap and nasty and didn't include the right sized nozzle either. However, the flavour and texture was just right - light, crumbly and melt in the mouth - and you can still see the hint of a swirl in the photos. These cookies could be considered a little on the dry side, which is why they are often baked without the glacé cherry on top and sandwiched in pairs with a buttercream and jam filling.
The AlphaBakes Challenge is a monthly baking challenge to make something featuring a randomly chosen letter - this can be part of the name of the product or one of the major ingredients. It is hosted jointly by Caroline, from Caroline Makes, and Ros from The More Than Occasional Baker, who take turns to generate a random letter and collate the entries. This month Ros is hosting and her random letter generator picked V!
Danish pastries are called Viennese pastries in Denmark, but my yeast bakery is a bit hit and miss, and I don't have time for misses at the moment. That left Viennese Whirls, or Melting Moments as they are called in some cookery books. All the available recipes are remarkably similar - some use a little more sugar or vary the proportion of cornflour and plain flour - so I don't really need to give one here. They are usually flavoured with vanilla too, so the letter V gets a double workout!
The dough I used didn't hold it's definition well during baking, but that might be because my piping kit is cheap and nasty and didn't include the right sized nozzle either. However, the flavour and texture was just right - light, crumbly and melt in the mouth - and you can still see the hint of a swirl in the photos. These cookies could be considered a little on the dry side, which is why they are often baked without the glacé cherry on top and sandwiched in pairs with a buttercream and jam filling.
The AlphaBakes Challenge is a monthly baking challenge to make something featuring a randomly chosen letter - this can be part of the name of the product or one of the major ingredients. It is hosted jointly by Caroline, from Caroline Makes, and Ros from The More Than Occasional Baker, who take turns to generate a random letter and collate the entries. This month Ros is hosting and her random letter generator picked V!
Labels:
AlphaBakes,
biscuits and bars,
glacé cherries,
vanilla
Subscribe to:
Posts (Atom)