Showing posts with label AlphaBakes. Show all posts

Friday, 6 May 2016

Chunky Fig, Apricot and Prune Cake

I know! It's the middle of May; we ought to be well into lighter Spring flavours, but when I made this cake it was snowing in northern England! Anyway, I quite like fruit cakes at any time of the year, as they keep better than sponges and cakes with fresh fruit, which is a good thing when you are only baking for two people.

Ros, at The More Than Occasional Baker, has announced that as AlphaBakes has reached the end of the alphabet again, she and co-host, Caroline, at Caroline Makes, have decided to end the monthly challenge after this month's recipe link-up. It's understandable - life has moved on for both of them and they have different priorities now, but I will miss the monthly ritual of stretching my imagination and/or culinary skills.

As the last AlphaBakes Challenge, and the last letter of this second run through the alphabet, this month's entries  need to feature an ingredient or recipe name beginning with F. I found the recipe for this Chunky Fig, Apricot and Prune Cake, on the River Cottage site, while I was looking for a cake with dried figs in. It sounded ideal - not too heavy with fruit, lightly spiced and flavoured with citrus.

The recipe was simple to follow, although it's slightly unnerving to add large pieces of dried fruit, sticky with a marmalade coating, at the last stage of the recipe. Surely disaster would follow, with sinking fruit? The recipe does warn of the possibility, and I was prepared to add a little extra flour, if necessary, to make sure the batter was quite stiff (especially as I was using large eggs). However, extra flour (I was using spelt) wasn't needed, and the fruit didn't sink, so all was well!

All was well with the flavour too. Because the pieces of dried fruit were larger than usual, each could be individually tasted, and the background flavours of mixed spice and citrus (from both orange and lemon zest, and marmalade) added an extra dimension. The texture of the crumb was moist but not heavy, and sweetness levels were about right too, overall. Definitely one to repeat!

Tuesday, 12 April 2016

Date and Tahini Slice

The randomly chosen letter for this month's AlphaBakes is T, although it's not that random, as we are nearing the end of the alphabet again, and T was one of only two letters left on this run-through. It's another strange letter when it comes to ingredients, as initial thoughts are that T must be easy, but then you look through recipe books to find that there aren't that many baking ingredients, or recipe names, beginning with T. Some of my books didn't have anything at all listed under T in the index, and others only had 'Triple....' or 'Toasted....' or similar descriptive words. Treacle cropped up quite a lot too, but I wasn't in the mood for anything too dark and sticky.

In the end, I decided to use Tahini, but it took me ages to find something that I really wanted to make, once I'd made that decision. I looked at cakes, cookies and flapjacks before I remembered that good old Australian word - slice - and came across this recipe, which seemed to use a good mix of  fruit and spices. It looked fairly healthy too - no added fat - until I read the nutritional information on the jar of tahini, and realised that sesame seeds contain nearly 60% fat, so using 185mls of tahini adds about 100g of fat to the recipe!

It's a simple recipe to follow, especially as metric weights are give alongside the cup measurements, but my cake batter was more like a cookie dough. I'm not sure whether this is down to different brands of ingredients being used, as well as desiccated coconut instead of shredded, or a fault in the recipe. I added a couple of tablespoons of milk, but it didn't make things much better. I gave the slice an extra 5 minutes baking time, to colour the coconut slightly, and be sure it was cooked through - a test at 20 minutes still looked a little damp.

The slice was pleasant to eat, and the flavours of dates, coconut and sesame seeds blended together well, but the amount of ground ginger used was hardly noticeable! The slice was more like a cookie in texture, but that made it a bit too dry for it's depth. Unfortunately, this wasn't something I'll be rushing to make again, although it might have worked better as a bar cookie, cooked in a larger baking tin, or even chilled and rolled into balls of dough to make conventional cookies.

AlphaBakes is co-hosted by Ros, at The More Than Occasional Baker and Caroline at Caroline Makes, who is this month's host. The basic idea is to use the chosen letter as the first letter of a major ingredient or part of the name of the dish which is made eg T is for Tiger Bread, or in my case, T is for Tahini. Full rules can be found here.

Wednesday, 16 March 2016

Lemon, Coconut and Cherry Loaf Cake

 - dairy-free!

Butter was on my shopping list; it's not my fault I forgot to pick it up - my husband distracted me by asking if we needed any cheese. By the time I'd explained, as I do every week, that if I needed something, it would be on my list, we had moved away from the butter shelf!

So, I would need to bake a cake with oil. As I also needed a cake to enter into this month's AlphaBakes challenge, which is the letter C, I decided to make a coconut cake, using both desiccated coconut and coconut oil. For added flavour, I decided to use a lemon that was languishing in the fridge, and some dried cherries which were near the 'best-before' date.

Ingredients
100g dried cherries, roughly chopped
2 tablespoons Kirsch (optional)
150g SR flour
1/2 teaspoon baking powder
75g desiccated coconut
200g caster sugar
160g coconut oil
zest of 1 lemon
3 large eggs
lemon juice, as required

Method
Soak the cherries in the Kirsch, if using, for a few hours beforehand, if you are organised enough. If you haven't got much time, or don't want to use alcohol,  soak the cherries in boiling water for a few minutes, then drain well.
Line a 900g (2lb) loaf tin with baking parchment and pre-heat oven to 180C.
Mix the flour, baking powder and desiccated coconut.
Beat the coconut oil, caster sugar and lemon zest until well blended.
Add the eggs one at a time, with a spoonful of the flour mixture, and beat in slowly.
Fold in the rest of the flour mixture, the cherries, and enough lemon juice to give a soft dropping consistency - I only needed a tablespoon of extra liquid.
Transfer the batter to the loaf tin, level the top and bake for about 60 minutes, until a test probe comes out dry and clean. If necessary, cover the cake after 30 minutes to prevent over-browning.
Cool in the tin for 20 minutes, then transfer the cake to a wire rack to finish cooling.

As the cake rose with a fairly flat top, I decided to turn it upside down and top with a lemon glacé icing made with a icing sugar and some of the leftover lemon juice.

You can see from the photos that the cherries sank to the bottom of the cake. To try to prevent this, I should have tossed them with a little of the measured flour. As I had turned the cake upside down to serve, this didn't look as bad as it could have done, but it was a stupid mistake to make! Fortunately it didn't affect the flavour, which was a good balance between the lemon, coconut and cherries. The texture was moist but a little heavy - I think it might have been better to beat the eggs and sugar together, then warm the oil slightly, to add it as a liquid.

AlphaBakes is a monthly challenge co-hosted by Caroline Makes and The More Than Occasional Baker. The idea is to bake something with a randomly chosen letter of the alphabet as the initial letter of either a major ingredient, or the name of the recipe. This month the host is Ros at TMTOB, and the letter chosen is C - in this case there's a double dose of Coconut and Cherries.

PS - this is my 600th blog post. How typical that it should be about something that wasn't entirely successful!

Saturday, 6 February 2016

Morning Glory Yogurt Loaf

an Anna Olson recipe

I'd never heard of Morning Glory Bread, until I started looking for a recipe for a loaf-shaped cake using yogurt in the batter. It seems that it's a quick breakfast 'bread', of the type popular in America and Canada - the sort of thing that's often called a tea-bread over here, as we haven't really embraced the habit of eating what seems like cake for breakfast, yet! It's raised with baking powder rather than yeast, and is packed full of whatever the cook has available in the way of fruit and nuts. This Anna Olson recipe adds tinned pineapple (or fresh peaches), raisins, coconut and orange zest, but on further investigation I found recipes adding things such as bananas, walnuts and even grated carrots too.

I had already decided to make a coconut flavoured loaf, as that was just about all I had in my store of cake 'add-ins', and had found a couple of possible recipes, but when I came across this recipe, with it's extra flavour elements, I knew I had to try it. Luckily I also had the remains of a bag of sultanas, that I could use instead of raisins, and there was a tin of pineapple rings in the larder, which I could blitz to turn into crushed pineapple. I used unsweetened desiccated coconut; I didn't think it would make too much difference as there was quite a lot of sugar in the loaf.

Most yogurt cakes use oil instead of butter, so are made by simply mixing wet ingredients in one bowl, dry in another and combining the two. Because this recipe used butter there was the added stage of creaming it with the sugar before adding the wet ingredients,  but it was still an easy recipe to follow.

The only problem I had was one of baking time - I've no idea how long the loaf spent in the oven, as I gave up keeping note after 90 minutes. I eventually took it out when my digital thermometer read 94C as I thought that was as near to 100C as the cake was going to get, and I needed the oven at a different temperature by then! The huge discrepancy between the recipe and my experience may have been down to a differently proportioned loaf tin (mine was short and deep), or the moisture in the tinned pineapple.

This was a very moist, close-textured loaf, because of the juicy pineapple. Although it was packed with fruit, and hadn't risen much it still seemed quite a light cake. The flavours of the pineapple and coconut were the most dominant, with the orange and touch of cinnamon providing subtle background notes. I treated this loaf as a cake, but it would also have made a good dessert, perhaps heating slices in a griddle pan and serving with poached fruit and yogurt.

The reason I wanted to bake a cake containing yogurt was that this month's AlphaBakes challenge is the letter Y. My imagination failed to come up with anything out of the ordinary for either an ingredient or a recipe name beginning with Y, so yogurt will have to do! AlphaBakes is hosted by Caroline, at Caroline Makes, and Ros, at The More Than Occasional Baker, and it is Caroline who is hosting this month's challenge.


Tuesday, 5 January 2016

Chocolate and Ginger Flapjack

As a sort of antidote to Christmas, when chocoholic cooks often try their best to impress their friends and family with showstopping desserts, cakes and other home-made treats, the theme for this month's We Should Cocoa challenge is........ Simple Recipes!

The We Should Cocoa challenge, to use some form of chocolate together with a monthly theme, was devised by Choclette at Tin and Thyme, but this month's theme of Simple Recipes has been chosen by guest-host Lisa, at Lovely Appetite.

I guess everyone's idea of simple will be slightly different, but to me, a simple recipe is more about ease and speed of preparation and cooking rather than the number of ingredients. After all, there aren't many ingredients in a macaron, but only an expert would call then 'simple' to make!

The recipe for Chocolate and Ginger Flapjack couldn't be much more simple - melt chocolate, butter, golden syrup and sugar together in a large bowl in the microwave (or in a pan on the hob, if you prefer). When all the chocolate has melted and the mixture is quite hot, stir in rolled oats and crystallised ginger pieces. Transfer to a baking tin, bake, cool and eat - simple!

To make sure the flavour of the flapjack wasn't as simple as it's recipe, I used 100% cacao, and the ginger was from a Christmas box of Turkish crystallised ginger pieces which were really fiery - I don't think I've ever eaten ginger that hot before! The bitterness of the cacao, and the heat of the ginger, gave these flapjacks a taste which might not appeal to children, but the effect could be toned down by using a chocolate with a lower percentage of cocoa solids (say 60-70%) and a milder ginger, or even replacing some of the ginger with dried fruit such as chopped dried apricots, so that the flapjacks taste sweeter.

Ingredients
100g dark chocolate or 100% cacao (I used Willie's Peruvian Black 100% Cacao)
100g butter
65g golden syrup
100g caster sugar
250g rolled oats
100g crystallised ginger, chopped into pieces about 1cm cubed (leaving the chunks of ginger quite large makes sure you get a good hit of the heat when it's eaten!)

Method
Pre-heat the oven to 180C (160C fan) and line the base and sides of a 20cm (8") square baking tin with baking parchment.
Melt the chocolate, butter, syrup and sugar in a saucepan on the hob, or in a bowl in the microwave. The mixture needs to be quite hot to dissolve the sugar, but doesn't need to boil.
Add the oats and the pieces of ginger to the chocolate mixture and stir until the oats are well coated.
Transfer the mixture to the baking tin and spread into an even layer, pressing down firmly with the back of a spoon.
Bake for 25 minutes, then cool for 10 minutes. at that point, while still warm, mark into squares or fingers of the desired size. Leave in the tin until completely cold.

This recipe makes flapjacks which stay together well and are chewy rather than crisp and crunchy. If you prefer crisp flapjacks bake for a little longer - another 10 minutes, perhaps.

I'm also entering these flapjacks into January's AlphaBakes challenge, where co-host Ros, at The More Than Occasional Baker has chosen the letter G. Ros alternates her hosting duties with Caroline, at Caroline Makes. G is for Ginger, in this instance, of course!

Thursday, 10 December 2015

Norwegian Apple Cake (Eplekake)

I chose this cake recipe primarily to make a non-Christmas entry to this month's AlphaBakes challenge. The letter chosen is N, and Caroline, of Caroline Makes (who is this month's host, a duty she shares with Ros, of The More Than Occasional Baker) is graciously allowing entries where N = Noel, but would obviously like some more general entries too.

When consulting my baking books, I found that there were very few choices of ingredients beginning with N - nuts, nutmeg - and even fewer recipe names, especially once you ruled out Nutty as part of the title. Before resigning myself to going with nuts, I looked at the recipes from countries beginning with N, especially where the name of the country was used in the title of the dish; it didn't take long to find Norwegian apple cake. This recipe had the added bonuses of keeping my baking light in the approach to Christmas and using up some of my store of home-grown apples.

I used this recipe, which produced a cake small enough for two of us to eat quickly. Most of the online recipes are similar - some add a handful of raisins, or nuts, or make a bigger cake, but the differences are minor and go to prove that the basic recipe is authentic and tradional.

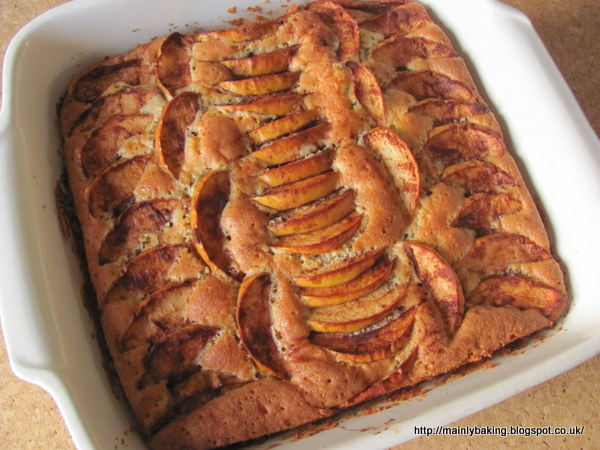
The cake is a vanilla flavoured sponge base with thin slices of cinnamon-sprinkled apples baked on top. It uses a slightly lower proportion of flour than a traditional British sponge cake recipe, and most recipes whisk melted butter and sugar together for the first step, as here, rather than creaming sugar with soft butter. These two steps make a more fluid batter than I'm used to, and I was worried that my springform pan would leak, so I changed to a ceramic baking dish at the last minute, which made a more shallow cake. I needed three of my small apples to get enough slices to cover the surface. Rather than sprinkling brown sugar and cinnamon over the surface of the cake, I tossed the apple slices in a sugar and cinnamon mixture before arranging them on the batter - I saw this in another version of the recipe and thought it a good idea, as it gets some of the cinnamon flavour into the batter mix, as it rises around the apple slices.

I thought this made a better dessert than a cake. When cold the sponge was moist but slightly too dense for my taste - it was best eaten warm, and would have been even better with cream or custard.  My apples were yellow-skinned; if I made it again, I think red-skinned apples would look prettier, but that's a minor quibble! It tasted good though - what's not to like about sweet apples mingled with vanilla and cinnamon?

Sunday, 8 November 2015

Marzipan and Cherry Loaf

When I plan my baking, and when I shop, there's always a little space in my mind for the baking challenges I like to do. I'm always hoping I can fit them into my plans, without going out of my way to  make something which wouldn't be happily eaten.

So when my husband had a Homer Simpson moment in front of a cake in Waitrose supermarket (Mmmm! Marzipan and cherry....) my immediate response was "I can make you one of those, if you really want it" and my participation in this month's AlphaBakes challenge was settled! M is for Marzipan.

I only made a small loaf, from a very basic recipe, because I didn't have many glacé cherries, and I also had other baking plans for later in the week.

I used the all-in-one method to mix the cake batter (200g SR flour, 1 teaspoon baking powder, 100g baking spread (softened butter would be fine too), 75g caster sugar, 2 small/medium eggs, 1 teaspoon almond extract and enough milk to give a dropping consistency), then folded in 70g halved natural coloured dark glacé cherries and 75g marzipan cut into very small cubes. I washed the syrup from the cherries before halving them, then mixed both the cherries and chopped marzipan with a tablespoon of flour from the weighed amount in the recipe. This can stop pieces of fruit sinking through a batter as it warms up in the oven.

I put the batter into a lined 1lb (450g) loaf tin, and scattered over another 25g of marzipan cubes and 1 tablespoon of demerara sugar. The cake was baked at 180C for 60-70 minutes, until a test probe came out clean and dry. Because the marzipan on top of the cake started to brown quite quickly, I had to cover the cake after 40 minutes.

I used marzipan with quite a high almond content, and cut down the usual amount of sugar a bit, but this was still a very sweet cake. The almond flavour was stronger than that of the cherries, possibly because of the added almond extract, but the contrast between the soft pieces of marzipan and the chewier cherries was good. I think, in hindsight, that putting some of the marzipan on top wasn't a good idea - cherries would have looked better, if I'd had any extra to use, and probably wouldn't have burnt.

AlphaBakes is a monthly challenge hosted alternately by Caroline at Caroline Makes and Ros at The More Than Occasional Baker. Each month a letter of the alphabet is randomly chosen, and then participants makes something using that letter as the first letter of a major ingredient or word in the name of the dish. This month, the letter M was chosen by Ros, who will post a round-up of entries at the end of the month.


Wednesday, 23 September 2015

Jam-swirled Crumb Cake

Being away on holiday for most of the first half of the month has limited my entries to the various cooking challenges which I try to participate in regularly - I got an early entry into Belleau Kitchen's Simply Eggcellent, and the first of Caroline Makes' Formula 1 Foods, but the challenge from We Should Cocoa to use blackberries and chocolate together has fallen by the wayside due to lack of time.

Despite needing to lose the holiday weight, and get my diet back on track, I found time to make a simple crumb cake for the AlphaBakes challenge this month, which is to use the letter J, either for the first letter of a main ingredient, or the first letter of part of the name of the dish (eg J for Jalapeno or J for Jalousie). See the full set of rules here, for a complete explanation.

My J was for Jam - I swirled some reduced sugar 'cherries and berries' jam into the top half of a crumb cake batter, hoping the result would be colourful and add extra flavour to a fairly plain cake. My recipe is a slight adaptation of this one, found on the blog Bake or Break, which I've been reading for several years. I reduced the sugar a little, altered the topping to accommodate what I had available, and baked the cake in a 20cm (8") round tin.

Ingredients

Cake
210g plain flour
2 teaspoons baking powder
pinch salt
115g butter, softened
100g caster sugar
50g light muscovado sugar
1 teaspoon vanilla extract
1 large egg
120mls milk
1/3 cup jam

Topping
50g light muscovado sugar
2 tablespoons flour
1/4 teaspoon cinnamon
1 tablespoon ground almonds
25g cold butter, cut into small pieces
2 tablespoons chopped toasted hazelnuts

Method
Pre-heat the oven to 175C, and base line a 20cm springform tin.
Make the topping by putting the sugar, flour, almonds and cinnamon into a small bowl, then rubbing in the butter until the mixture looks like breadcrumbs. Stir in the hazelnuts, then set aside at room temperature.
Mix the flour, baking powder and salt together. In a large bowl beat the butter and sugars unril light and fluffy. Beat in the egg and vanilla, with a tablespoon of the flour mix. Then fold in the rest of the flour, alternately with portions of the milk, to make a stiff cake batter.
Spread about 2/3 of the batter into the cake tin, then spread on the jam, leaving a border of batter around the edge of the tin. Carefully spread on the remaining batter, then use a teaspoon handle to swirl through the cake batter, trying to keep in the top half of the mixture.
Sprinkle the topping over evenly, squeezing it together in your fingers to make it a little clumpier, rather than powdery.
Bake for 35 minutes, then reduce the temperature to 160C and bake until a tester comes out clean - about another 15 minutes (45-50 minutes in total). Cool in the tin.

Sadly, the finished cake didn't look as good as I'd hoped. It rose unevenly, sank back badly during cooling and when cut, it revealed that the jam layer had sunk during baking and lost a lot of it's vibrant colour. The hoped for swirls of colour in the top of the cake just didn't materialise! The crumb crust hadn't really adhered to the cake batter either, which made the cake difficult to cut and serve. It tasted fine though - the topping was sweet and nutty and the jam added a good fruity flavour to the cake. Overall, something that needs a little more work, but could be a good store-cupboard recipe!

The AlphaBakes Challenge is hosted alternately by Caroline, at Caroline Makes, and Ros, at The More Than Occasional Baker. Ros is this month's host, and will post a round-up of entries at the end of the month.


Thursday, 13 August 2015

Zwetschgendatschi

or, to put it more simply, plum tart.

This German speciality should be made with a type of plum (the 'zwetschgen' part of the recipe name) which is similar to a damson, but is often made with other varieties of plums, particularly if the cook doesn't live in Germany! The pastry is made from an enriched yeast dough, the plums are arranged neatly on top  and the whole thing is baked in a hot oven. What could be simpler?

I found many variations when trying to decide on a recipe - shortcrust pastry is an option, rather than yeast dough; a streusel topping can be added; some recipes sweeten the fruit before baking, some sprinkle on sugar afterwards; some recipes use breadcrumbs on the dough, before arranging the fruit, to soak up any excess fruit juice. In the end, I decided to be guided by the one recipe I had in my cookery books - this was a dairy-free Jewish recipe, but I adapted it to use dairy products.

The dough was made from a teaspoon of easy-bake yeast stirred into 250g plain flour. To this was added 1/2 egg, a tablespoon of honey, a pinch of salt, 50g melted butter and enough warm milk to make a soft but not sticky dough (I used about 100mls of the 125mls recommended in the recipe). After kneading for 10 minutes the dough was left, covered, to rise until doubled in size. The risen dough was knocked back and rolled out to about 1/2 cm in thickness. There should be enough dough to line a 25cm diameter, loose-bottomed tart case, but I wanted to use my new rectangular tart case, so was left with enough dough to also line a 15cm diameter cast iron skillet,

Quartered pitted plums were arranged in neat rows in the rectangular case and the tart was left to prove again for 20 minutes. Then the tart was baked at 190C for about 25 - 30 minutes, until the pastry was golden. As soon as the tart was out of the oven it was sprinkled with cinnamon flavoured sugar.

Before arranging the plums on the small round base, I rolled out 80g of marzipan to fit the case, and laid this on top of the dough. I also cut the plums into 1/8ths for this smaller tart - it helped get a tighter fit  of fruit in the small space. After the second proving, this was baked for the same time as the large tart and also sprinkled with cinnamon sugar while hot (4 tablespoons of caster sugar with 1 teaspoon of cinnamon was enough for both tarts, with some left over).

I bought a kilo of plums and used roughly 600g for these two tarts. My recipe recommended 750g for one large 25cm tart.

The oblong tart was elegant in it's simplicity, and very tasty. The light sprinkling of sugar added enough sweetness to the plums, and I liked the way the plums held their shape; they were just cooked through but still looked fresh. The yeast dough pastry was light and made a nice change from shortcrust. Yeast dough could be considered  'healthier' too (or at least, less calorific) as it contains a much lower proportion of fat compared to pastry. I think I could have left the pastry a little thicker, and next time I will bake on a pre-heated baking sheet to try and get a crisper bottom.

The pastry was thicker on the small round tart, and this made it soft rather than crisp - reminiscent of eating a danish pastry. The sweetness of the marzipan, together with the almond flavour, made this tart much richer than the plainer one.

Both tarts are best eaten fresh as the sugar topping draws juices out of the fruit over time.

I didn't choose this recipe at random - this month's AlphaBakes challenge is the letter Z! This challenge is hosted alternately by Caroline, at Caroline Makes (who is the host this month), and Ros at The More Than Occasional Baker. The randomly chosen letter must be used as part of the name of the dish or as the start letter of a main ingredient - full rules here. I'm entering the oblong plum tart into the challenge; the round one isn't a traditional Zwetschgendatschi.

While thinking about the challenge I picked up several interesting recipes for various types of zucchini cake, so there might be a second entry this month, if I don't run out of time!


Wednesday, 17 June 2015

White Chocolate, Coconut and Raspberry Flapjack

This recipe was devised to use up a carton of Jordan's 'Country Crisp with Raspberries'  breakfast cereal. The cereal is made up of clusters of oats and barley flakes, stuck together with sugar and palm oil and flavoured with small quantities of dried raspberries, hazelnuts and coconut. It's very tasty, and very calorific if you eat the recommended portion size, but unfortunately my husband didn't find it as filling as his usual brands of granola and muesli. Never one to waste food, flapjacks seemed a good use of what was left after he'd tried it for a few days.

I adapted my usual flapjack recipe, reducing the amount of  butter, sugar and syrup used to allow for the fat and sugar already in the cereal, and adding rolled oats for substance and a little more coconut for flavour. I also threw in the remains of a pack of white chocolate chips, just to use them up!

Ingredients
200g butter
75g golden syrup
125g light muscovado sugar
250g Country Crisp cereal
150g rolled oats
30g desiccated coconut
50g white chocolate chips

Method
Melt the butter, syrup and sugar together in a large bowl in the microwave, or a saucepan on the hob, then mix in the other ingredients. Spread evenly into a 30 x 20cm (12 x 8") baking tin, lined with baking parchment, and press down firmly. Bake at 180C for 30 minutes. Cool for 10 minutes, then mark into bars with a heavy knife (I get 18 pieces out of this size of tin, but you may prefer smaller bars). Leave in the baking tin until completely cold before cutting into pieces, and storing in an airtight tin.

These flapjacks were light and crunchy, as I think some of the cereal is puffed during the manufacturing process.  This crunchiness made them harder than those I usually make, but it's nice to have an occasional change from chewy flapjacks. Although there was only a small percentage of dried raspberries (2.5%) in the cereal, their flavour was noticeable, and complimented the coconut well.

The AlphaBakes challenge,  hosted by Caroline at Caroline Makes, and Ros at The More Than Occasional Baker, is to make something whose name, or principal ingredient begins with a randomly chosen letter of the alphabet.

This month the challenge is hosted by Caroline, and the chosen letter is O, so I'm entering these flapjacks because they contain OATS.

Saturday, 16 May 2015

Cheddar and Jalapeno Cornbread,

made with Quark.

I love the AlphaBakes challenge, where we are asked to cook something using a randomly chosen letter of the alphabet, as either the starting letter of a principle ingredient (eg B for bacon), or as part of the name of the dish (eg B for Battenburg Cake). Admittedly, some letters of the alphabet prove more difficult than others, but that's all part of the fun.

Last time the letter Q came around I made a cake using quinoa, which had a fairly unpleasant texture and didn't go on my list of things worth making again; this time I intended to play it safer with a quiche. Except every time I suggested quiche for dinner, my husband vetoed the idea, so I had to think again. Quark seemed the next best idea, and while searching for recipes I came across this cornbread recipe from The Fabulous Baker Brothers.

This is a luxury version of cornbread, compared to recipes I've tried before. It contains lots of cheese, sweetcorn kernels, onion and jalapeno peppers for flavour, and uses quark instead of the sour cream or buttermilk more usually found in cornbread recipes.

This was a straightforward recipe to follow, but my batter was very dry and I needed to add a few tablespoons of milk to give a stiff dropping consistency. The cooked cornbread was quite dry and crumbly, so it wouldn't have hurt to make the batter a little sloppier. The cornbread also took a lot longer to cook than the 40 minutes the recipe suggested - I think mine was in the oven for a touch over an hour!

We both really liked this - it was very cheesey, and well spiced with the jalapenos, which I had chopped quite finely. Most cornbread recipes contain a proportion of wheat flour, which I think lightens the sponge texture; this one was all cornmeal, and also contained coarsely puréed sweetcorn kernels, so it was quite dense. It definitely needed more liquid in the batter though, to reduce the crumbliness a little.

We ate the cornbread, still warm, with a spicy ratatouille. The following night we ate it with a pork and bean chilli, but after two meals I'd only used half the cornbread, so I had to freeze the rest. I hope it doesn't become even more crumbly in the freezer.

This cornbread also fits the brief for Dom's Simply Eggcellent challenge over at Belleau Kitchen. This month he wanted our savoury recipes using eggs. While eggs are not the principle ingredient of a cornbread, it's almost impossible to make any sort of cake without eggs, so I think it's OK to submit this recipe.


AlphaBakes is co-hosted by Ros, at The More Than Occasional Baker and Caroline, at Caroline Makes. This month's challenge, using the letter Q, is hosted by Ros, who will be posting a round-up of entries at the end of the month.

Sunday, 12 April 2015

Brownies with Hazelnut Praline Crust

I sometimes go to great lengths not to waste food. I've been known to decide on dinner on the basis of half a tin of tomatoes in the fridge. So when I tried making hazelnut praline to decorate last week's chocolate cheesecake, and ground it too finely, there was no chance it would be thrown away.

I thought about incorporating it into a chocolate refrigerator cake (tiffin), but decided it would end up like finely chopped hazelnuts, and the flavour of the praline would be lost. I tried making balls of praline mixed with Biscoff spread, which I would place in brownie batter so that each square had a nutty 'truffle', but the mixture was just too sweet to be pleasant. In the end I decided just to sprinkle it over a tray of brownie batter and hope that the sugar didn't dissolve quickly, leaving just chopped nuts on the surface, or even worse, that the praline didn't just sink.

The plan worked just fine - the praline made a crisp crust on top of the brownie, which was a nice contrast in texture, and the crust still had the praline flavour of caramel and toasted hazelnuts. I used my favourite brownie recipe, which I don't feel quite as guilty about since I reduced the sugar content by 25%, scaled down to an 8" square baking tin. *The praline was made from 50g chopped toasted hazelnuts mixed into 50g of caramelised sugar which was spread out on a piece of baking parchment to cool, then broken into pieces and ground to a fine crumb after it had set.

Ingredients
140g unsalted butter
140g 74% plain chocolate
300g light muscovado sugar
1 teaspoon vanilla extract
3 medium eggs
160g plain flour
3 tablespoons cocoa
100g praline (see above*)

Method
Melt the butter and chocolate together in a large bowl - I prefer to do it over hot water, but the microwave also works. Cool to lukewarm, if necessary, then mix in the sugar and vanilla extract, stirring until the sugar has dissolved. Beat in the eggs, one at a time, then sift in the flour and cocoa and fold in.
Transfer the batter to an 8" (20cm) baking tin, lined with parchment paper, and sprinkle over the praline to give an even layer on top. Bake at 180C for 25-30 minutes until a test probe comes out with a few damp crumbs still clinging.
Cool in the tin then cut into as many pieces as you think fit. I make 16 pieces out of this size tin.

The only criticism I had of these brownies was that they were slightly overcooked. I didn't check until 30 minutes had passed, and they were past the optimum point for a really moist brownie by then. It doesn't spoil the flavour but it does make them slightly drier than I really like.

I will also be interested to see if the praline stays crisp for longer than a day or two - it takes us a while to get through a whole batch of brownies.

I'm entering these into the Tea Time Treats April link-up party - this month, with Easter in mind, the theme is chocolate. Tea Time Treats is co-hosted by The Hedge Combers and Lavender and Lovage, and this month's host is Karen at Lavender and Lovage.

As I'm short of baking time this month (I don't often bake more than once a week now, because we're both weight watching), these brownies will also be my entry into this month's AlphaBakes Challenge, which is the letter B. I realise brownies aren't very original, but it's better than no entry at all! AlphaBakes is co-hosted by Caroline at Caroline Makes and Ros at The More Than Occasional Baker, and Caroline is this month's host.