Showing posts with label pistachios. Show all posts

Tuesday, 19 February 2019

Rose Blondies

with pistachios and cocoa nibs

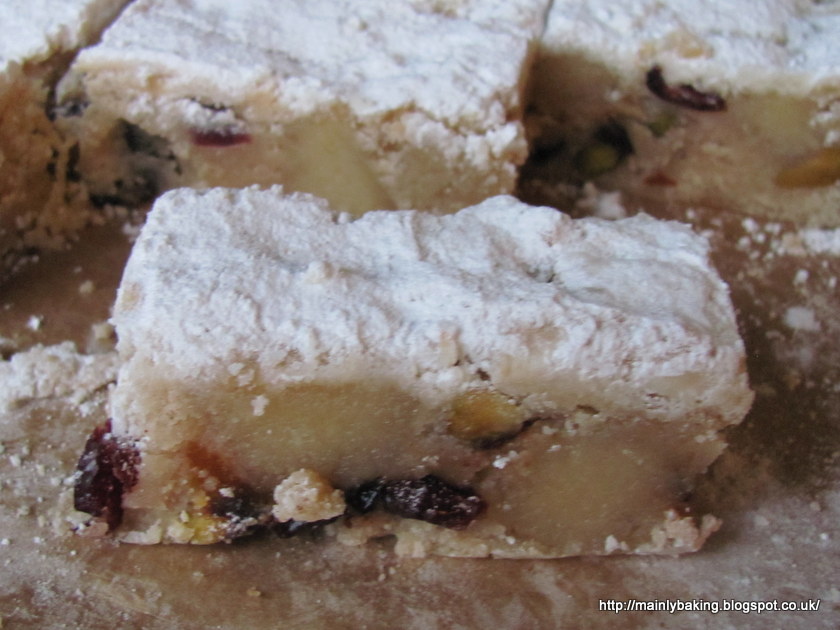
This recipe is appearing a little late for St. Valentine's Day, but it was made for my local Cake Club meeting, which didn't take place until after that date. Roses and chocolate are synonymous with St. Valentine's celebrations, so it seemed natural to use them together to flavour my bake. I  chose to make blondies rather than brownies so that the full effect of the colourful additions of rose petals, chopped pistachios and cocoa nibs could be seen.

This is a recipe which I've used once before, back in 2011, when it was very much an experiment. I made a bigger batch this time, doubling up the basic recipe but not all the add-ins. I also decorated the blondies to fit in with the Valentine's theme - something I wouldn't usually do.

Ingredients
150g plain flour
pinch salt
scant 1 teaspoon baking powder
60g unsalted butter
100g caster sugar
2 tablespoons milk
200g white chocolate
2 eggs
1 1/2 teaspoons rosewater*
80g pistachios, chopped
30g cocoa nibs
1 tablespoon rose petals (optional)

* Different brands of rosewater vary a lot in strength. I used Neilsen-Massey, which is very strong. Add to taste, according to what you have experienced with your particular brand, remembering that too strong a flavour can be off-putting.

Method
Preheat oven to 160C and line a 20cm square shallow baking tin with parchment.
Mix the flour, salt and baking powder in a small bowl.
In a large pan, melt the butter, sugar and milk together on a low heat. When the butter has melted add the white chocolate and stir until the chocolate has melted. Remove from heat.
Beat in the eggs and rosewater, then sieve in the flour mixture and fold in, followed by the nuts, cocoa nibs and rose petals, if using.
Transfer the batter to the prepared tin and bake for 25 minutes, or until an inserted probe comes out just dry.
Cool in the tin then cut into bars or squares for serving.

I used a glacé icing coloured with 'hot pink' gel, and some bought chocolate hearts to finish off the decoration.

These blondies were dense and chewy, as they should be, but a little on the dry side. Most people trying them agreed that the rose flavour was just about right.


Monday, 16 April 2018

Emergency Brownies with Pistachio Nuts and Chilli Chocolate

I've used Nigella Lawson's recipe for Emergency Brownies, from her latest book 'At My Table', several times now; not because I have frequent emergencies, but because the recipe is just the right size for someone living on their own, who tries hard not to overindulge on cake.

As I said before, it's not the best recipe for brownies that I've ever made, but it's pretty good! This time, I used pistachio nuts left over from Easter baking, and chilli-flavoured chocolate (that was a bit of an emergency - my chocolate stocks were very low!)

The recipe is online now, here on the BBC Food website. I'd advise you to save a copy, as experience has taught me that the BBC doesn't keep celebrity chefs' recipes for ever! Next time you need it, it'll probably be gone! I find that 20 minutes baking leaves the brownies still slightly gooey in the centre, but I think my tin size is a little smaller than the one Nigella suggests, making the brownies a little deeper.

Friday, 6 April 2018

Pistachio and Marzipan Palmiers

I have to admit that this was more of an assembly job than a real baking session, but these puff pastry biscuits were a lovely treat over the Easter weekend. I also have to admit that I chose the recipe to use the last of the Christmas marzipan, which had been stored, well wrapped, in the fridge since I made these Mincemeat and Marzipan Squares a month ago.

The recipe was in this feature on Easter baking, in the Guardian newspaper. There are a few points to note when it comes to assembly - the nut mixture needs to be firmly embedded into the pastry (I found it best to press down with the rolling pin rather than roll), and I felt that a longer chilling time would have made the roll of dough easier to cut. Unfortunately I didn't have more time at that stage as I needed the oven for the joint of lamb we were having for dinner. I baked the palmiers at 180C fan (200C conventional) as the temperature given in the recipe seemed a bit low for cooking puff pastry in a conventional oven. The palmiers still took the full 20 minutes to bake to a light golden colour, so my decision to raise the oven temperature seemed correct.

These are best eaten the day they are baked; the pastry wasn't quite so crisp the next day. Comparing my photos to the illustration with the recipe, it looks as though I should have processed the nuts and marzipan to a finer texture, but I liked the crunch of some larger pieces of nuts.

Monday, 3 October 2016

Fudgy Chocolate and Pistachio Slice

I intended to bake this recipe, for mocha brownies on a shortbread base, but when I found myself with half a packet of digestive biscuits which needed to be used up, I decided to put the fudgy topping from the recipe onto a biscuit crumb base instead.

I think I used about 150g of biscuits and 75g melted butter to make the crumb base, which I pressed into the base of a 20cm ( 8") square baking tin, and chilled while I made the topping. The mixture for the topping was very easy to put together, as it is based on a can of condensed milk.

To a 400g can of condensed milk add: 30g plain flour, 1 large egg, 65g cocoa, 1 teaspoon vanilla extract, 1/2 teaspoon of baking powder and 2 teaspoons of instant coffee dissolved in 1 tablespoon of hot water. When this is evenly combined, fold in 75g of chopped nuts - in this case I used pistachios. Spread the mixture over the crumb base and bake at 180C for about 25 minutes until the centre is set. Cool in the tin and cut into squares or fingers when cold.

These little treats were delicious. The topping is like a really fudgy sweet brownie, as you'd expect from using a can of condensed milk. My only criticism was that the amount of crumb base wasn't enough. I used the amount of biscuits I had available, but if I made these again I would use more biscuits and butter to make a thicker base.

I'm sending this to October's We Should Cocoa link-up, hosted by Choclette at Tin and Thyme. Any recipe containing some form of chocolate is welcome to be added.

Thursday, 7 April 2016

Courgette, Sultana and Pistachio Loaf

I managed to make one more recipe from Honey and Co: The Baking Book, before the library demanded it back from me. It was down to a choice between this courgette loaf and a carrot cake, and the courgette loaf won because I had all the ingredients already (allowing for a couple of substitutions).

I used sultanas instead of golden raisins, and orange zest instead of lemon, neither of which were going to have a major affect on the flavour of the cake. I also chopped the pistachios roughly, as I dislike whole nuts in cakes.

I didn't really encounter any problems while making the cake, although both the loaf recipes I've made from the book have almost filled my 2lb loaf tin, leaving me worried (needlessly, fortunately) about cake batter ending up on the floor of the oven.

This cake was moist and dense but not too heavy. The pistachios, sultanas and flecks of green from the courgettes made it quite colourful, and the chewy sultanas and crunchy pistachios gave some variations in texture while eating. However, once again, it was the spices used that made this cake something special - star anise and ginger, combined with the citrus zest, gave a really unusual sharp and peppery flavour, which was balanced nicely by the sweetness of the sultanas.

Saturday, 5 March 2016

Rose and Raspberry Chocolate Chip Cake

It's not often that I turn my hand to fancy cake decorating - I'm usually happy with a dusting of icing sugar or a drizzle of glacé icing. However, the challenge of producing a cake on the theme of 'In Bloom!' for a Clandestine Cake Club meeting spurred me on to decorate the cake too. I used fondant icing and gel colouring to produce a simple ribbon effect, and added a few dried rose petals and chopped pistachio nuts for added visual appeal. I think, later in the year, crystallised fresh rose petals would look very pretty, and for the more artistic sugarcrafters, flowers made from fondant icing could be added.

I used the basic Madeira Cake style recipe I made recently, and added 2 teaspoons Nielsen-Massey rose water, 50g chopped pistachio nuts, 100g chopped dark chocolate flavoured with raspberry and 10g of freeze dried raspberry pieces (a whole tube of supermarket own brand).

I was a little disappointed that the cake was a bit dry and crumbly when cut, but the it tasted just right. Rose was the predominant flavour, which was what I wanted, but the other ingredients were all noticeable. It looked quite pretty too, with the little flecks of pink from the raspberries contrasting with the green pistachios and dark chocolate. Ideally, larger pieces of dried raspberry, and more of them, would have been better, but I hadn't planned well enough ahead to get hold of any by mail order and had to make do with what was stocked locally.

Using floral essences in baking is difficult - too much and the perfume overwhelms the flavour and makes the cake taste of Granny's toiletries, too little and the subtleness of the floral notes is lost. I was happy with the level of rose flavour in my cake, but I know that different brands of rose water differ in strength, so it's something that each baker needs to judge for themselves if trying a similar cake.

At the Clandestine Cake club meeting there were several other cakes also flavoured with rose, the most ambitious of which was a layer cake with Turkish delight flavours - lemon, rose, pistachio and vanilla layers with lemon cream filling and rose frosting. This was delicious, but very rich! One of the more unusual cakes was a chocolate cake with a cream filling flavoured with parma violets - an interesting combination! Lavender and elderflower flavours were also used in cakes, and some cake-makers chose to interpret the theme visually - decorating cakes with flowers, or to look like a flower pot with buds beginning to show through, in the case of one ambitious baker!

The raspberry chocolate I used in the cake was from the Divine range of Fairtrade chocolate. It's currently Fairtrade Fortnight, and this year the campaign is focusing on Breakfast. This cake isn't breakfast food, but using Fairtrade chocolate does give me an excuse to mention the organisation! Read about the aims of the Fairtrade foundation here.

This is the sort of cake which probably should be promoted for a celebration of  Mother's Day tomorrow, but as I made it myself, and what was left for us to eat after Cake Club has long gone, it's not being used as such here. Let's call it a celebration of the coming Spring!

Wednesday, 17 February 2016

Pistachio and Cranberry Loaf Cake

The first thing I'm going to say about this cake is that the flavour is amazing! I knew it was going to be something special when I scraped the last of the raw batter from the mixing bowl, just to get an idea of what it tasted like. The name of the cake doesn't do enough justice to the flavours within - as well as pistachios and dried cranberries there was lime, fennel seeds, cardamom and vanilla, which combined to make something unlike any of the constituent parts - I love it when that happens!

The recipe wasn't perfect and there are things I would change next time, but I thought I'd get the praise in first, as the nitpicking doesn't detract from what a great cake it was. I didn't realise when I decided to make the cake, that it was a recipe from Honey & Co, who specialise in Middle Eastern cooking. I can't find the recipe anywhere online - although if you have a subscription to the online Financial Times, I believe it was published there - but there is a book 'Honey & Co: The Baking Book', which is now on my 'must have' list, even if it doesn't contain this particular recipe!

Ingredients
200g SR flour
1 teaspoon ground fennel seeds
5 cardamom pods - ground to a powder with the pods
1 teaspoon vanilla extract
pinch of salt
100g whole pistachios, peeled
150g dried cranberries
zest of 2 limes
150g butter
150g caster sugar (the recipe specified golden)
2 eggs (I used large)
100g jam (the recipe specified a red jam such as raspberry or cherry)
the juice of 1 lime
about a tablespoon of demerara sugar to sprinkle on top (I used crushed raw sugar cubes)

The cake is made by the traditional method of creaming the softened butter and sugar together, with the lime zest and vanilla, then slowly adding the eggs. All other dry ingredients are added to the flour, then folded into the batter, then finally the juice of the lime and the jam is folded in. After the batter is levelled in the baking tin, the surface is scattered with demerara sugar, then the cake is baked at 160C in a large (1kg/2lb) loaf tin, for about 60 minutes, turning halfway through cooking so that it bakes evenly. Cool in the tin.

I baked at 160C in a conventional oven, and the cake took over 90 minutes to bake, so I think the temperature given must be for a fan oven ie 180C in a conventional oven. Things I did differently: I used the pistachios as they came from the pack (do they really need peeling?) and chopped them roughly rather than leaving them whole, and because I didn't check my storecupboard properly, I had to use apricot jam. Things I'd do differently next time - take the pods away from the cardamom seeds - they didn't grind to a powder very well in my spice grinder and left little bits of husk in the mixture; add the juice of the second lime, as the batter was quite thick, and the limes were small.

The cake was a little crumbly the first day it was made, but settled down overnight to something a bit firmer. The extra lime juice might have made it a bit less inclined to crumble, and a little more moist - the slight dryness is the only criticism I have (apart from the lack of clarity over the baking temperature).

Monday, 14 December 2015

Not so Magic Cake, and other bits and pieces!

There's nothing wrong with the 'tiffin' style dessert pictured at the top of this post. It was made to Delia Smith's recipe for Chocolate-crunch Torte with Pistachios and Sour Cherries, following the recipe exactly, apart from using dried cranberries instead of dried sour cherries.

It was made as an quick replacement for an attempt at a 'magic' cake which I somehow knew had failed before it was even out of the baking tin. Magic cakes are so called because one cake batter separates into three layers during cooking - a thin dense pastry-like layer at the bottom, a custardy layer in the middle and a light sponge on top.

I used the chocolate and hazelnut magic cake recipe featured in this recent newspaper article, and even though I can now see where I might have made a mistake (trying to incorporate the egg whites evenly into the batter, rather than leaving it in clumps) I don't think the finished cake would ever have looked as attractive as the photo in the article, or tasted good either. 100g of Nutella-type chocolate hazelnut spread is not enough to make a cake taste strongly of chocolate, nor give it a good deep colour. This is what mine looked like - you can just about see three layers, but it was a really unattractive shade of beige, the custard was dense and slimy and it didn't really taste of anything definite - certainly not hazelnuts or chocolate. After trying one mouthful, for research, it went into the food waste recycling - and, as I've often said, food has to be really awful for me to throw it away!

I didn't bake a cake last weekend; it was my husband's birthday, and he wanted a stollen, which I buy rather than make as my yeast doughs are very unpredictable. I made a very tasty seasonal fruit crumble though, using 3 eating apples, 100g fresh cranberries, the zest of a clementine and the clementine segments, cut in half, to make 4 portions of dessert. I also added a teaspoon of mixed spice to my usual crumble recipe of equal weights (75g) of butter, brown sugar, plain flour and rolled oats.

I also tried my hand at apple-chilli jelly recently, using the homegrown apples which were too small to peel and use in any other way. The beauty of apple jelly is that the fruit is just roughly chopped - peel, cores and pips included - before cooking with water and adding some vinegar. The cooked fruit is strained, then reboiled with sugar and sliced chillies, until the setting point is reached. I used this recipe from gardener Sarah Raven, using just the regular mixed red and green chillies sold as moderately hot in the supermarket.

After cooking the apples in water and straining the juice I had about 1.5 litres of liquid; I was a little worried, as despite my careful handling of the fruit, the liquid looked cloudy at this point. I needn't have worried though, as soon as it came to the boil with the added sugar it miraculously cleared - I just wish this had been mentioned in any of the recipes I read! I used a sugar thermometer, to be sure that the setting point had been reached. I didn't manage to distribute the chillies very evenly when potting the jelly - the jar in the photo got the most - and it looked as if all the chilli slices were going to float, until I remembered a tip I'd read somewhere about turning the sealed jars upside down for about 10 minutes, then back again, and repeating as the jelly cooled and set. This procedure eventually traps some of the chillies near the bottom, despite their inclination to float! I think the chilli slices are for decoration - there's certainly a lot of heat in the jelly alone, so even the jars without much visible chilli will taste the same.

Saturday, 7 March 2015

Semolina Cookies

One Batch of Dough, Two Delicious Cookies

The same basic dough is used for these Date Bars and Pistachio Cookies. It's a Dan Lepard recipe, given Middle Eastern flavours with pomegranate molasses, rose water and orange blossom water. I made one batch of dough from this recipe, and made a half quantity of the Date Bars and half a batch of these Pistachio Cookies.

I had decided to use semolina for this month's AlphaBakes Challenge (Ros of The More Than Occasional Baker has chosen the letter S), and was trying to decide between a cake  or biscuits when Janie of The Hedge Combers announced that the March Tea Time Treats challenge was for cookies and biscuits. The decision was made for me - I would make semolina cookies which could be an entry for both baking challenges.


Semolina seems to be common in Middle Eastern and Asian cooking, but is less well known in the UK as a baking ingredient. It's sometimes added to shortbread to make it crisper and crumblier, but is best known as the basis for the sort of milk pudding that we all hated at school! Semolina is the coarse centres of durum wheat grains, left after the flour has been milled away. 

I looked at many recipes for semolina cookies, which all looked similar, but they had small differences in the proportions of fat, flour and eggs, so that it was impossible to decide if one recipe was going to work out better than another. In the end I found Dan's recipe and was persuaded by the extra flavours added to the cookie dough. After trying it, I'm sure the dough on it's own would have made delicious cookies.

In the first recipe the dough is rolled out and wrapped around a filling of spiced date purée and in the second, chopped pistachios and a little more sugar is added, and then the dough is just rolled into balls. Both recipes were fairly straightforward - just a little fiddly - and gave good results. One tip I can pass on - if you are going to purée dried dates in a food processor, cut each one in half across the length, to check that the stones have been removed. I found two left in in my pack of dates. Trying to process a date stone could be a costly blunder!

The dough was a little dryer than I expected, and I eventually realised (after it was too late to put things right) that I hadn't added quite enough liquid, as I had used less of the rose water and orange flower water (mine are quite concentrated and I've been caught out in the past by following recipe instructions and finding out I'd used too much) but hadn't made up for the lower volume of liquid.

The dry dough was difficult to roll out and meant that the dough round the Date Bars cracked a little during baking. It was also difficult to incorporate all the chopped nuts for the Pistachio Cookies, but I'm not sure if that was due to the dryness, which made the dough crumbly, or the sheer volume of nuts - probably a bit of both.  At least I know how to remedy the problem - a couple of tablespoons of milk or water is all that is needed next time.

Additionally, next time I will flatten the Date Bars a little before cooking. This wasn't mentioned in the instructions, so I expected that they would flatten naturally during cooking to turn out as in the photograph accompanying the recipe (see the link above). As you can see from the photographs of my Date Bars, this didn't happen!

Both these cookies were delicious, in different ways. The Date Bars were the best - the moist spicy date filling and the crunchy sesame seed coating were a good contrast to the crumbly cookie dough.

However, with the Pistachio Cookies the added flavours in the dough shone through, particularly the rose water, as the pistachio nuts did not have a strong flavour.

AlphaBakes (rules here) is hosted alternately by Ros, of The More Than Occasional Baker and Caroline of Caroline Makes.

Tea Time Treats (rules here) is hosted alternately by Janie of The Hedge Combers and Karen of Lavender and Lovage.

Sunday, 8 June 2014

Cocofina coconut oil makes........

Chocolate Chip and Pistachio Brownies

Although I looked extensively online for recipes using coconut oil, many of them seemed to concentrate on the health aspects of using it instead of other fats, and some seemed very worthy indeed - full of seeds, strange grains and elusive raw ingredients. What I wanted to do was to use it to make something I was familiar with, for a good comparison, so in the end it seemed sensible to use a recipe that I already had

I adapted the recipe I usually use, for brownies made with oil, to make these brownies with coconut oil. Although coconut oil is solid at room temperature, I was trying to compare it's use against the oils I usually use in baking, so it seemed better to use an oil-based recipe rather than a butter-based one.

I decided to reduce the number of eggs in the recipe from 3 to 2, on the, perhaps spurious, basis that the more solid coconut oil would make the brownies firmer than when liquid oil was used, so a third egg was unnecessary.

Ingredients
150g plain (70%+) chocolate
100g coconut oil
2 large eggs
130g caster sugar
100g dark muscovado sugar
1 teaspoon vanilla extract
105g plain flour
75g milk chocolate, chopped coarsely
30g chopped pistachios

Method
Prepare an 8" square baking tin, and pre-heat the oven to 180C.
Melt the coconut oil and chocolate together, over a pan of simmering water.
In a large bowl, beat the eggs, sugar and vanilla together for about 5 minutes.
Fold in the chocolate mixture, followed by the flour and then the chopped chocolate and nuts.
Transfer to the baking tin and cook for 25 minutes until just firm but not too dry.
Cool in the tin before cutting into portions of the desired size.

I was really pleased with these brownies - they were as rich and fudgy as those made with butter and kept really well too. Baking with oil can seem OK when you know you have to do it for dietary needs, but you do lose some of the richness of both texture and flavour that you get from butter. Coconut oil gave back some of this to this particular recipe, hopefully it will work as well in other recipes too. However, coconut oil isn't tasteless, and it's flavour comes through more than the flavour of even a distinctive olive oil. This isn't a problem occasionally, but if every cake tastes of coconut, then I'm sure we'll soon be fed up with it and want a change.

One area where I do think coconut oil will be an advantage is on the few occasions I need to cook something dairy-free for a friend; she is a good cook herself and really loves her food and although she has adapted to a dairy-free diet well, she really misses rich cakes and desserts. With coconut oil I should be able to make some real treats for her, if it works as well as it has in this recipe.

If you haven't done so already, please read my review of other Cocofina products and enter the give-away at the end of the review.

Disclaimer: Although Cocofina provided the coconut oil free of charge, I was under no obligation to write a positive review. All opinions expressed are my own.

Thursday, 15 May 2014

Apple and Pistachio Cake, with Elderflower Drizzle

As a break from cheap chocolate cakes for the We Should Cocoa challenge, I decided to tackle this month's AlphaBakes challenge. We're on the second run through the alphabet now, and this month's randomly chosen letter is E. I'd already decided that I would bake with Elderflower flavour, so imagine my delight at finding the first elderflowers out this morning, just in time to add to the photographs of the cake. I'd looked in my usual patch yesterday and they were still in bud, but this morning I passed an elder tree in a sunnier position, and the first bunches were open!

While I was looking for inspiration for flavours to pair with elderflower, I came across apple and elderflower yogurt in the supermarket, and a recipe for a pistachio, yogurt and elderflower cake from Jamie Oliver. Although the cake looked delicious, I didn't want anything quite so elaborate, but I liked the idea of using apples and pistachio nuts with the elderflower flavour.

I decided that I didn't want the contrasting textures of chopped nuts and chunks of apples, just their flavours, so I grated the apples and ground the nuts, so that the cake would have an uniform texture. I based the cake on this recipe for an apple cake using grated apple, substituting 50g of the flour with ground pistachio nuts and using golden caster sugar instead of brown. I also used about a tablespoon of elderflower cordial instead of milk to get a soft batter. I kept the peel on the apples - two small red eating apples - in the hope that the flecks of pink would show in the finished cake, but any visible peel seemed to have turned green on cooking! When the cake was cooked, I pricked the top all over with a cocktail stick and drizzled on 4 tablespoons (60mls) of elderflower cordial before leaving it to cool.

Although all the flavours were very subtle, the cake was delicious, and much lighter than I'd expected after the addition of grated apple. It might have been better to follow the example in JO's recipe, and use more cordial, reduced down to a syrup, but after a week of costing out cake recipes I was very conscious of how expensive elderflower cordial is!

AlphaBakes (rules here) is a challenge based on a randomly chosen letter of the alphabet. The dish made must feature something beginning with that letter as one of the main ingredients or part of the name. It is hosted jointly by Ros at The More Than Occasional Baker and Caroline at Caroline MakesRos is this month's host with the letter E, and will feature a round-up of entries at the end of the month.

Friday, 14 March 2014

Chocolate Peanut Butter Squares

I chose this recipe from a recently bought cookbook (1001 Cupcakes, Cookies & Other Tempting Treats - by Susanna Tee), and didn't realise until I had completely filled a 20 x 30cm shallow tin to the brim, just how big it was. For about the first time ever, I cut this bake into more portions than recommended, and still daren't even guess at the calories in each piece. Fortunately, CT was the recipient of 2/3 of the pieces, and we were left with just 4 pieces each, to eat over four days!

This traybake is divided into three layers; the base layer contains basic cookie ingredients plus oats and nuts and is mixed to a dough with egg. The middle layer is condensed milk mixed with peanut butter and the top layer is part of the base mixture left as a crumble and mixed with chopped milk chocolate. The top streusel layer is held in place by the condensed milk as the traybake cooks.

The individual layers can just about be seen in the photographs but the whole thing comes together as a sweet, sticky, chewy treat when eaten. Despite the 350g of sugar, a whole tin of condensed milk and 300g of milk chocolate, these squares were not excessively sweet! My only criticism would be not really tasting the peanut butter, but I'm not sure if adding more to the condensed milk would affect how the recipe works.

Base and top layers - rub 225g butter into 350g plain flour and 1 teaspoon of baking powder. Mix in 350g light brown muscovado sugar, 175g rolled oats and 70g chopped nuts (I used almonds, hazelnuts and pistachios). Set aside 1/4 of the mixture and mix an egg into the larger portion (it will still be crumbly). Spread this part of the mixture evenly into a 20 x 30cm x 3cm deep baking tin and press down to bind. Bake at 180C for 15 minutes. Meanwhile mix 300g chopped milk chocolate into the reserved oat and nut mixture.
Middle layer - mix 70g chunky peanut butter into a 400g tin of condensed milk.

When the base is cooked, pour over the condensed milk mix and spread evenly. Sprinkle the reserved crumb and chocolate mix over this, trying to place the chocolate chunks evenly, and press down lightly. Bake for another 20 minutes. Cool completely before cutting into 20 - 24 pieces (leave as long as possible - chocolate stays soft for a surprisingly long time!)

Tuesday, 10 December 2013

Fig, Pistachio and Honey Balls

These could almost be considered guilt-free Christmas treats - no dairy, no gluten, no refined sugar, no added fat. There's just a tasty mixture of dried fruit, nuts and honey, with orange zest, orange flower water and cinnamon for flavouring. The recipe comes from the December 2013 issue of Good Food magazine, but isn't available on the website yet.

Here's a brief overview of the recipe - it isn't difficult, but you do need at least a mini-chopper, if not a full sized food processor.  My mini-chopper was big enough to process all the dried fruit in one batch.

200g soft dried figs and 100g dates are processed to a purée with 40g of well-flavoured honey (I used wild thyme), 1/2 teaspoon of cinnamon, the finely grated zest of an orange and 2 teaspoons of orange flower water, then 100g chopped pistachios and 50g of chopped blanched almonds are worked into the paste. The mixture is rolled into cherry-sized balls and placed on baking parchment to be chilled. I found it easier to roll the very sticky paste by chilling it first, and got the recommended 25 balls out of the mixture.

There is an option in the recipe to roll the fruit balls in cocoa before serving, but I was taking them to a dinner party where one of the guests could not eat chocolate, so decided not to do this. A tempered dark chocolate covering might be a tasty, sophisticated finish too. For presentation I put each ball into a petit four case before filling a shallow box with a single layer.

I'm entering this into this month's Tea Time Treats challenge, the last to be hosted by Kate, of What Kate Baked. The theme she has chosen is one which fits well into December - Festive Foodie Gifts. The rules for the Tea Time Treats challenge can be found here, on co-host Karen's blog (Lavender and Lovage). Karen will be carrying on setting TTT challenges in the new year.

Tuesday, 18 December 2012

Cherry Stollen Bars

This is the start of my seasonal baking, although it was made for Hub's birthday treat. I like this recipe so much that I'll probably make another batch for New Year, when we have family visiting. I like these bars because they are packed with marzipan, and they achieve the 'stollen' effect without using yeast. Not only does yeast baking take so much time, my yeast doughs are notoriously unreliable - a recipe which works once may not work the next time I try it!

The recipe for these Stollen Bars comes from Dan Lepard, and featured in last year's Christmas cooking supplement in the Guardian Weekend magazine. When I made them last year, I followed the recipe exactly and thought the result was perfect! This time I varied the fruit content and cut down on the nuts a little, mostly because of what I had available in the store cupboard, but also because I wanted to try the recipe with cherries and cranberries. I used only 50g of pistachios and 150g of mixed dried fruit, including cherries, cranberries, chopped apricots and sultanas. There were more cherries by weight than any of the other fruit - a mix of regular and sour - which is why I've called these Cherry Stollen Bars. I used a generous coating of butter - about 25g was enough - and kept adding icing sugar until no more butter soaked through. Hubs thought it would be better with less icing sugar!

Although the result was just as tasty as before (I had been worrried that stronger tasting fruit would overwhelm the pistachio and orange flavour, which didn't happen), and looked really festive, I wasn't as happy with the bake. I'm not sure if the tray of dough was slightly under-baked or if the marzipan  lumps melted round the edge and made the dough too moist. I used marzipan with a slightly lower almond content than my usual brand, so that might have accounted for the difference. Whatever it was, it left the bars  moister in the centre than previously - more cake-like than bread-like - which I didn't like quite as much (although I am being really picky and self-critical here!).

As well as being a good seasonal bake, these Stollen Bars fit into this month's AlphaBakes Challenge. This month the challenge, set by Ros from the More Than Occasional Baker, is to bake something where the name, or principle ingredient, begins with the letter 'S'. I expect, given the time of year, that stollen will feature heavily in the offerings, but that's fine by me, as it's one of my favorite christmas cakes. Ros co-hosts this baking challenge with Caroline, from Caroline Makes - each month a new letter of the alphabet is chosen randomly.

Tuesday, 25 September 2012

Pistachio Brownies

Brownies are the ideal store-cupboard bake, as long as you are one of those people who keep chocolate in store - and I know some people don't! My favourite brownie recipe doesn't even need you to have butter, as it uses oil to reduce the saturated fat content.

So when I needed a quick cake at the weekend, and didn't have natural yogurt in the fridge to make any of my usual recipes for low saturated fat cakes, I turned to the trusty brownie recipe. I knew the storage box of cake add-ins was getting low on nuts, but I did have a pack of pistachios, so to this batch of brownies I added 50g of chopped pistachios and 70g plain chocolate chips.

I got distracted and slightly over-baked this batch, but they were still moist enough and rich in flavour, despite the lack of butter - I think the large amount of chocolate, sugar and eggs, compared to flour, ensures a rich fudgy texture.

Friday, 20 April 2012

Nutty Lemon Biscotti - a Random Recipe

A double celebration - my 300th post is for Belleau Kitchen's 2nd Blogiversary Random Recipe challenge! This is the first time Dom has specified a baking recipe for his Random Recipe challenge, so I can take part with (almost) no cheating on choosing the recipe. I had to cheat slightly, as the first recipe I got when randomly opening the gorgeous book, Tea with Bea (recipes from Bea's of Bloomsbury) was Chocolate Peanut Butter Biscotti, and peanut butter isn't allowed in the house while FB is living here, as she has a severe peanut allergy! Fortunately the recipe on the next page was for these Nutty Lemon Biscotti, so it didn't feel too much like cheating to use that recipe instead.

Unfortunately I can't find an online version of these tasty lemon biscotti, but the ingredients and method are very similar to the recipe for Chocolate Peanut Butter Biscotti in the link above - more flour replaces the cocoa, honey replaces the golden syrup, white sugar and extra-virgin olive oil are used, and the dough is flavoured with the zest and juice of a large lemon and a pinch of ground cardamom before adding 50g each of whole almonds, hazelnuts and pistachios.

I haven't tried many biscotti recipes, and these may not have dried out enough, as once again, I forgot that this book uses a fan oven when giving cooking temperatures, but it was really good to make a batch of biscotti that weren't tooth-breakingly hard!

The flavour was excellent too, but you really have to like whole nuts to enjoy these fully - I prefer my nuts in smaller pieces, although recently I've coming to appreciate whole nuts more.

These biscotti recipes both use a little oil instead of butter, which makes them suitable for my low saturated fat baking. The lemon recipe suggests that dried fruits or chocolate chips can be used instead of nuts, such as sour cherries, dried apricots and white chocolate - so anyone with a tree nut allergy can still enjoy the basic recipe.

Thursday, 8 March 2012

Pistachio Chocolate Ripple Cake - We Should Cocoa

Green is not a common natural colour for many baking ingredients. When you read that green and blue are two of the colours that are most likely to make people reject manufactured food, it's not surprising that there isn't much green around - apparently green and blue are associated with mould! So, when Chele at Chocolate Teapot set the theme of 'green' for this month's We Should Cocoa challenge, in honour of St Patrick's day on March 17th, there weren't going to be many options available to me. In the end, it came down to mint or pistachio. Whilst I love the mint and chocolate combination in confectionary, I'm not too keen on it in baking, for some reason. You are welcome to call me contrary!

So, the decision to use pistachio nuts was made for me. I don't often make big cakes for We Should Cocoa, but on this occasion I decided to adapt the Alice Medrich Ripple Cake recipe that I've used several times before. It's a well-textured pound cake which has proved quite versatile in the past. It almost always ripples prettily during baking without any help from me - the swirls in the layers occur during baking.

This time, as well as reducing the size of the cake by 20%, to better fit my bundt tin, I exchanged some of the flour for ground almonds, reduced the proportion of the chocolate ripple, and added chopped pistachios, chocolate nibs and a little green colouring to the cake batter.

The results were very pleasing, although reducing the proportion of the chocolate ripple cut down on the chocolate flavour a bit too much. I did it to make the cake look more green for the challenge, but I think if I make this again I will go back to the original larger chocolate layers. I have to confess that I had to edit the photos a little to try to make the cake look as green as it was in real life - you may call it cheating, but I blame the camera for not capturing the colour properly!

Ingredients:
3 tablespoons cocoa
3 tablespoons caster sugar
2 tablespoons water

270g plain flour
50g ground almonds
scant 2 teaspoons baking powder
1/4 teaspoon salt
320g caster sugar
200mls sunflower oil
4 cold eggs
1 teaspoon vanilla extract
200mls cold milk
50g chopped pistachio nuts
25g cocoa nibs
green food colouring

Method
Preheat oven to 180C and prepare a 10-cup bundt tin.
In a small bowl, mix the first 3 ingredients to a smooth paste.
Sift the flour with the baking powder and salt, and whisk in the ground almonds to distribute evenly.
Beat the sugar, oil and vanilla extract until amalgamated.
Beat in the eggs one at a time, then continue beating with an electric whisk for about 3 minutes, until the mixture is pale and thick.
Reduce the speed of the whisk to slow and mix in the flour mixture and the milk in alternate portions, whisking only enough to incorporate the flour properly.
Weigh 300g of the batter into a small bowl and stir in the cocoa mixture.
Add green food colouring to the plain batter to taste, then stir in the nuts and cocoa nibs.
Layer the batters alternately in the bundt tin, 1/3 of each at a time, starting with the green batter.
Bake the cake for 60minutes, or until a test probe is clean, then cool in the tin for 15minutes before turning out onto a wire rack. Dust heavily with icing sugar before serving.

We Should Cocoa is a monthly challenge co-hosted by Chele at Chocolate Teapot and Choclette at Chocolate Log Blog. Each month participants are given an ingredient (or method) which must be used in a chocolate product. The full rules are available here if you would like to join in.