Showing posts with label chocolate. Show all posts

Sunday, 26 September 2021

Instant Coffee Banana Bread

Faced with over-ripe bananas, yet again, but wanting to try something different, I came across this recipe from Matt Tebbutt and BBC's Saturday Kitchen. It adds coffee and (optional) chopped chocolate to banana bread  - of course I added the chocolate! This was a straightforward recipe to follow, and didn't give me any problems.


This made a pleasant enough loaf cake, but didn't convince me that any of the added flavours - chocolate, coffee and nutmeg - actually improved the basic premise of banana bread, which is that you want it to taste mostly of bananas. 

I've just noticed that when I used chocolate in a banana cake once before, I didn't really like the result that time either, but thought the issue was too much chocolate. I'll be sticking to adding dried fruit and/or nuts in future.

Monday, 19 July 2021

Marbled Bundt Cake (Chocolate, Orange and Chilli)

I returned to another old favourite for my son's 40th birthday cake. Both he and I have birthdays in the first half of July, so in truth, it was a shared cake, and he expressed no preference as to what I baked.

The recipe originally came from Alice Medrich,  but over the years I've made a few tweaks. Most importantly I've reduced the size of the cake to fit the only bundt tin I have and converted the American cup measurements to metric weights and volumes. I've also replaced the pepper in the recipe with cayenne pepper, and added the finely grated zest of an orange.

The cake is made with oil (olive or sunflower, depending on whether or not you want the extra flavour of olive oil) and cold milk and eggs, so is quick to make without needing to wait for ingredients to get to room temperature. The two batters are just layered into the pan and the marbling is formed by the movement of the batters in the tin as the cake cooks.

I was a little disappointed with the frosting - it didn't flow as far as I'd hoped, and then didn't set as firmly as I expected either - but that might have been due to the temperature in the kitchen - it was the hottest day of the year! I wouldn't usually frost this cake, but it was for a celebration!

I used another favourite - a Mary Berry recipe - for the frosting. Melt 90g of dark chocolate and 30g of butter together, then beat in 1 tablespoon of golden syrup and 1 1/2 tablespoons of milk. If used straight away, it should be a glaze, although I usually wait until it's cooler before spreading it on top of a cake to give a fudgy frosting. This time I wanted a flowing glaze, but it was too thick to cooperate! 

The revised recipe for the cake is written out in full in this post here on my blog, so there's no need to repeat it here. I will add that I now prepare bundt tins with a homemade lining paste, following Nancy Birtwhistle's recipe, which you can find in this recipe on her website. Once made, the paste (equal quantities of oil, flour and Trex cooking fat) keeps for many months in the fridge, in an airtight jar, and just needs bringing up to room temperature before use. I've used it for a few years now and it's never failed - the cakes have always released from the bundt tin perfectly.

Sunday, 25 April 2021

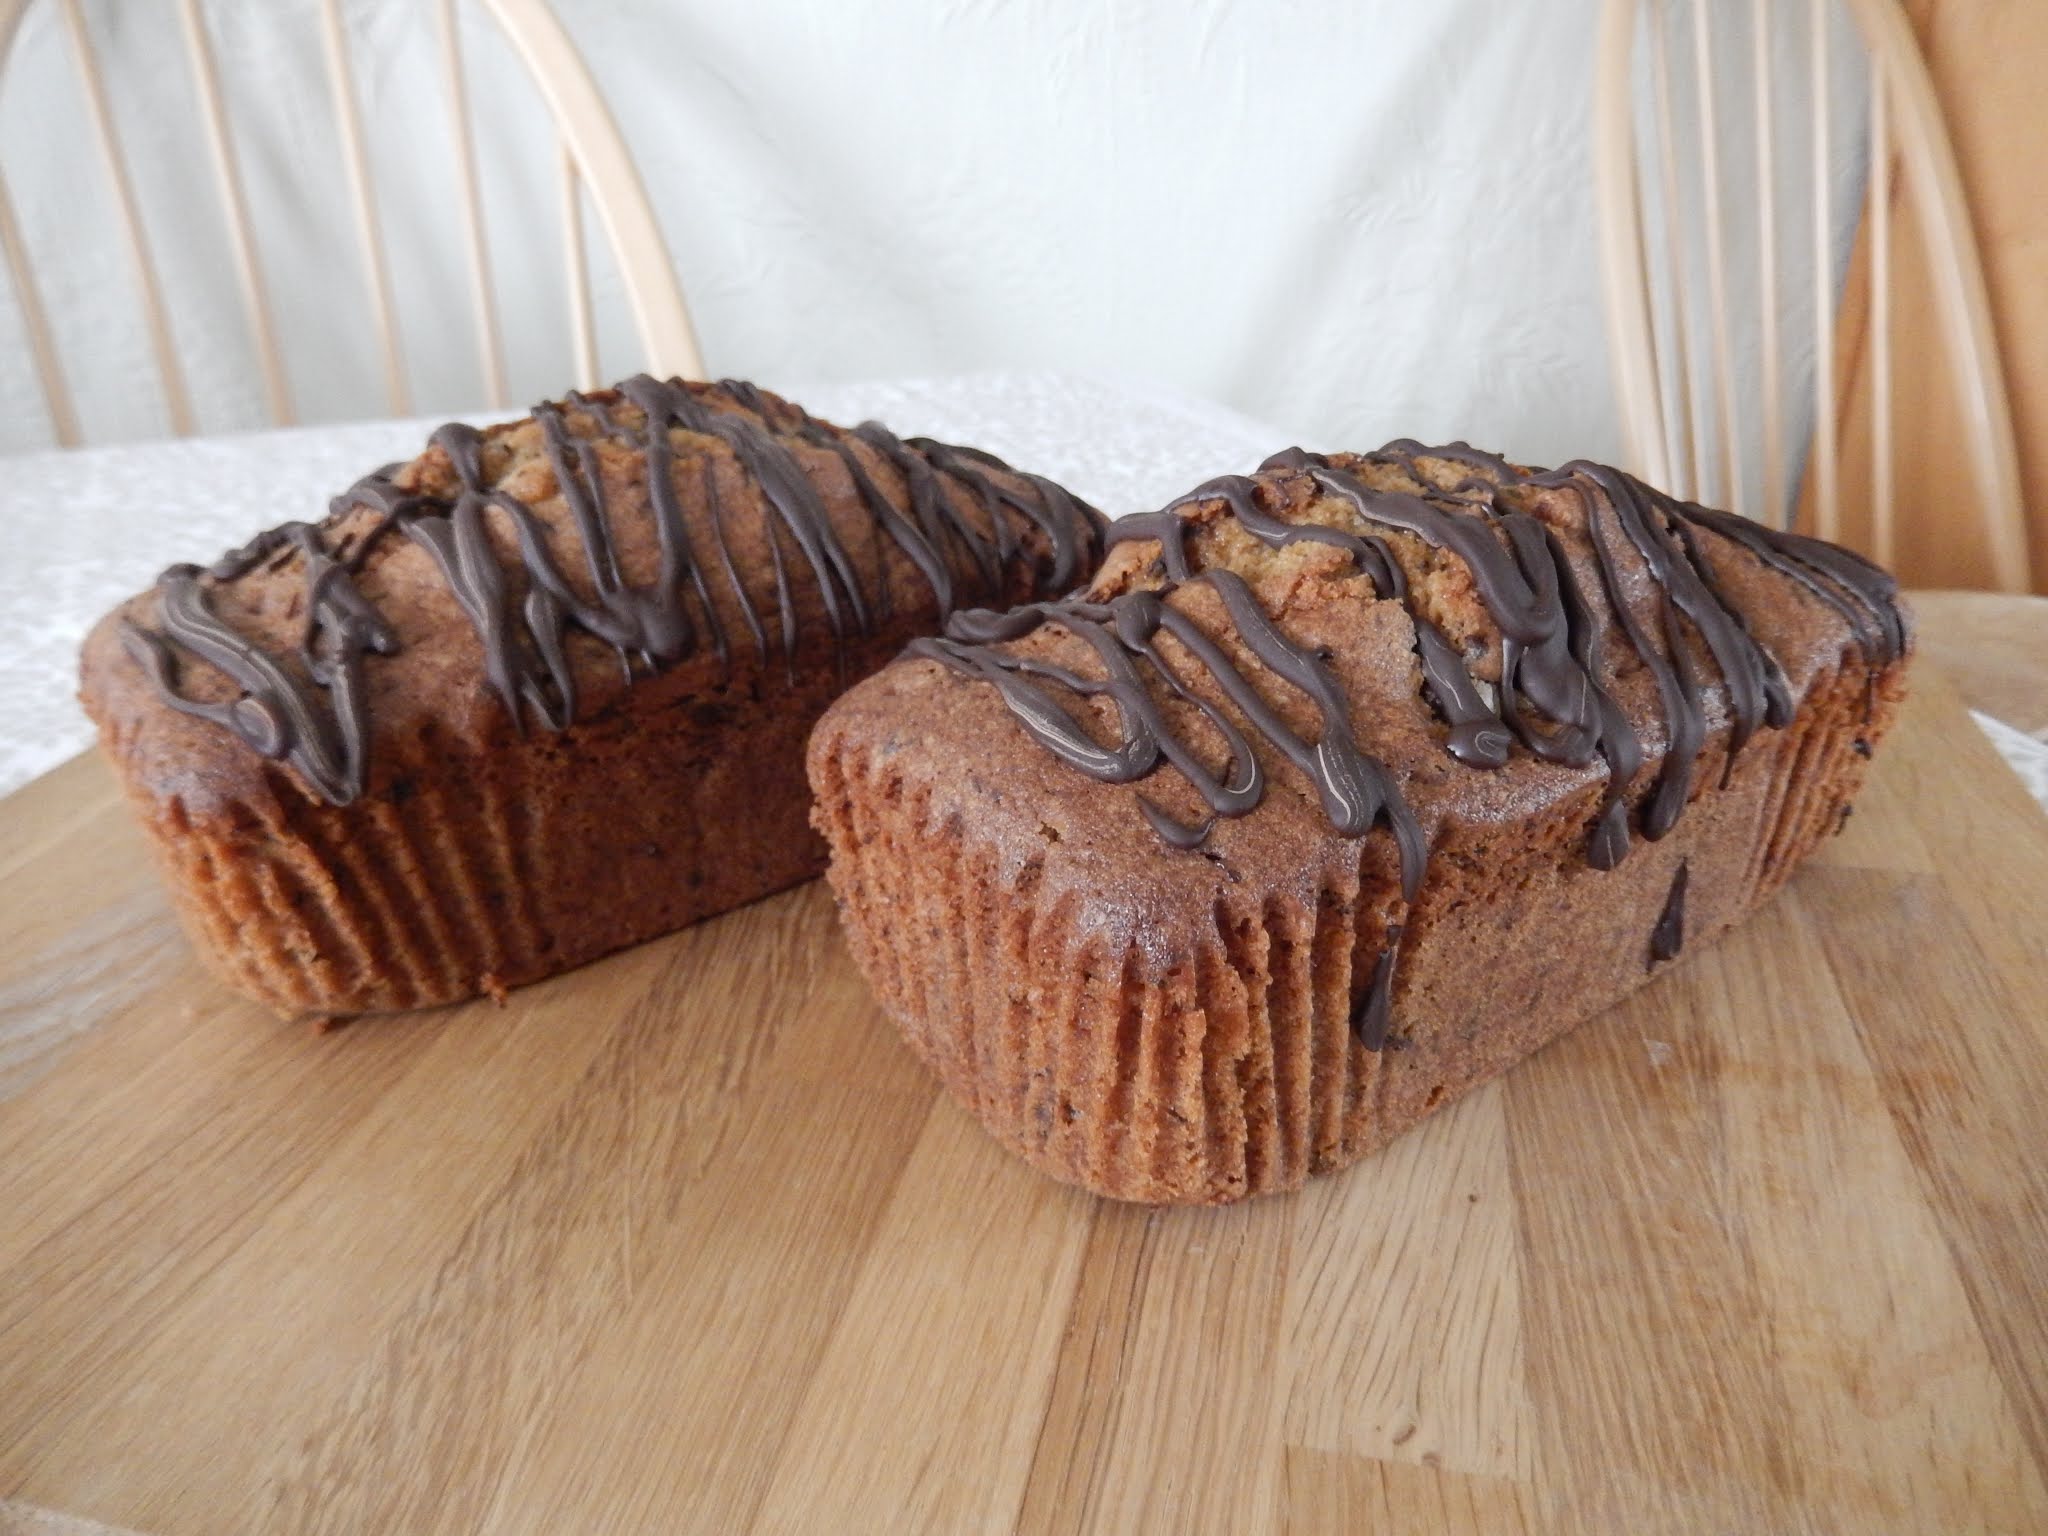
Biscoff Spread and Chocolate Chip Loaves

My second Easter bake, for my son, who would rather eat chocolate than dried fruit, was a variation on this recipe from The Baking Explorer. At the end stage of making the batter, I stirred in 150g of chopped plain (70%) chocolate.

In order to share the cake with him, I decided to bake it in two 1lb loaf tins, and guesstimated that this would reduce the cooking time by 15 minutes, which turned out to be correct!

As I would be wrapping the cake to take it to him, adding a buttercream topping didn't seem a good idea, so I just dribbled some more melted chocolate over the cooled cakes.

As usual, I was disappointed that the Biscoff flavour wasn't stronger, but even though I anticipated this, I decided not to add any extra spices to the cake, as I didn't want the flavour to fight with the chocolate. In the end it was a good balance  between the very subtle spices and chocolate. A little vanilla extract might have been an improvement!

Wednesday, 23 December 2020

The Triennial Chocolate, Fig and Ginger Panforte

For some reason, I have made this Panforte, for Christmas, at three year intervals - 2014, 2017 and again this year. Perhaps it's going to be a tradition!


Panforte is a particularly suitable Christmas treat this year, when, if we are meeting friends and family at all, it's on a very restricted schedule with regards to both numbers and time. It keeps for weeks after making, so however few of you there are to eat it, you'll get through it without any waste. 

This year, this panforte will almost be all mine! Apart from a brief visit from both my children on Christmas Day for an exchange of presents and a meal together, the Covid restrictions mean, like many others, I'll be alone most of the time. That doesn't bother me - all I need is a good book to keep me happy, and it will only be a few days before we're all back into the routines of our lives. For me that can be quite hectic, as I volunteer at the local Food Bank, which has been very busy since the start of the pandemic.

I followed my original recipe from 2014, which was a compilation of several other recipes, in a quest for perfection. I could vary the flavours by changing the fruit, or leaving out the ginger, but this particular combination of chocolate, figs and ginger, together with the spices and hint of orange, works so well that I'm reluctant to make changes.

Here's wishing you the best 

for this Festive Season, 

with hopes that 2021 

will be better for all of us!

Monday, 21 September 2020

Salted Caramel Brownies

 My children and I made good use of the unexpectedly good weather in the middle of the month, and had tea and cakes together in my garden. It was the day before the guidelines changed to the 'Rule of Six', after which we could have mingled our three households indoors, but we'd made the arrangement with the good weather in mind, so didn't change it. It makes Covid hygiene and cleaning simpler if no-one comes into the house too.


I made these salted caramel brownies, using a tin of caramelised condensed milk and a pinch or two of sea-salt crystals - some directly on the caramel layer, then just a little more sprinkled sparsely over the top. They weren't as successful as the original recipe, as the caramel didn't stay oozingly soft after baking, but they were still very good.

Saturday, 1 August 2020

'Bounty Bar' Shortbread Squares

Yet another version of one of my favourite recipes! 

We've been trying to carry on our local Cake Club online, and although it's nice to see what other people have been baking, it's not the same as meeting up and tasting each others' offerings!

This time the theme (or perhaps that should be 'challenge') was to use a maximum of 5 ingredients. As no-one else would be sharing my bake, I wanted to make something that would either keep well, or that I could freeze in portions. As I have a designated 'cake drawer' in the freezer, and it was rather full at the time, I decided to make something that would keep well enough for me to eat over several days.

These layered shortbread squares were the obvious choice - I really like them, they are quick to make and the filling seems to be infinitely variable. I've made them with jam, purée made from reconstituted dried fruit, mincemeat, chocolate spread and caramel. The only thing I've yet to try is fresh fruit compote, which I fear may be too wet.

This time, I could only add 1 ingredient to the 4 which make up the shortbread - flour, semolina, sugar and butter. 

I decided to take a leaf out of my '4-Ingredient Cookbook', which is occasionally somewhat elastic when it comes to defining an ingredient. Marzipan, for example, is one ingredient, even though you need at least three ingredients to make it, and a cup of mixed fresh herbs only counts as 1 ingredient too!

I decided to use chopped Bounty Bars as the filling layer,  to give the flavour of both coconut and chocolate! The idea worked really well, although if I make them again, I'd add 100g more chocolate, or get hold of some dark chocolate Bounty Bars, to maximise the chocolate flavour.

Ingredients
170g SR flour
170g semolina
170g butter
85g caster sugar
200g Bounty Bars - 8 treat sized bars - finely chopped

Method
Pre-heat the oven to 190C/170C fan, and lie a 20cm square shallow baking tin with parchment.
Place the flour and semolina in a large bowl. Warm the butter and sugar together in a small pan, just until the butter has melted and sugar dissolved. Pour this onto the flour mix and stir well until evenly combined.
Put 2/3 of the shortbread dough into the baking tin, spread evenly and press down firmly.
Sprinkle the chopped Bounty Bars evenly over the dough.
Crumble the rest of the shortbread mixture evenly over the surface and pat down lightly - it won't give complete coverage but will spread while baking.
Bake for 25 minutes, until surface is golden brown. Leave to rest for only 3-5 minutes, then cut into squares or bars. Do not remove from the tin until completely cold, or the bars will crumble.

Tuesday, 21 July 2020

Spiced Chocolate Bundt Cake

I last made this cake, from Sainsbury's website at the end of 2014, as a pre-Christmas treat. This time I made it for a birthday tea for myself and my two children, held in the garden to comply with Covid-19 guidelines. Both my son and I have July birthdays, close together, so usually share a cake. The three of us enjoyed the cake, and the warm sunny afternoon - until the flying ants came out! 

As before, I didn't top with the ganache from the recipe, but with Mary Berry's fudgy chocolate frosting. You can see the details here - nothing has changed. The cake was a little crumblier than I remembered, but that might have been because not all of my eggs were large. The flavour was still very good.


Friday, 27 March 2020

Chocolate Chip and Orange Loaves

I baked two loaves to take one to each of my children, just before the Covid-19 lockdown measures became more stringent. At the time the food panic buying was at it's height and the supermarket shelves were empty of almost all baking ingredients, so I was relying on my store cupboard.


I wasn't sure when supplies would get back to normal so although I would usually use 4 eggs in this amount of cake batter, I decided to cut down to 3 and use the juice of the orange that I was zesting, in place of the 4th egg. That way none of the orange was left over either.

Ingredients
200g caster sugar
200g butter, softened
3 large eggs
250g SR flour
zest and juice of 1 orange
100 - 150g chocolate chips (I used about 30g milk chocolate chips and 100g of chopped plain chocolate)

Method
Preheat the oven to 180C (160C, fan) and line 2 x 450g (1lb) loaf tins (I use the pre-formed liners for loaves).
This cake is made by the all-in-one method, so put everything, except the orange juice and chocolate, into a bowl and beat with a hand-held mixer until smooth, adding enough orange juice to give a dropping consistency. (I needed all the juice from the small orange I was using, but if more liquid is needed a little milk or water can be used too.)
Use a large spoon to fold in the chocolate, then divide the batter equally between the two tins and level the surface.
Bake for 60 minutes, or until a test probe comes out clean.
Cool in tin for about 10 minutes, then move to a wire rack.


I didn't get to see the insides of these cakes, or to taste them to see if the lack of egg was detrimental to the texture, but there were no complaints from the recipients. I asked my daughter if the cake was dry and she said that it wasn't, so I'm pleased about that.

Unfortunately I didn't get any good photos either, although you can see the bulging top!

Saturday, 28 December 2019

Festive Desserts

I made two desserts for the Christmas period, as something chocolate is obligatory, but my daughter had also asked for a repeat of Dan Lepard's Mont Blanc Layer Cake.

The Mont Blanc Layer Cake recipe, based on meringue, is far too big for just three of us, particularly as it doesn't keep well, so I made a meringue roulade with only 3 egg whites, filled it with a half quantity of the chestnut and ricotta cream and drizzled melted chocolate over the top.

We decided, on trying the dessert, that although it was delicious, we all preferred the crisper meringue of the original recipe, which gives a better textural contrast with the chestnut cream than the soft meringue of the roulade.

For  the chocolate dessert, I made a half-sized quantity of Delia Smith's Chocolate Truffle Torte, which fitted nicely into a 7" (18cm) shallow cake tin. The only departure from the recipe was to use Amaretto liqueur instead of rum.

My daughter also contributed a batch of mince pies, which has become a tradition now. She uses this Mary Berry recipe, which adds dried apricots to the mincemeat and tops the tarts with grated marzipan.

Saturday, 2 November 2019

Cherry Cheesecake Brownies

I've made these Cherry Cheesecake Brownies once before; an attempt which was delicious, but not altogether successful, because the cherry jam sank through the (reduced fat) brownie batter, and ended up in pools on the liner of the baking tin.

This time I went back to my favourite brownie recipe, made with butter. It's the one I've been using for more than 20 years, with a small reduction in sugar being the only modification I've made to the recipe in that time.

This time the recipe worked perfectly! The swirls of tart cherry jam balanced the sweetness of the cheesecake and both were a good contrast to the dense, chewy brownie.

Which makes it all the more annoying that I didn't get any photographs before some of the brownies were eaten, and the rest distributed between my children, for them to take home after dinner. I was left with this one portion for myself - a remarkable feat of restraint on my part!

Ingredients
Brownies: 140g butter
140g plain chocolate - about 70% cocoa solids
300g light muscovado sugar
1 teaspoon vanilla extract
3 large eggs
160g plain flour
3 tablespoons cocoa
Cheesecake: 180g full fat cream cheese
50g caster sugar
1 large egg
1/2 teaspoon vanilla extract
Plus: 125g cherry jam

Method
Line a 20cm(8") square baking tin with baking parchment. Pre-heat oven to 180C/160C fan.

To make the brownie batter: Melt together the butter and chocolate in a large bowl, over a pan of simmering water. Cool to around 40C if necessary (so that the eggs don't start to cook) then mix in the sugar and vanilla extract, followed by the eggs, one at a time. Finally sift in the flour and cocoa, and fold in until thoroughly mixed. Put 3/4 of this batter into the baking tin, reserving the rest for the swirls in the topping.

For the topping: Beat together the cream cheese, caster sugar, vanilla extract and egg until smooth. It will be quite runny. Pour this over the brownie layer in the baking tin. Dot the cherry jam over the surface, about a teaspoon at a time, then do the same with the reserved brownie batter, putting the blobs between the areas of jam. Use the handle of a teaspoon, or something like a chopstick, to swirl the jam and brownie batter blobs into the cheesecake mixture - you get a better pattern if you swirl deep enough to get into the lower brownie layer just a bit.

Bake for 40 minutes until just firm, then cool in the pan before cutting into the desired sizes. I cut into 16 squares, but less greedy people might prefer smaller bars.

Tuesday, 23 July 2019

Chocolate Chip Loaf Cake, with Hazelnuts, Raspberries and Lime

Although chocolate, raspberries, hazelnuts and lime sounded a very tasty combination of ingredients, this was a case where the sum total was less than its parts. I think the problem was that none of the ingredients stood out, so that, although these were pleasant cakes, overall the flavour was too non-descript. This could probably be easily remedied by more lime zest, more raspberries, a chocolate with more cocoa solids, or some chopped hazelnuts as well as the ground nuts, depending on which added ingredient you wanted to accentuate.

It was a double disappointment as these two cakes were to mark my and my son's birthdays in the middle of July, and I would have liked to make something a bit more memorable.

I made a double batch of what has become my 'go to' recipe for small loaf cakes, and divided it between two tins. This time, instead of chopping a bar of chocolate I bought dark chocolate chips as I thought the regularity would look better - perhaps it did, but I think the flavour would have been better with a bar of chocolate, as I usually use one with higher cocoa solids than in the bought chips.

Ingredients
220g caster sugar
220g softened butter
4 eggs
230g SR flour
50g ground hazelnuts
zest of 2 limes (reserve juice for icing)
10g dried raspberry pieces
100g dark chocolate chips
a little milk if necessary

Topping -  50g icing sugar, lime juice

Method
Put all the cake ingredients except the raspberry pieces and chocolate chips into a large bowl and beat until smooth and fluffy, adding a little milk if necessary to give a dropping consistency. Fold in the raspberries and chocolate. Divide the mixture between two small (1lb) loaf tins, lined with parchment or a pre-formed liner, and bake at 180C (160C fan) for about 60 minutes, or until a test probe comes out clean and dry.

When cool, make the icing by sifting the sugar and adding the lime juice a teaspoon at a time to give a thick, just-pourable consistency. I find it easiest to drizzle this over a cake by putting the icing into a small freezer bag, and snipping off one corner.

When the first slice was cut from the cake I thought the chocolate chips had sunk, but this was just the bad luck of random distribution - I took this photo of a slice further into the cake, just to prove they hadn't!

Saturday, 5 January 2019

Salted Caramel Brownies

My second festive bake, aiming to be more versatile. These are great warm, with cream or ice cream, as a dessert, but are also good for coffee breaks and tea times. I was lucky in my choice of salted caramel sauce -  from Sainsbury's Taste the Difference range - as it stayed soft and gooey after baking, even when the brownies were cold. It added an extra touch of decadence to have the caramel oozing out!

I used my usual recipe for the brownies - Melt 140g butter and 140g of 70% plain chocolate together. This can be done in a microwave, but I prefer to do it in a large bowl, over a pan of simmering water. Allow to cool a little if necessary, as you don't want to scramble the eggs, then add 300g light muscovado sugar, and a teaspoon of vanilla extract to the bowl, stirring until the sugar has dissolved. Next, add 3 large eggs, one at a time, beating each one in to give a smooth batter. Sift 160g plain flour and 3 tablespoons of cocoa into the bowl and fold in.

Set aside about 3 tablespoons of the batter, and transfer the rest to a 20cm square shallow tin, lined with baking parchment. Warm 250g salted caramel sauce, if necessary, so that it flows easily, and spread it over the surface of the batter. Dot the reserved batter, a teaspoon at a time, over the caramel then swirl the caramel and brownie mixture together, without going too deeply into the batter.

Bake at 180C for 40 minutes. It's difficult to do a skewer test as the caramel stays liquid and becomes very hot and bubbly, but as the brownies cool, everything settles down. When the brownies are cold, cut into bars or squares. I usually cut into 16 squares.

Wednesday, 19 December 2018

Brownies with Almond and Orange Chocolate Chips

After deciding to make brownies, I realised I didn't have enough butter, so went back to the oil-based recipe I used to use frequently when my son was on a low saturated fat diet. It's not as rich as a butter-based recipe, but it's not bad at all. I added 100g of  dark chocolate with orange and almond pieces to give more interest to both the flavour and texture.

The recipe is based on this one, from Cookie Madness, although I make it half as big again to make deeper brownies, and use sunflower oil rather than olive oil, as well as changing the add-ins. I have tried olive oil, and although it adds an interesting dimension, it's not a flavour I want every time I bake them, so I find a more neutral oil is better on most occasions.

Ingredients
150g plain chocolate (about 70% cocoa solids)
120mls sunflower oil
3 large eggs
130g caster sugar
100g dark muscovado sugar
1 teaspoon vanilla extract
105g plain flour
100g chopped chocolate of choice (I used a dark chocolate with almond pieces and orange flavour)

Method
Pre-heat the oven to 180C and line a 20cm square baking tin with parchment.
Melt the chocolate in a bowl over simmering water, then remove from the heat and whisk in the oil.
In a large bowl, whisk the eggs, sugars and vanilla for 5 minutes, then fold in the chocolate and oil mixture.
Sift the flour over the batter, and fold in, followed by the chopped chocolate.
Transfer the batter to the baking tin, then bake for 25 minutes.
Cool in the tin, then cut into squares or bars.

Friday, 23 November 2018

Cookie Bars

I've been really busy lately, helping my son clean and redecorate his new flat before he moved in. I made these cookie bars in a quiet moment - probably waiting for paint to dry before I could do anything else. I found this recipe, which originally came from Fig Jam and Lime Cordial blog, a while back, and it's really useful for cookies in a hurry.

Because I didn't want to add to my store cupboard of cooking ingredients, I bought a 120g pack of ready-mixed 'add-in' morsels marketed by Whitworth's. It was a mix of 35%  cranberries infused with cherry juice, 25% dark chocolate, 20% cherry infused apple and 20% raisins, called Dark Choc Cherry mix 'n' bake. I added 30g chopped roasted hazelnuts to add a bit more flavour and crunch. I used these in place of the chocolate and the orange zest in the recipe.

Although it was quick and easy to use a pre-packed mix of chocolate and fruit, infusing cranberries and apple pieces with cherry juice didn't give the same intense flavour that using dried cherries would have done, and there wasn't really enough chocolate in the cookie bars to satisfy a chocoholic! Not a bad idea for a speedy bake, though, particularly if you don't want to accumulate lots of opened bags of dried fruit and nuts.

Tuesday, 13 November 2018

Chocolate Peanut Buddy Bars

It's over eight years since I last wrote about these Chocolate Peanut Buddy Bars, but I can't believe that I haven't made them in the intervening period. It's possible, of course - daughter has a peanut allergy, so I wouldn't have baked them while she was living here, and I cut down on the amount of baking I've been doing when my son first moved out in 2012.

Either way, they popped into my mind again when trying to decide what to make for the weekend. I wanted something that would get me through the start of the week too, when I don't have time to bake. These seemed ideal as the 30 x 20cm traybake cuts into around 24 pieces. I use a baking tin that is slightly smaller than specified in the American recipe (8 x 12" instead of 9 x 13") as that's the size of tray I have; I think standard sizes are slightly different in the USA. I added another 5 minutes to the baking time to compensate for a deeper mixture.

The only other change I make to the recipe is to use plain chocolate - about 70% - as it does cut through the sweetness of the cookie bars and gives a stronger chocolate flavour. In this blog post I've 'translated' the cup volumes to metric weights, with 150g of chocolate going into the bars, and 200g being used for the topping.

Unfortunately, I must have covered the bars before they were completely cold - when I went back the next morning to photograph them, the top was covered with little pock marks, which I can only assume was condensation dripping from the aluminium foil covering the tray overnight. It didn't affect the flavour, but did spoil the photos a bit.

Friday, 2 November 2018

Almond and Orange Cake, with Chocolate Chips

At the moment, I'm baking more frequently; my son is staying with me for a few weeks, as he had to sell his flat before he could complete on his new purchase, so that he didn't lose his buyer. He could eat cake several times a day, and not have to worry about putting on weight.

This recipe is based on the proportions of a Madeira Cake - more flour than butter and sugar - which makes a sturdier but more satisfying cake, which keeps well. I added ground almonds for moistness, and a little almond extract to make sure there was a good almond flavour. Classic flavours which work well together!

Ingredients
175g softened butter
175g caster sugar
3 large eggs
a few drops of almond extract
finely grated zest of 1 large orange
200g SR flour
50g ground almonds
a little milk, if necessary
100g dark chocolate chips or 70% cocoa solids chocolate, roughly chopped*
a sprinkling of flaked almonds for topping, optional

* I prefer to chop a bar of chocolate as I like the mix of large and small pieces of chocolate, plus the tiny speckles which splinter off, in this type of cake

Method
Preheat the oven to 170C, and prepare a 20cm(8") round deep cake tin. I use non-stick springform tins with a parchment base liner.
Cream together the butter and sugar until light and fluffy.
Add the eggs, one at a time, with a spoonful of the weighed amount of flour. Beat in on a slower speed, if you are using a hand-held mixer.
Fold in the flour, almonds, almond extract and orange zest, adding a little milk, if needed, to give a soft dropping consistency. Finally, fold in the chocolate.
Transfer the batter to the prepared tin, level the top, and sprinkle over the flaked almonds, if using.
Bake for about 60-70 minutes, or until a test probe comes out clean and dry.
Cool for 15 minutes in the tin, then transfer to a wire rack to complete the cooling.

This cake would be easy to remove from the base of the cake tin, as it's quite sturdy. I just leave it on the base for convenience - it makes it easy to move in and out of the storage container.

Thursday, 18 October 2018

Brownies with Caramel Flavoured Biscuit 'Nibbles'


I admit it - I only bought McVitie's 'Caramel Flavoured' Digestive Nibbles to make this batch of brownies more interesting for my blog post. I was scanning the biscuit and confectionery shelves in the supermarket, thinking that adding Oreos or Maltesers was no longer original enough, when I noticed Nibbles - little chocolate covered balls of biscuit a little smaller than Maltesers. This Caramel flavoured version also had a layer of caramel cream between the biscuit and the chocolate coating.

After tasting a few (for quality control purposes only, of course!), I just added the rest of the pack of biscuit pieces (around 110g) to my favourite brownie recipe:

For a 20cm (8") square tin: Melt 140g of butter and 140g of dark chocolate together in a large bowl, over a pan of simmering water. Allow to cool if necessary, so that you can add the eggs without cooking them. Add 300g light muscovado sugar, and stir until the sugar has dissolved. Next, add three eggs, one at a time, and beat in to give a smooth batter. Sift 160g plain flour and 3 tablespoons of cocoa into the bowl, and fold in, followed by the biscuit pieces. Transfer to the parchment-lined baking tin, level the surface, and bake at 180C for around 30 minutes. Cool in the tin, then cut into fingers or squares, whatever size you like.

What surprised, and pleased, me was that the two layers of coating around each little ball of biscuit kept their integrity during baking, so that you could both see and taste that the caramel flavour was part of the biscuit pieces, and not in the brownie mixture.  When I realised each 'Nibble' had the caramel flavour in a coating, I had expected it to melt away during baking, and just give a mild caramel flavour to the whole traybake.

I was also happy that the biscuits kept their crunch for the three days that the brownies lasted; I expect this was also down to the coatings not melting away, thus protecting the biscuit pieces from the moister cake surrounding them. The caramel flavour was quite mild, but noticeable, and when combined with the crunch of biscuit, certainly elevated this batch of brownies from basic to interesting.

Friday, 5 October 2018

Chocolate Spice Gingerbread

This is a really light gingerbread cake, flavoured with Green and Black's Maya Gold Chocolate, which contains spices, orange and vanilla. More spices and chopped prunes are added, along with more dark chocolate to increase the depth of the chocolate flavour.

Even though other spices are added, the unique taste of Maya Gold is still the predominant flavour. I have tried this recipe with orange zest and extra spice, instead of Maya Gold, and although it's still very good, it's not the same!

I made two of these delicious cakes, one to keep and one to donate to a Macmillan Coffee Morning event. Fortuitously the recipe used half a pack of prunes, half a bar of Maya Gold chocolate, and just a tad over half a pot of buttermilk (I just added a tablespoon of natural yogurt to the second cake to give the right volume) so it was good to make the second cake instead of having leftovers to worry about, particularly as Maya Gold chocolate isn't one of my favourite 'eating' chocolates.

Personally, I prefer a heavier, denser gingerbread (the sort which grows a sticky top over time), but as an amalgamation between gingerbread and chocolate cake, this particular recipe is hard to beat.

Tuesday, 21 August 2018

Chocolate Hazelnut Tart

- for the final We Should Cocoa

We Should Cocoa, a monthly link-up for chocolate recipes started 8 years ago, when Tin & Thyme was still Chocolate Log Blog, and Choclette shared her hosting duties with Chele at Chocolate Teapot. Amazingly, I have been participating since the first link-up, although not very regularly recently. According to my records, I've contributed to 65 out of a possible 95 events. This month will be the 96th We Should Cocoa - and Choclette has decided to call a halt.

For many years the link-up had a theme, so I decided to check on the first, in August 2010. It turned out to be raspberries. I made Chocolate Frangipane Tartlettes with chocolate pastry and raspberry jam in the base - a kind of chocolate bakewell tart. At the same time, I made some similar tartlettes, with Nutella in the base, which we preferred. I thought it would be a fitting end to these events to base my entry on the first thing I made, so decided to go with a tart with Nutella in the base and a hazelnut frangipane on top. I also added more chocolate to the filling, so that the final tart had both the chocolate and hazelnut flavours of the Nutella ramped up.

Ingredients
Pastry
150g plain flour
100g butter
25g icing sugar
25g cocoa
1 egg yolk
cold water to mix

Filling
110g softened butter
110g caster sugar
1 egg + 1 egg white
1 tablespoon plain flour
110g ground hazelnuts
150g chocolate hazelnut spread
25g plain chocolate (I used 100% cacao) grated*

to finish - 40g plain chocolate (about 70%)

* 100% cacao is very hard, and when grated on a fine microplane grater, 25g goes a long way. If you are using  70% plain chocolate, or a coarse grater, you might need as much as 50g to get enough grated chocolate to cover the base.


Method
Make the pastry by sifting the icing sugar and cocoa into the flour, then rub in the butter until the mixture resembles breadcrumbs. Add the egg yolk and enough cold water to make a soft but not sticky dough, kneading briefly. Shape the dough into a disc, wrap in clingfilm and refrigerate for 15 minutes. Roll out the dough thinly and  line a 20cm (8") tart tin. Refrigerate again while you make the filling.
Pre-heat the oven to 200C. Put a baking sheet into the oven while it is heating.
Cream the butter and caster sugar until light and fluffy, then slowly beat in the egg, egg white and flour. Fold in the ground hazelnuts.
Warm the chocolate spread slightly (just a few seconds in the microwave, or in a bowl over hot water) and spread over the base of the pastry case, then sprinkle over the grated chocolate. Spoon the hazelnut frangipane filling into the pastry case and spread evenly.
Put the tart onto the preheated baking sheet and bake for 10 minutes, then lower the heat to 180C and bake for a further 25 minutes until the frangipane is set and golden in colour. Cool in the tin.
Finish the tart by melting the 40g of plain chocolate and drizzling it over the cool tart - I put the chocolate into a small plastic bag, then put that into a mug of hot water (seal the bag first, of course). When the chocolate has melted, snip off one corner of the bag to allow the chocolate to dribble out.

This tart was delicious! The extra dark chocolate in the base cut through the sweetness of the chocolate hazelnut spread, and the hazelnut flavour of the frangipane came through strongly. The only thing wrong was that the frangipane appeared to have separated a little as it cooked, leaving a pale set custard-y layer at the bottom. Although this didn't affect the flavour, it did affect the appearance; I have no idea what went wrong.

So, it's the end of an era! I'm sending this recipe to the very last We Should Cocoa link-up. Although I don't bake as much now as I did 8 years ago, I can thank WSC for stretching both my skills and my imagination. Over the years I've used ingredients that I would never have thought to pair with chocolate (some more successfully than others, I must admit) and tackled more complex recipes than I would usually handle. I believe Chocolette intends to keep the WSC archive, and has a Pinterest board, so we can still look there for inspiration.

Thank you for 8 years of fun, Choclette!


Tuesday, 17 July 2018

Chocolate Tart - free from gluten and lactose

I've used this recipe before, when I needed a gluten- and lactose-free chocolate tart. I really liked it the first time I made it, and didn't want to play around finding a different recipe, as we were are in the middle of a heat-wave and having too much cake/dessert around isn't good for me at all, especially with no-one to help me eat it!

I find gluten- and dairy-free pastry shrinks more than usual when baked blind, but the recipe I use makes a sweet shortcrust pastry case which doesn't stick to the baking tin, doesn't seem to suffer from soggy bottoms and has a good 'short' texture which doesn't become too hard, which seems a good trade-off to me. The dough starts out stickier, and needs careful handling - you can find the details here. Instead of adding the tart filling to a raw pastry case, as in that particular recipe, the pastry case is baked blind once the clingfilm is removed.

When baking blind, the only thing I do differently, compared to regular shortcrust pastry, is to dry out the pastry case for a little longer than usual, at a lower temperature. I initially bake the case, lined with baking parchment and filled with baking beans, at 200C for about 12-15 minutes, then turn the oven down to 160C, remove the parchment and beans and return the empty pastry case to the oven for about 20 minutes.

The filling for this tart is dense and fudgy, but as you don't add much extra sugar, it allows the flavour of the chocolate to dominate, so you need to choose a chocolate that you are happy  to eat on its own. The addition of the coffee is to further bring out the chocolate flavour, but I can't see any reason why other flavours couldn't be used too, such as orange zest. And, of course, if you don't need dairy/lactose-free, make it with butter and regular double cream.

As you can see, I served this tart with raspberries and there was also raspberry coulis and cream available.