Monday, 17 April 2017

Golden Simnel Cake

My family's festive celebrations have never included traditional fruit cakes - we're more of a mini chocolate appreciation society -  so I was surprised when my daughter asked me to make a Simnel Cake for Easter this year. I'm not averse to traditional recipes but I still wanted to put a spin on this cake to make it more personal, so I decided to make a golden fruit cake.

After looking at several recipes, I thought that Felicity Cloake's recipe from her 'How to Cook the Perfect.....' series in The Guardian would be the best one to adapt to what I wanted. I particularly liked the idea of adding saffron to help the golden colour of the cake I was planning.

I used the same quantities of all ingredients, although I used caster sugar instead of light brown sugar, to keep the crumb colour as pale as possible. Instead of using 400g of the fruit Felicity suggested (sultanas, currants and glacé cherries) I used 115g of each of sultanas, golden raisins and chopped apricots and 55g chopped dried peaches. I left the mixed peel in the recipe but took out the chopped almonds, as my daughter doesn't always like chewing on pieces of nuts, even though she loves the flavour of almonds. I used shop-bought white marzipan instead of yellow - just a personal preference!

It's a pity I didn't cross reference Felicity's decision making processes with the sources she used, or I would have discovered that her oven temperature was for a fan setting, not a conventional oven - after 2 hours at the quoted temperature the cake batter was still raw. It took another hour with the oven turned up another 20C for the cake to cook. Anyone with any experience of fruit cakes would have noticed the error straight away, but I've hardly ever made a rich fruit cake, even in 40 + years of cooking!

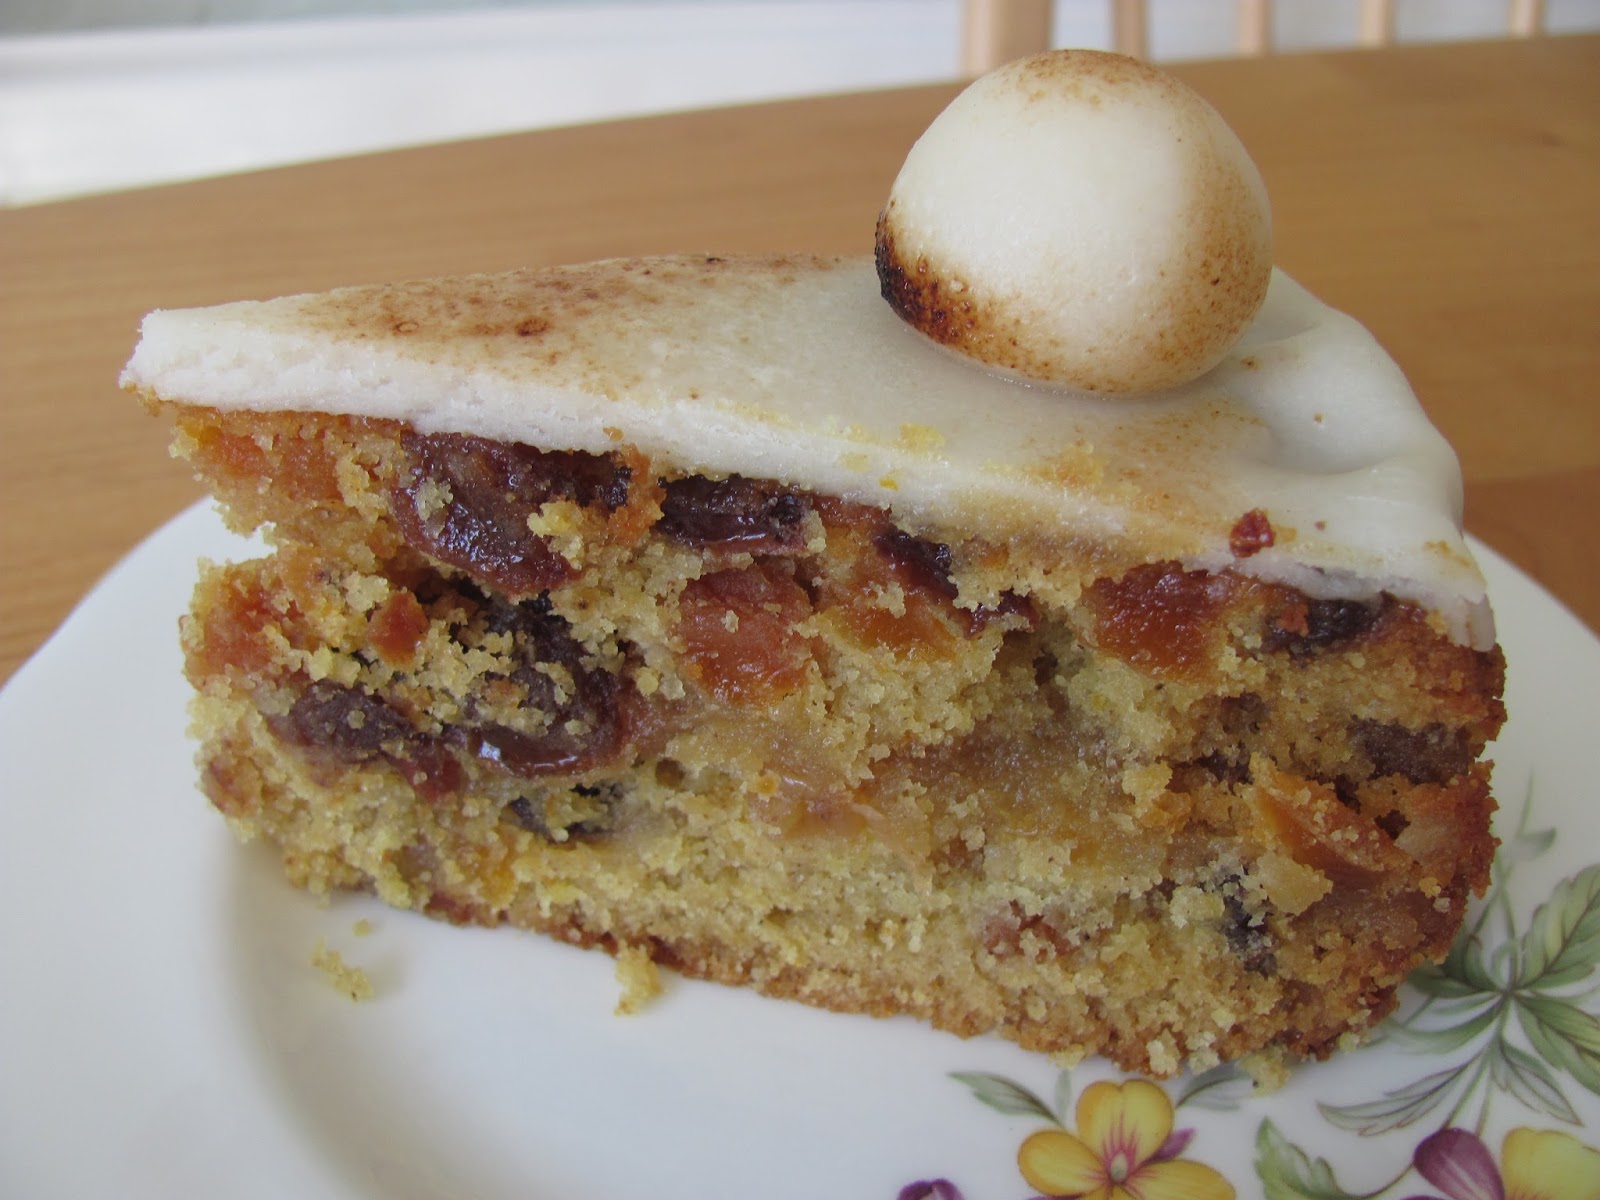
I was quite impressed with the look of the finished cake, although if I ever make another I will use more marzipan so that I can put thicker layers inside and on the top. The size of the 11 decorative balls, at 15g each, was about right, however. When cut, the colour of the crumb was just right for a golden cake.

I liked the flavour of the cake - a delicious subtle balance between spice and citrus, with all the fruits working in harmony, so that none stood out more than others. The soft inner layer of melted marzipan added a note of bitter almonds to the cake, although it hadn't stayed level in the cake, possibly a result of the error in cooking temperature.

There were other faults too, which might have been caused by the same error - the fruit wasn't evenly distributed in each layer, and although the cake was really moist, it was also crumbly and didn't cut cleanly. However, these faults were outweighed by the lovely flavour; all it really meant was that it was difficult to get a good photograph. I will have to try the recipe again, and cook it properly next time!


Thursday, 13 April 2017

Rhubarb, Marzipan and Citrus Cake

I've been harvesting our homegrown rhubarb since the middle of March, and this traybake recipe is perfect for the beginning of the season when there are some thin stalks to pick. If you can only get thick sticks, then I suggest you cut them into fairly thin slices, both to distribute the rhubarb evenly through the cake, and make sure it cooks properly.

I picked this Rhubarb, Marzipan and Citrus Cake recipe because I wanted something portable to take to my daughter, who was cooking a Mother's Day dinner, and also because I know she loves marzipan.

I followed the recipe exactly, although I used the zest from the whole lemon and orange, as I didn't see the point of leaving half grated fruit - this turned out to be a good move, as the citrus flavour wasn't very pronounced, even with the extra zest. I also used fine cornmeal rather than polenta, as I can only get the quick-cook sort which is relatively coarse.

What the recipe doesn't mention is that initially the cake batter seems too stiff, and although it does slacken a little when the fruit is added, it never gets to the 'dropping' stage. Resist the temptation to add more liquid -  more juices will be released from the fruit during baking.

We all loved this dessert - there were subtle citrus notes amongst the tang of the rhubarb, and the marzipan gave concentrated pockets of the sort of almond flavour you don't get from ground almonds alone. My husband reckoned it would come a close second to rhubarb crumble in his 'favourites' list!

Friday, 7 April 2017

Salted Caramel and Chocolate Fudge Squares

I found myself with half a tin of caramelised condensed milk, and no idea what to make with it. One thing that kept coming up, however inventively I worded my internet searches, was Millionaires' Shortbread, and similar bakes. The problem with many ready-made caramel products is that they often aren't thick enough to work really well in things like Millionaires Shortbread - I hate cutting into something only to see the caramel squidge out all over the plate.

However, the recipes made me wonder if mixing the caramel with melted chocolate would mean that it set more solidly after baking, and decided that it couldn't hurt to try. I then decided to pair the chocolate-caramel mixture with my favourite, really easy, shortbread recipe - from Sue Lawrence's 'On Baking' - and ended up with the components of a Millionaires' Shortbread with much less work. I also added some salt flakes and some hazelnuts for extra flavour.

Ingredients
170g unsalted butter
85g caster sugar
170g SR flour
170g semolina
60g coarsely chopped hazelnuts
pinch salt flakes

filling - 200g caramelised condensed milk, at room temperature
100g of plain chocolate (the darker the better - I used Willie's Chef's Drops; although they are just 70% cocoa solids they are quite bitter when eaten on their own, so ideal for adding to caramel)
1/2 teaspoon salt flakes

Method
Pre-heat the oven to 190C and line a 20cm (8") square baking tin with baking parchment, using one piece of paper to come up the sides of the tin too.
Melt the chocolate in a bowl over a pan of simmering water and allow  to cool a little, if necessary, to around 40C (blood heat). Mix in the caramelised condensed milk and the salt.
Melt the butter and sugar together, either in a large bowl in the microwave, or a large pan on the hob. Add the flour and the semolina and mix everything together to give a crumbly rubble.
Put 2/3 of the mixture into the baking tin and spread evenly, pressing down firmly so that it looks like a sheet of dough rather than rubble.
Spread on the chocolate mixture, stopping just short of the edges.
Mix the hazelnuts into the remaining dough, and sprinkle this over the contents of the baking tin, this time only pressing down lightly.
Sprinkle over a pinch more salt, then bake for 30 minutes until the topping is firm and golden.
Leave for 30 minutes to give the chocolate layer time to set a bit, then mark into squares. Leave in the baking tin until completely cold, as the squares are too fragile to move while hot.

These were really tasty! The centre was rich and fudgy, but because it was a thin layer it didn't seem over-sweet. The shortbread layers were, as usual, crisp, but with a 'melt-in the mouth' delicacy. The added salt was just the right amount and the hazelnuts added to both the texture and flavour. 

These weren't quite successful as replacement for Millionaires' Shortbread, with it's separate layer of caramel, as the caramel flavour wasn't really strong when mixed with the chocolate, but what this means is that these could probably be made with basic condensed milk to give the same fudgy filling, without much loss of flavour.

I'm adding these to April's We Should Cocoa link-up, over at Tin and Thyme. Choclette doesn't set a theme for this link-up - any recipe, using any form of chocolate is welcome.

Saturday, 1 April 2017

Goat's Cheese Soufflé Tart

This is the second time I've written about this recipe, for a Goat's Cheese Soufflé Tart, which is given extra flavour with a layer of onion chutney in the base, but the first was several years ago, so it was definitely time revisit the recipe!

I had a lot of cheese left after a meal with friends, including a large piece of soft goat's cheese, which wasn't going to keep for long. I was in two minds as to which kind of tart to make - this recipe or a more conventional leek and goat's cheese quiche with an egg and cream custard filling. In the end, I decided to make this soufflé-style tart again, as it was such a success the first time.

It's a little more fiddly to make than a traditional quiche, but from my previous experience, more likely to be successful, as the semi-solid, meringue-like, soufflé filling prevents any possibility of a soggy pastry bottom when the tart is cooked. I made my own pastry from 200g plain flour, 100g butter, 25g grated parmesan cheese plus water to mix, and used it to line a 22cm (9") deep fluted flan tin, which was then baked blind. I then followed the recipe closely for the soufflé filling, except for using finely chopped rosemary instead of thyme.

Once again, this was a resounding success! The onion chutney I had chosen was flavoured with a little chilli, nigella seeds and cumin, so added an extra piquancy to the layer between the pastry and goat's cheese filling. The souffléed filling was moist and creamy - completely different to the custard filling of a conventional quiche - and the pastry was light and crisp. The goat's cheese which was crumbled over the surface of the tart didn't brown much during cooking, so the tart looked pale and interesting rather than well-cooked, but this didn't affect the flavour. My goat's cheese was quite strongly flavoured and this came through well in the tart.

Sunday, 26 March 2017

Mincemeat Flapjacks

I'd planned to make mincemeat shortbread from Sue Lawrence's book 'On Baking', but we were suffering from an unscheduled cut in our water supply, which meant I couldn't do anything which was going to make my hands really sticky - such as rubbing fat into flour, or handling biscuit dough. Luckily I found a recipe for mincemeat flapjacks a bit further on in the book, and decided I could make the recipe without touching any of the ingredients in a way which would need me to wash my hands. Just a quick wipe with a hand sanitiser afterwards and all was well. The flapjacks were made in one saucepan too, which minimised the washing up - useful when you can't actually wash-up at all!

Ingredients
225g mincemeat
170g butter
285g golden syrup
the grated zest of 1 orange
425g porridge oats

Method
Pre-heat oven to 180C and line a baking tin roughly 20 x 30cm (8 x 12") with baking parchment, using one piece big enough to come up the sides of the tin too.
Melt the mincemeat, butter and golden syrup together in a large pan, over a low heat, stirring often.
When the butter has melted remove the pan from the heat and add the orange zest and oats. Mix everything together thoroughly.
Transfer the oat mixture to the baking tin and spread evenly, pressing down firmly. Bake for 25-30 minutes until golden brown.
Mark into pieces while still warm, but cool completely before removing from tin.

The smell while these flapjacks were baking was fantastic, and they tasted pretty good too. There wasn't a large amount of mincemeat in the recipe but it was enough to give quite a strong flavour. The mincemeat I used was quite citrussy, so it was complemented by the added orange zest. My usual flapjack recipe uses more sugar than golden syrup, whereas this recipe uses mainly golden syrup plus the sugar in the mincemeat. The end result was very similar, as these flapjacks were also nice and chewy - they were perhaps just a little softer than those I usually make.


Monday, 20 March 2017

Chocolate Tart

gluten- and lactose-free

I have a favourite recipe for a baked filling for a chocolate tart, which is naturally gluten-free, but unfortunately it didn't work well when I tried to make it lactose-free too. Using a vegetable fat instead of butter and lactose-free cream instead of creme fraiche lead to the filling separating during baking to give a thin layer of egg custard on the base with a thicker chocolate layer on top. It was still edible and quite tasty but not really good enough to serve to guests.

Searching through my file of recipes cut from magazines, I eventually found a recipe for a filling for a chocolate tart which looked suitable. It contained a much smaller amount of butter than the previously tried recipe and cream rather than creme fraiche, so I hoped it would adapt better to lactose-free alternatives.

Ingredients
23cm (9") pre-baked shortcrust pastry case (gluten and dairy-free, if necessary)
50g hard vegetable fat (eg Stork)
250g 70% dark chocolate, dairy-free
3 large eggs, separated
50g caster sugar
6 tablespoons lactose-free double cream
1 tablespoon finely ground fresh coffee

Method
Pre-heat oven to 200C.
Melt the butter and chocolate together in a bowl, over a pan of simmering water. Cool slightly.
Whisk egg whites to very soft peak stage.
Whisk yolks and sugar in a large bowl, until just combined and slightly frothy. Stir in the coffee and cream.
Pour in the cooled chocolate mixture, and fold in gently, along with the egg whites.
Spoon the chocolate mixture into the pastry case, and level using a hot, wet palette knife to give a smooth surface.
Bake for 12-15 minutes, until the edges are firm and the centre is just set.
Cool to room temperature before serving.

This recipe worked perfectly. The chocolate filling was dense and fudgy, but not too sweet. Although I don't need either gluten-, dairy- or lactose-free baking for family cooking it is nice to have 'free-from' alternatives when needed for guests. Now that I'm happy with the gluten-and dairy-free pastry recipe I use, a chocolate tart is a useful addition to my repertoire.


Monday, 13 March 2017

Date and Ginger Chocolate Chip Biscuits

Biscuits aren't one of my favourite things to make; in general there's too much faffing about to make them worth the effort. They might look more decorative but you can usually get the same amount of eating pleasure from a traybake cut into squares or bars, with lots less work for the cook. However, put the name Dan Lepard to a biscuit recipe, and it's one I'll look at twice, and by the second time I'll probably be eagerly searching the storecupboard, to check I've got all the ingredients. It's no coincidence that this is my second biscuit bake this year (see here), and they are both Dan's recipes - previously I hadn't made any biscuits since July last year!

I think it must be the (sometimes unusual) combinations of flavours that Dan uses, and that he tries to maximise the impact of those flavours, which makes his recipes so appealing to me. In this case, I love the combination of dates with chocolate, and ginger with chocolate, as well as dates and ginger, but the only time I've ever used the three ingredients together is in another Dan Lepard recipe - Chocolate Passion Cake, where the dates were used as an egg replacement rather than a flavouring ingredient.

These Date and Ginger Chocolate Chip Biscuits, published on the Good Food, Australia site, were relatively quick and easy to make, as the method is based on melting butter and sugar together, before mixing in the other ingredients. I used cocoa, rather than carob, and dark muscovado sugar but otherwise followed the recipe exactly.

I portioned out the biscuit dough using scales, and got 21 biscuits out of the mix, not the 24 suggested in the recipe. As I was using the fan oven, so that I could put in two trays of biscuits together, I cooked for the minimum time suggested.

These biscuits were as delicious as I expected. Rich in chocolate flavour, with large chunks of fiery ginger which were a delight to chew on. I find dates quite neutral in flavour (which is why they're often used as a sugar replacement these days) but I think that they really enhance the impact of chocolate and they certainly contributed to the chewiness of these biscuits.

This shows how the chocolate melted and tried to escape!
My only slight disappointment with the biscuits was that any chocolate chunks on the outside of the dough ball melted during baking, leaving a lot of melted chocolate on the baking paper, and on top of some of the biscuits. This might be down to my choice of chocolate, but as these biscuits were really only chunks of chocolate, dates, and ginger held together with the minimum amount of dough, it would be difficult to make them without any chocolate chips on the surface. I've not looked into bake-stable chocolate in detail, as I've never really needed it, but my impression is that it's quite expensive - possibly only for perfectionists, which I'm not!


I'm sending these to Choclette's We Should Cocoa link-up for March, over at Tin and Thyme. There is no theme to the link-up, any recipe, using any form of chocolate, is welcome.