Thursday 26 June 2014

Coconut Cake with Apricots and Cherries...........

made using Cocofina coconut flower nectar.

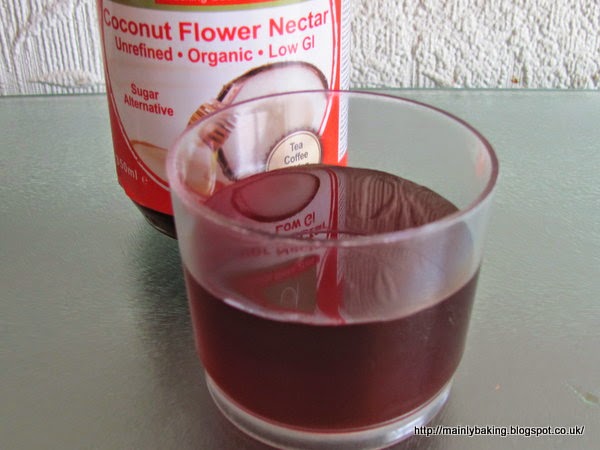
I was determined to use some of the coconut flower nectar that I received from Cocofina in a cake, but I didn't have much luck finding a recipe for anything I liked the look of. Most people seem to use it for 'health' reasons, and the resulting recipes are correspondingly specialised, often containing seeds, odd grains and lots of raw ingredients that I just don't keep in stock.

OK - maybe coconut flower nectar does have a low GI, but it has a similar amount of calories to any other form of sugar, so it's not exactly the 'guilt-free' eating that some people like to portray. I just wanted to find out how it reacted to baking and what it tasted like in a cake. In the end, I had a brainwave and started looking for cake recipes made with honey. Even then I had difficulties; so many recipes - even those called honey cakes - used a tiny proportion of honey and the usual amount of refined sugar. Same thing when I looked at maple syrup recipes (maple syrup has a similar viscosity to coconut flower nectar). What I wanted was a recipe where the only form of sugar was honey.

Eventually I stumbled across this US site, the National Honey Board, which had a huge recipe section. I found this recipe for Apricot Honey Bread, which served as the starting point for my recipe, although I made quite a few changes. The biggest alteration was reducing the sweetener (honey) by 1/3, as 300g not only sounded a huge amount, it would use up almost all my supply of coconut flower nectar.

Ingredients
250g spelt flour
100g plain white flour
3 teaspoons baking powder
1/2 teaspoon bicarbonate of soda
1/2 teaspoon salt
zest of half an orange
300mls semi-skimmed milk
200g coconut flower nectar (or honey)
2 tablespoons coconut oil (or vegetable oil)
1 large egg, beaten
120g dried apricots, chopped
100g naturally coloured glacé cherries, halved, rinsed and tossed with a tablespoon of the measured flour
75g desiccated coconut.

Method
Prepare a suitable baking tin (I used a 2lb loaf tin which was almost too small - I think an 8"(20cm) square deep cake tin might have been a better size). Pre-heat the oven to 180C.

Mix the flours, baking powder, bicarbonate of soda, salt and orange zest in a large bowl.
In another bowl whisk together the milk, coconut flower nectar, egg and oil; add this to the flour mix and blend until just combined - don't over-mix. Finally fold in the dried apricots, glacé cherries and desiccated coconut.

Transfer to the baking tin and bake for 50-60 minutes, or until a test probe comes out clean. Cover the cake after 40 minutes if it seems to be browning too quickly. Cool in the tin for 20 minutes before turning out onto a wire rack.

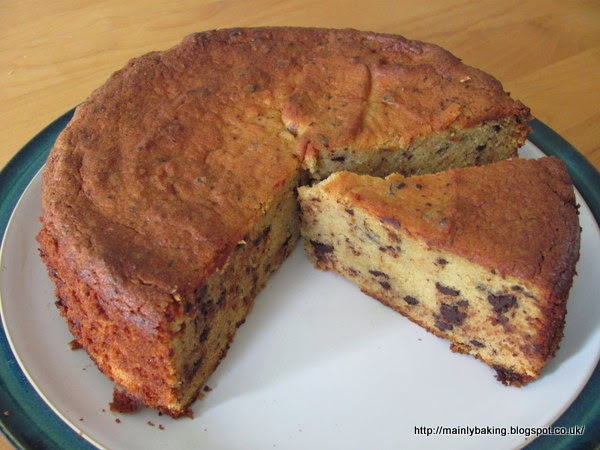
I was really pleased with this cake - although quite sturdy, it had a lighter texture than I expected, and was much more moist too. With such a small amount of fat, and only one egg, as well as using a liquid sugar, I was expecting it to have a much heavier texture.

The flavours of coconut, apricots and cherries complimented each other well, with just a hint of citrus from the orange zest. Reducing the amount of sweetener didn't seem to have a detrimental effect, either. Unfortunately, I think the delicious flavour of the coconut flower nectar was masked by all the other flavours, although it's hard to tell without making the same cake with ordinary sugar and tasting them side by side.

It's good to know that coconut flower nectar can be successfully used in baking, but it's so difficult to find suitable recipes, and adapting recipes can be such a hit-or-miss experience that I doubt I will use it again unless a liquid sweetener is needed in the original recipe. If you are adapting your diet to use less refined sugar, then coconut nectar, with it's low GI, is definitely a good substitute, but for me, it's best used in simpler things such as sweetening cooked fruits or drizzling over natural yogurt (a truly delicious instant dessert!). It's also quite expensive, which is another reason for not using so much in one go - used sparingly in situations where it's flavour comes through means it will go a lot further and probably still do as much good in the long run.

Thursday 19 June 2014

Speculaas - Dutch spiced cookies

 When I was offered a sample of speculaas spice mix, from Steven Dotsch, director of The Speculaas Spice Company, I jumped at the chance to try it, as speculaas have been on my 'to do' baking list for ages. These spiced Dutch cookies are closely associated with Christmas baking, but that didn't stop me  trying out the spice straight away. The Speculaas Spice Company has only recently launched it's spice mix on the market, and Steven was inspired to start the company because he missed the homemade biscuits from his childhood in Amsterdam. You can read Steven's story, and get hold of his spice mix, from the company's website.

The spice mix he eventually brought to the market is based on his grandmother's recipe and contains a blend of nine spices including high grade cinnamon, cloves and ginger. The other six are being kept a secret, but we can have a good guess at what they might be from the spice mix recipe that Dan Lepard publishes alongside the recipe I used for Speculaas cookies. Dan's spice mix comes from a Dutch friend, and I guess most Dutch bakers would have their own special blend of spices. Whatever the other spices are in the Vandotsch mix, besides the cinnamon, cloves and ginger, they come together in a very subtle way to produce something that is almost indescribably unique. From the smell, I can recognise the cloves, but the flavour isn't really like any of the main constituents - it's almost as if a new spice has been found!

I chose Dan's recipe, not just because I respect his skills as a baker, but because I'm lazy. Nearly all the recipes I found rolled out the cookie dough and cut it to shape, or pressed  the dough into special moulds. As I'm not a Dutch housewife, I don't have any moulds, and rolling and cutting didn't appeal to me. Dan's recipe chilled the dough in a rectangular mould, then cut thin slices from the block of dough, a method I've used before for some similar biscuits - caramel almond thins. This method does produce more rustic looking cookies, but that's not something that bothers me.

This recipe is unusual in another respect - it adds finely crushed cream cracker crumbs to the dough to increase the density and crispness. I followed the recipe exactly, and chilled the dough overnight, as that was most convenient for me. I guess the dough would need chilling for at least three hours if you wanted to make the recipe in one day! When it came to slicing the dough I got  over 30 cookies from half the block, so froze the other half for future use. The cookies spread a little during baking, so mustn't be placed too close together.

As I can't describe the flavour of the spice mix, all I can say is that these biscuits were delicious. They were very crisp (something I didn't achieve with the caramel almond thins) and the spices gave the measure of lasting heat, in the mouth, that you'd expect from the use of cinnamon and ginger. The only thing I disliked was the pale specks of cracker crumbs showing in the cookies, but that is easily remedied by finer crushing next time!

Disclaimer - although I was sent a 15g sample of Vandotsch speculaas spice mix, I was not asked to give a positive review. Any opinion expressed is my own!

Tuesday 17 June 2014

Pear, Almond and Chocolate Chip Cake

Gluten-free, dairy free and no added fat

The We Should Cocoa challenge this month is hosted by Michelle, of Utterly Scrummy Food for Families, a blog I haven't come across before, but which invites further investigation, with it's detailed posts and bright photographs.

For her theme she has asked us to bake something which contains chocolate in some form, but is gluten-free. I'm not a regular gluten-free baker, although I do occasionally cook for a couple of friends who are gluten-free eaters. As I don't have gluten-free flours in stock (other than cornflour for sauces and gravies), I prefer to find recipes which never contained flour in the first place, rather than try to adapt existing recipes to work with flours which may have different characteristics to wheat flour.

This cake recipe, which is similar to the classic whole-orange and almond cake made famous by Claudia Roden, is adapted from an Annie Bell recipe, and has become my favourite gluten-free cake. It has the bonus of being dairy-free too, although there are some natural fats present from the eggs, almonds and chocolate. It can turn out very moist, which makes it an excellent dessert too, when served with a suitable cream or ice-cream.

Over time, I've made a few changes to Annie Bell's recipe, as I find it rises better if the eggs are separated, and the whisked egg whites folded into the batter. In this version, I used dried pears instead of apricots, left out the cocoa and added 100g of chopped chocolate to give a bigger chocolate hit. I also had a couple of egg whites in the fridge to use up, so instead of 6 whole eggs, I used 5 eggs plus the two extra whites.

Ingredients

225 g dried pears, roughly chopped
5 eggs
2 egg whites
200g caster sugar
225g ground almonds
1/2 teaspoon ground cinnamon
1 teaspoon gluten-free baking powder
100g (85% cocoa solids) chocolate, finely chopped (gluten- and dairy-free)

Method
Base line a 20cm (8") deep non-stick loose-based cake tin. Pre-heat oven to 180C.

Simmer the dried pears with 250mls of water, until the fruit is soft and the water almost absorbed. Cool a little, then purée in a food processor or with a stick blender. If necessary, add a little more water so that the final consistency of the purée is thick but not too solid - I like it just a little looser than canned pumpkin purée. Leave to cool completely.

Separate the whole eggs, then beat all the egg whites together until at the soft peak stage. Whisk the egg yolks and sugar together in a second bowl, until pale and thick. Fold the pear purée into the egg yolk mixture, followed by the almonds, baking powder, cinnamon and chopped chocolate. Lastly, add the egg whites, in three portions - stir in the first portion thoroughly then gently fold in the remaining portions, to keep in as much air as possible.

Transfer the batter to the prepared pan, and bake for 50-60 minutes, until a test probe comes out clean, or with only a few moist crumbs clinging - no raw batter. If your fruit purée was a little on the loose side, baking may take a little longer. Immediately run a knife around the edge of the cake, between the cake and the tin, to completely loosen it, but leave in the tin until cold before turning out. Using the knife like this makes sure that if the cake sinks, it does so fairly evenly.

This was a delicious cake with a moist texture, although the pear flavour wasn't strong. The bitter chocolate stopped it being too sweet.

We Should Cocoa is the brainchild of Choclette, at Chocolate Log Blog, and the full set of rules can be found on her blog. Briefly, the aim is to produce something containing some form of chocolate plus the chosen ingredient or task for the month. The host (in this case, Michelle, see above) posts a round-up of all the entries at the end of the month.


Wednesday 11 June 2014

Derby Squares

I love the challenge that AlphaBakes presents each month. The aim is to bake something that uses a randomly chosen letter of the alphabet for it's name or one of the main ingredients eg A is for apples, B is for bacon, C is for Chelsea Buns etc. What often surprises me most is the letters that prove difficult, especially when looking for ingredients. This month the chosen letter is D, and the indices of my cookery books were decidedly sparse; apart from dates, which I used last time round, and damsons (out of season), everything else consisted of titles such as 'double....' or 'delicious....' or even 'dreamy....'. Not quite what I wanted!

I eventually came across a recipe for Derby Squares, and a bit of research online told me that the recipe is based on Kentucky Derby Pie, which is similar to a pecan pie in structure, but often uses walnuts instead, and adds chocolate too. When made into a traybake, the base is made of either shortbread dough or a biscuit crumb - my recipe used shortbread.

I can't find a recipe exactly the same as the one I used, but that's probably just as well, as mine didn't turn out too well. Here's one of the nearest I found, to give you an idea of the recipe, although there was no alcohol in mine! The recipe I used came from 'Biscuits, Pastries and Cookies of the World' by Australian chef Aaron Maree, which I've used several times in the past with great success.

I made a shortbread dough from 210g plain flour, 60g icing sugar, 120g butter and two egg yolks, which was used to line the base of a 28 x 18cm (11 x 7") baking tin, pressing in by hand rather than rolling out the dough. The filling was made by beating 3 large eggs and 240g of caster sugar until light and fluffy, then folding in 90g plain flour, 120g melted butter, 1 teaspoon vanilla extract, 240g chopped plain chocolate and 90g chopped walnuts. The filling was poured over the biscuit base, and baked at 160C for 40 minutes. When cold, the tray bake was cut into bars and dusted with icing sugar.

The main problem with this recipe was that the top baked to a crisp meringue-like coating. It was only the very top of the filling, but it meant that as soon as a knife was applied, it cracked and looked very unsightly. I don't know whether it was the proportions of the batter ingredients that lead to this, or whether I misinterpreted the instruction to beat the eggs and sugar until light and fluffy, and beat for too long. The batter used little flour in proportion to the other ingredients, so baked to a very light, moist texture, and the added nuts and chocolate sank to give a separate layer between the base and the cake topping. I also thought (and you don't often hear me complain about this) that there was too much chocolate compared to nuts. If I made it again I would reduce the chocolate by about 50g and increase the nuts by the same amount.

Apart from all that, these really were a delicious, indulgent treat! The negatives make it sound as if I didn't like them, but I did - I just though they could be improved upon!

AlphaBakes (rules here) is a challenge based on a randomly chosen letter of the alphabet. The dish made must feature something beginning with that letter as one of the main ingredients or part of the name. It is hosted jointly by Ros at The More Than Occasional Baker and Caroline at Caroline Makes. Caroline is the host this month, with the letter D, and as usual will post a round-up of entries at the end of the month.

Sunday 8 June 2014

Cocofina coconut oil makes........

Chocolate Chip and Pistachio Brownies

Although I looked extensively online for recipes using coconut oil, many of them seemed to concentrate on the health aspects of using it instead of other fats, and some seemed very worthy indeed - full of seeds, strange grains and elusive raw ingredients. What I wanted to do was to use it to make something I was familiar with, for a good comparison, so in the end it seemed sensible to use a recipe that I already had

I adapted the recipe I usually use, for brownies made with oil, to make these brownies with coconut oil. Although coconut oil is solid at room temperature, I was trying to compare it's use against the oils I usually use in baking, so it seemed better to use an oil-based recipe rather than a butter-based one.

I decided to reduce the number of eggs in the recipe from 3 to 2, on the, perhaps spurious, basis that the more solid coconut oil would make the brownies firmer than when liquid oil was used, so a third egg was unnecessary.

Ingredients
150g plain (70%+) chocolate
100g coconut oil
2 large eggs
130g caster sugar
100g dark muscovado sugar
1 teaspoon vanilla extract
105g plain flour
75g milk chocolate, chopped coarsely
30g chopped pistachios

Method
Prepare an 8" square baking tin, and pre-heat the oven to 180C.
Melt the coconut oil and chocolate together, over a pan of simmering water.
In a large bowl, beat the eggs, sugar and vanilla together for about 5 minutes.
Fold in the chocolate mixture, followed by the flour and then the chopped chocolate and nuts.
Transfer to the baking tin and cook for 25 minutes until just firm but not too dry.
Cool in the tin before cutting into portions of the desired size.

I was really pleased with these brownies - they were as rich and fudgy as those made with butter and kept really well too. Baking with oil can seem OK when you know you have to do it for dietary needs, but you do lose some of the richness of both texture and flavour that you get from butter. Coconut oil gave back some of this to this particular recipe, hopefully it will work as well in other recipes too. However, coconut oil isn't tasteless, and it's flavour comes through more than the flavour of even a distinctive olive oil. This isn't a problem occasionally, but if every cake tastes of coconut, then I'm sure we'll soon be fed up with it and want a change.

One area where I do think coconut oil will be an advantage is on the few occasions I need to cook something dairy-free for a friend; she is a good cook herself and really loves her food and although she has adapted to a dairy-free diet well, she really misses rich cakes and desserts. With coconut oil I should be able to make some real treats for her, if it works as well as it has in this recipe.

If you haven't done so already, please read my review of other Cocofina products and enter the give-away at the end of the review.

Disclaimer: Although Cocofina provided the coconut oil free of charge, I was under no obligation to write a positive review. All opinions expressed are my own.

Friday 6 June 2014

Cocofina Products Review and a Give-away

Cocofina has been around as a company producing coconut water since 2005, so they can hardly be accused of jumping on the latest bandwagon promoting coconut products, such as oil and sugar, as healthier alternatives to 'mass market' oils and sugars. In fact, their website only makes a few health claims for it's oil and flower nectar, buried deep within the site, and the main selling point for the coconut water is that it is isotonic, making it a refreshing drink, suitable for post exercise rehydration. Since the company's beginning, Cocofina's range of products has increased to include oil, flower nectar, snack bars and three varieties of fruit-flavoured water.

When I was contacted by Cocofina, to see if I would be interested in reviewing their products, I asked to try the things I could use when cooking, such as the oil and flower nectar, so that I could write a review that fitted in with the main theme of my blog - baking. Along with these two products I received a bottle of coconut water and some organic snack bars, which are made from only raisins, dates, coconut and oats (or cocoa and cocoa nibs, depending on the variety of bar). These bars contain around 145 calories and Cocofina suggests they are eaten as a pre-workout snack.

While I was waiting for my samples to arrive, I researched the health claims for coconut products. Both the oil and flower nectar are expensive, so I hoped there would be some real benefits from using them in place of  the wide range of fats and sugars already available for cooking.

Frankly, the information available on potential health benefits is very confusing. Most claims are made by producers or retailers, and don't seem to me to be backed up by large scale medical-standard trials. For every website proclaiming the benefits, there is one refuting those claims.  There are even contradicting statements about whether or not production of nectar is harmful in the long-term, rather than a sustainable source of coconut products, as it's argued that bleeding the flowers for sap prevents the palm tree from ever producing coconuts. I certainly don't feel confident about recommending any particular online reading to you - if you are interested in finding out more, any web-search will give you plenty of sites to choose from.

From my extensive reading I gleaned these main points, which seem to me to be quite relevant:

#Coconut flower nectar has a low GI, which means the energy it contains is released slowly and doesn't play havoc with blood sugar levels. This makes it better to use than cane or beet sugar, maple syrup or honey.

#Although there are claims that coconut oil can play a part in lowering cholesterol levels, it has to be remembered that it is one of the most saturated of all the cooking oils on the market - it is solid at room temperatures below 25C.

#Coconut oil may have natural antibiotic properties - many people use it, in addition to regular dental hygiene, to keep their mouth and gums healthy.

When it came to using the products, I obviously had to try the flavours of the oil and flower nectar first. The oil, despite being solid at room temperature, has a very light feel in the mouth, and disappears quickly with no greasy residue; it tastes only slightly of coconut. It is also absorbed quickly into the skin, if you were to use it for cosmetic or toiletry purposes. I've already made a batch of brownies using the coconut oil, which I will be writing about in a separate post. All I'll say here is that I was very impressed with the results, which were as good a brownies made with butter. My first impression is that coconut oil makes a much better substitute for butter than other oils, for dairy-free or vegan cooking. The background flavour of coconut might be considered a downside - however much you like coconut, you don't want everything you make to taste of it!

The coconut flower nectar has a dark caramel colour and a consistency similar to maple syrup. The flavour is hard to describe - I thought it tasted like a strong honey with a touch of molasses. The strong flavour may make it an acquired taste for some people, but I can see if being a good substitute for honey in baking recipes. I'll be looking for recipes to try soon. Cocofina recommends it for sweetening drinks, baking, cooking and even spreading (on hot toast, presumably!). I drizzled a teaspoon of nectar over a dish of natural yogurt, to sweeten it a little, and it was delicious.

I have to admit that I didn't like the coconut water on it's own; the 4.7% natural sugars present made it too sweet for my taste, but it did taste good when used to dilute pomegranate molasses or lime cordial to make a refreshing fruit flavoured drink.

The snack bars were delicious and made an almost guilt-free snack for someone perpetually worried about calorie intake. Around 145 calories of almost 100% fruit/coconut, with no added sugars, also made a good midday 'meal' on days when I was fasting on the 5:2 diet - a nice change from a bowl of salad!

This brings me to the 'give-away'. Cocofina have offered a case of 24 delicious Organic Coconut and Date Snack Bars to one of my UK-based readers. To be included in the draw for the prize, I'd like you to leave a comment telling me your favourite culinary use, or recipe, for any coconut product, including good old-fashioned desiccated coconut. Please leave an email address, or other means of contact, in your comment so that I can get in touch if you are the winner. The winner will be randomly picked on 20th July.

Disclaimer - although I was approached by Cocofina and asked to review their products, they have not exerted any influence over what I have written; all opinions expressed are my own.

THIS DRAW IS NOW CLOSED!

The winner is Debbie Costley aka Busybee - congratulations. Please get in touch via my email address here, or see my PM on Wildfood.

Sunday 1 June 2014

Hazelnut, Chocolate and Coffee Cake

I wanted to make a long loaf cake, so that it could be easily shared with CT, who was coming for one of his occasional dinners. We really don't see much of him now unless he needs something; this time he was using us for a parcel delivery that he couldn't be at home for.

After taking part in the We Should Cocoa challenge of making a chocolate cake for less than £1 (see everyone's efforts here), I had some baking spread left over, so decided to use some in this cake - usually I would use softened butter, despite cooks such as Mary Berry and Delia Smith advocating the use of 'margarine'.

Ingredients
200g baking spread
200g golden caster sugar
225g SR flour
50g ground hazelnuts
1 teaspoon baking powder
4 eggs
2 teaspoons instant coffee dissolved in 1 tablespoon hot water
100g plain chocolate chopped into large chunks
milk to mix, if necessary

Filling (chocolate hazelnut buttercream)
30g baking spread
60g icing sugar
60g chocolate and hazelnut spread (Nutella)

My loaf tin has roughly the same capacity as a 2lb tin, but has the cross-section of a 1lb tin, so is much longer than normal. This seemed like a good idea when I bought it, but the cakes made in it usually look badly proportioned.

Method
Put all the cake ingredients except the milk and chocolate into a bowl and mix to a soft batter with a spoon or an electric mixer. Add milk if necessary to give a dropping consistency (I used just a tablespoon) and then fold in the chopped chocolate. Simple!

Spread into the prepared tin and bake at 180C for about an hour, or until a test probe comes out clean and dry.

When cake is cold, split in half and fill with the chocolate hazelnut buttercream - just beat the ingredients together until light and fluffy.

The flavours of coffee, chocolate and hazelnuts were well balanced in this cake, although it needed the filling to counteract a little dryness in the cake crumb. I probably should have used a little less flour. The photo makes it look as if the chocolate chunks all sank, but that wasn't the case - I just happened to cut the cake at a bad point for a photograph!