Showing posts with label Nutella. Show all posts

Tuesday, 21 August 2018

Chocolate Hazelnut Tart

- for the final We Should Cocoa

We Should Cocoa, a monthly link-up for chocolate recipes started 8 years ago, when Tin & Thyme was still Chocolate Log Blog, and Choclette shared her hosting duties with Chele at Chocolate Teapot. Amazingly, I have been participating since the first link-up, although not very regularly recently. According to my records, I've contributed to 65 out of a possible 95 events. This month will be the 96th We Should Cocoa - and Choclette has decided to call a halt.

For many years the link-up had a theme, so I decided to check on the first, in August 2010. It turned out to be raspberries. I made Chocolate Frangipane Tartlettes with chocolate pastry and raspberry jam in the base - a kind of chocolate bakewell tart. At the same time, I made some similar tartlettes, with Nutella in the base, which we preferred. I thought it would be a fitting end to these events to base my entry on the first thing I made, so decided to go with a tart with Nutella in the base and a hazelnut frangipane on top. I also added more chocolate to the filling, so that the final tart had both the chocolate and hazelnut flavours of the Nutella ramped up.

Ingredients
Pastry
150g plain flour
100g butter
25g icing sugar
25g cocoa
1 egg yolk
cold water to mix

Filling
110g softened butter
110g caster sugar
1 egg + 1 egg white
1 tablespoon plain flour
110g ground hazelnuts
150g chocolate hazelnut spread
25g plain chocolate (I used 100% cacao) grated*

to finish - 40g plain chocolate (about 70%)

* 100% cacao is very hard, and when grated on a fine microplane grater, 25g goes a long way. If you are using  70% plain chocolate, or a coarse grater, you might need as much as 50g to get enough grated chocolate to cover the base.


Method
Make the pastry by sifting the icing sugar and cocoa into the flour, then rub in the butter until the mixture resembles breadcrumbs. Add the egg yolk and enough cold water to make a soft but not sticky dough, kneading briefly. Shape the dough into a disc, wrap in clingfilm and refrigerate for 15 minutes. Roll out the dough thinly and  line a 20cm (8") tart tin. Refrigerate again while you make the filling.
Pre-heat the oven to 200C. Put a baking sheet into the oven while it is heating.
Cream the butter and caster sugar until light and fluffy, then slowly beat in the egg, egg white and flour. Fold in the ground hazelnuts.
Warm the chocolate spread slightly (just a few seconds in the microwave, or in a bowl over hot water) and spread over the base of the pastry case, then sprinkle over the grated chocolate. Spoon the hazelnut frangipane filling into the pastry case and spread evenly.
Put the tart onto the preheated baking sheet and bake for 10 minutes, then lower the heat to 180C and bake for a further 25 minutes until the frangipane is set and golden in colour. Cool in the tin.
Finish the tart by melting the 40g of plain chocolate and drizzling it over the cool tart - I put the chocolate into a small plastic bag, then put that into a mug of hot water (seal the bag first, of course). When the chocolate has melted, snip off one corner of the bag to allow the chocolate to dribble out.

This tart was delicious! The extra dark chocolate in the base cut through the sweetness of the chocolate hazelnut spread, and the hazelnut flavour of the frangipane came through strongly. The only thing wrong was that the frangipane appeared to have separated a little as it cooked, leaving a pale set custard-y layer at the bottom. Although this didn't affect the flavour, it did affect the appearance; I have no idea what went wrong.

So, it's the end of an era! I'm sending this recipe to the very last We Should Cocoa link-up. Although I don't bake as much now as I did 8 years ago, I can thank WSC for stretching both my skills and my imagination. Over the years I've used ingredients that I would never have thought to pair with chocolate (some more successfully than others, I must admit) and tackled more complex recipes than I would usually handle. I believe Chocolette intends to keep the WSC archive, and has a Pinterest board, so we can still look there for inspiration.

Thank you for 8 years of fun, Choclette!


Monday, 13 July 2015

Date and Hazelnut Chocolate Fudge Cake

I don't often make layer cakes, mainly because I don't often want the extra calories added when the layers are stuck together. Even if the top is only dusted with icing sugar, the simplest filling will involve too many calories, whether it's just a layer of jam, or something more complex. However, I will make an exception for celebrations such as birthdays, and both I and my son celebrate our birthdays in the first half of July.

Unfortunately, the cake I chose to make, this Date and Hazelnut Chocolate Fudge Cake, from the Waitrose website, promised more than it delivered. On the plus side, it was perfect for a layer cake, as it rose evenly and made two firm layers which were so deep that I could have cut them in half to make a four layer cake, if I had wanted to.

The biggest problem was that the cake itself didn't have much flavour. If it hadn't been for the cocoa in the fudgy frosting, it wouldn't have tasted of chocolate at all! It didn't taste of dates, either - the only flavour which came through clearly was that of hazelnuts, and I've made better tasting hazelnut cakes! I think the combination of the date purée, coffee and the small amount of chocolate in the chocolate hazelnut spread (Nutella) combined to make a new, unidentifiable flavour which was pleasant, but definitely not chocolate. If the recipe had been called a Date and Hazelnut Cake with Chocolate Frosting, it would have been a more accurate guide to the flavours to expect.

Another problem was that the frosting didn't work for me - it started to split as the boiling water and Nutella was worked into the butter, cocoa and icing sugar mixture. Adding more icing sugar didn't solve the problem, nor did adding more Nutella. It was only when I beat in some cold milk that everything amalgamated properly to make a smooth frosting.

By then I'd added about 75g of extra ingredients, but the quantity of frosting still looked a little meagre against the depth of the cake, particularly the amount between the layers of cake.

Despite these deficits, the cake was still pleasant to eat, as long as you didn't think too hard about whether or not it tasted of chocolate. The texture was light but moist and firm, which was presumably thanks to the date purée. I'd like to think that using the date purée cut down on both the fat and sugar needed in the cake batter, but when you take account of the amount of these  two components in the Nutella, I think it looks as if the date purée was added for texture, volume and flavour - not for health reasons!

Wednesday, 6 May 2015

Chocolate Tarts x 2

1) chocolate tarts with Nutella and white chocolate/vanilla ganache
2) chocolate and marzipan tarts.

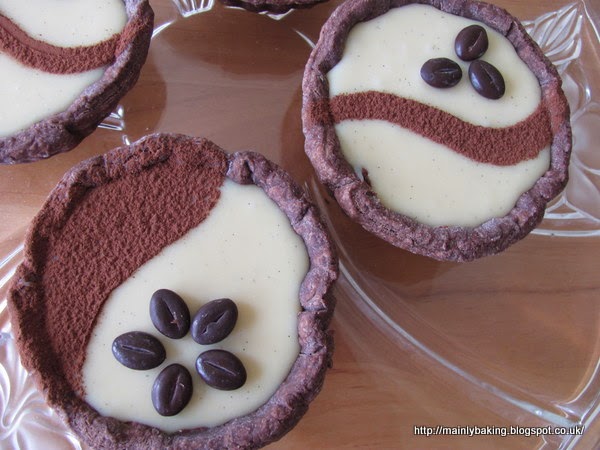
These chocolate tarts with Nutella and white chocolate/vanilla ganache filling were made our Bank Holiday dessert, but also fit the bill for for this month's We Should Cocoa Challenge. Karen, at Lavender and Lovage, is the guest host for the challenge started by Choclette at Tin and Thyme (formerly Chocolate Log Blog) and has asked us to use vanilla and chocolate together.

I decided to make extra chocolate pastry when making these ganache filled tarts, and used it to make smaller tarts filled with a disc of marzipan and a chocolate frangipane topping.

The recipes for both were just cobbled together as I went along, and I didn't take careful notes, but here's more or less what happened:

I made an unsweetened shortcrust pastry, from 270g plain flour, 30g cocoa, 75g butter and 75g lard. After rubbing the fats into the flour and cocoa, I added 1 teaspoon of instant coffee dissolved in a tablespoon of hot water, followed by enough cold water to make a firm dough. After resting in the fridge, I lined 12 jam tart moulds and four 9cm diameter individual tart moulds with pastry, and baked blind.

I originally intended just to fill the larger tart cases with white chocolate ganache but thought this might not have quite enough flavour, so before pouring in the ganache I spread a tablespoon of Nutella over the base of the pastry. I then chilled the cases for 10 minutes, so that the ganache didn't disturb the Nutella when it was poured on. The ganache was made by heating 125ml of double cream until just at boiling point, then stirring in 170g of good quality white chocolate and a teaspoon of vanilla bean paste with seeds. I allowed this to cool a little before pouring into the pastry cases, then cooled to room temperature before refrigerating. Once cold, the tarts were decorated with cocoa sifted through stencils, and chocolate coffee beans. I  brought the tarts up to room temperature before serving.

For the chocolate and marzipan tarts I put a quarter of a teaspoon of apricot jam into each case, with a small disc of marzipan (made from a pea-sized piece) on top. I made the frangipane mixture by beating together 40g ground almonds, 25g SR flour, a heaped teaspoon of cocoa, 50g caster sugar, 1 egg, 50g softened butter and a few drops of almond extract until smooth. This was just enough batter to put a heaped teaspoonful into each tart case. I sprinkled a few flaked almonds on top before baking at 160C until the frangipane felt solid - about 15 minutes.

I was right about the white chocolate tarts needing more flavour than just vanilla. Adding the chocolate  hazelnut spread gave them just that bit more interest, but afterwards I wondered if peanut butter might have been even better, as it would have counteracted the sweetness of the ganache too.

I had been a little worried about the ratio of cream to chocolate for the ganache, as recipes I looked at ranged from equal amounts of each (200ml cream to 200g chocolate) down to only adding 50ml of cream to 200g chocolate. The ganache I made was about right for a tart filling - holding it's shape, but not too hard, at room temperature.


The smaller chocolate and marzipan tarts were delicious too, but it's hard to go wrong when combining chocolate and marzipan!


Friday, 20 February 2015

Viennese Hazelnut Bars

First of all, I'm going to admit that this entry for the AlphaBakes challenge is a bit of a cheat. This recipe appears in the book 'Biscuits, Pastries and Cookies of the World' (by Australian chef Aaron Maree) as Weiner Wafflen. I think there's two spelling mistakes in those two words - as nothing shows up on Google - and what he really meant was Wiener Waffeln, which translates as Viennese waffles or wafers. I can find a few German references to recipes which produce a similar biscuit to this, but the majority of references are to what most British people call wafer biscuits.

To be on the safe side, and to enable me to use them for this month's AlphaBakes challenge, I'm re-naming these as 'Viennese hazelnuts bars'. In case you haven't realised yet, the AlphaBakes challenge was to use the letter V, for either a Valentine's themed bake, or something with a name or principle ingredient beginning with V.

These bars consist of two layers of hazelnut biscuit/shortbread dough, with redcurrant jelly sandwiched between them before being baked. After cooling, the sheet of biscuits is glazed with apricot jam and a thin layer of glacé icing, before being cut into fingers. The biscuit dough is flavoured with lemon and cinnamon, as well as the hazelnuts, and is very similar to the pastry used for many Linzertorte recipes. It is very short and crumbly, making the bars very delicate. The filling and topping add both moisture and flavour to the bars, but the shortbread dough trimmings were also delicious when used to make plain heart-shaped biscuits (and also when sandwiched with Nutella!)

The hazelnut dough was made by creaming together 270g  softened unsalted butter and 180g caster sugar until light and fluffy. Then two large egg yolks, the finely grated zest of 1 lemon and 1 tablespoon of cinnamon was beaten in. The food mixer was then turned to it's lowest speed, and used to mix in 150g ground toasted hazelnuts and 360g plain flour. Once a dough had formed it was wrapped in cling film and refrigerated for an hour.

The chilled dough was kneaded lightly, then divided into halves. Each half was rolled out, to about 5mm in thickness, then trimmed to a rectangle 25 x 20 cm (10 x 8"). One layer  of dough was fitted into a baking tin of the same size, base-lined with parchment, then spread with 100g redcurrant jelly. The top layer was then put on, being careful not to trap any air between the two layers of dough, and pressed down firmly. The cookie sheet was then baked at 175C (165C fan) for 20-25 minutes until firm and just beginning to colour around the edges.

After cooling in the tin the cookie sheet was glazed with warmed, sieved apricot jam, then, when this was set, with a thin layer of glacé icing. When the icing had set the cookie sheet was removed from the baking tin and cut into 18 fingers.

I re-rolled the trimming from the dough, and cut out heart shapes which were baked for 15 minutes, at the same temperature, until firm and golden. These were then sandwiched in pairs with Nutella spread, as a nod to Valentine's Day.

It would be worth making the hazelnut dough just for this reason, as it is delicious, and didn't spread during baking. If making a large batch of sandwich biscuits, I would make a different chocolate filling, as Nutella is a bit too runny at room temperature (or maybe it was just my supermarket 'own brand' spread at fault!).  I'd probably pretty them up with a drizzle of icing on top, too!

AlphaBakes (rules here) is a monthly baking challenge hosted alternately by Caroline at Caroline Makes and Ros at The More Than Occasional Baker. This month, Caroline has chosen the letter V. Entries to the challenge have to use the chosen letter as the beginning letter for either the name of the bake, or one of the significant ingredients. This month, V for Valentine's Day was allowed, which widens the scope of the challenge a bit, as V isn't an easy letter to use.

Sunday, 1 June 2014

Hazelnut, Chocolate and Coffee Cake

I wanted to make a long loaf cake, so that it could be easily shared with CT, who was coming for one of his occasional dinners. We really don't see much of him now unless he needs something; this time he was using us for a parcel delivery that he couldn't be at home for.

After taking part in the We Should Cocoa challenge of making a chocolate cake for less than £1 (see everyone's efforts here), I had some baking spread left over, so decided to use some in this cake - usually I would use softened butter, despite cooks such as Mary Berry and Delia Smith advocating the use of 'margarine'.

Ingredients
200g baking spread
200g golden caster sugar
225g SR flour
50g ground hazelnuts
1 teaspoon baking powder
4 eggs
2 teaspoons instant coffee dissolved in 1 tablespoon hot water
100g plain chocolate chopped into large chunks
milk to mix, if necessary

Filling (chocolate hazelnut buttercream)
30g baking spread
60g icing sugar
60g chocolate and hazelnut spread (Nutella)

My loaf tin has roughly the same capacity as a 2lb tin, but has the cross-section of a 1lb tin, so is much longer than normal. This seemed like a good idea when I bought it, but the cakes made in it usually look badly proportioned.

Method
Put all the cake ingredients except the milk and chocolate into a bowl and mix to a soft batter with a spoon or an electric mixer. Add milk if necessary to give a dropping consistency (I used just a tablespoon) and then fold in the chopped chocolate. Simple!

Spread into the prepared tin and bake at 180C for about an hour, or until a test probe comes out clean and dry.

When cake is cold, split in half and fill with the chocolate hazelnut buttercream - just beat the ingredients together until light and fluffy.

The flavours of coffee, chocolate and hazelnuts were well balanced in this cake, although it needed the filling to counteract a little dryness in the cake crumb. I probably should have used a little less flour. The photo makes it look as if the chocolate chunks all sank, but that wasn't the case - I just happened to cut the cake at a bad point for a photograph!

Thursday, 4 April 2013

Date and Hazelnut Chocolate Fudge Cake

Date and Hazelnut Chocolate Fudge Cake - a big title for a cake which, athough delicious in it's own way, didn't live up to the expectation of  the recipe on the Waitrose website.

There was nothing fudgy about this cake - it was almost feather light, despite containing date purée, which I expected to make it fairly dense in texture. The use of chocolate hazelnut (Nutella) spread as the only source of chocolate in the cake didn't make it very chocolatey either. The dates weren't noticeable as a separate flavour, but that was to be expected, as anyone who's eaten sticky toffee pudding can testify. There was cocoa as well as Nutella in the filling and frosting, which gave it a stronger chocolate flavour but unfortunately there was not quite enough of it to balance the perceived shortcomings of the cake.

Despite all that, we all really liked this cake - the combination of all the flavours made it much more interesting than a basic chocolate sponge cake. The crumb was tender and light, but also moist, thanks to the date purée. Using the dates to replace some of the sugar meant the cake wasn't over-sweet either. The nutty flavour of the Nutella was quite strong, even if it wasn't very chocolatey, and the filling and frosting was a rich contrast to the lightness of the cake, although the cake did need more of both.

I think, as the person reading the recipe and making the cake, I had different expectations to the people just eating 'another' chocolate cake. I don't often make light layer cakes, but I'd be very happy to produce this one again. I just think I'd call it something different, and double the quantity of frosting!

Friday, 15 March 2013

Italian Pine Nut Tart

This months random letter choice for the AlphaBakes challenge turned out to be the letter I. This is a really limiting letter - I didn't find any ingredients beginning with I and the only entries in the indexes of most of my books were 'icing' or 'iced'. I decided to follow the advice of this month's host (Caroline of Caroline Makes) and think geographically. I also decided I would only pick a recipe if it was labelled with the country of origin in it's name eg I wouldn't choose tiramisu, and then post it as Italian tiramisu, or make an Irish Guinness cake.

After much studying of my cookery books I found a recipe called Italian Pine Nut Tart with Chocolate Spread in my Green and Black's book of chocolate recipes which looked really tasty. It is described as a cross between a biscuit and a tart, and can be filled with almost anything, but a book of chocolate recipes had to go with a chocolate filling - a lot of chocolate hazelnut spread (Nutella).

Ingredients
310g plain flour
1 teaspoon baking powder
100g unsalted butter, cold, cut into small cubes
150g caster sugar
2 large eggs
2 tablespoons water
300g chocolate hazelnut spread
1 large egg yolk
1 tablespoon milk
50g pine nuts

Method
Sift the flour and baking powder and rub in the butter, as for pastry.
Mix in the sugar, then add the beaten eggs and the water if needed, to make a soft dough. Knead gently until dough is smooth, then wrap and chill for 45 minutes.
Preheat oven to 180C and grease a 23cm(9") loose-based fluted flan tin
Roll out 3/4 of the dough on a floured surface and use to line the tart tin. The dough is soft and difficult to work with but any holes can be patched up easily.
Spread the chocolate spread evenly over the pastry, and roll the remaining pastry to make a lid. Press the edges of the base and lid together, to seal.
Mix the egg yolk and milk, and brush over the tart, then sprinkle with the pine nuts.
Bake for 35-40 minutes, until golden, watching the tart carefully towards the end of the cooking time, as pine nuts can burn easily.


This was a delicious tart. The pastry was crumbly and buttery - like a soft shortbread. The chocolate hazelnut spread was a thick enough layer to really taste and the pine nuts gave a crunchy, slightly bitter topping. Definitely one to make again!

We tried to think of other fillings which would work well, and came up with several - marzipan, creme patissiere, thick fruit compotes, chocolate ganache for nut avoiders, mincemeat, dates cooked to a purée. Other flavours could be added to enhance the tart - cinnamon or citrus zest in the pastry, for instance, would go well with a creme patissiere or marzipan filling.

AlphaBakes is the brainchild of Caroline of Caroline Makes and Ros of The More Than Occasional Baker. They take turns to host the challenge, and the randomly chosen letter must be used either as the main part of the recipe name or as a main ingredient eg N is for Nuts or Nanaimo Bars. The host for the month posts a round-up of entries at the end of the month.

Friday, 14 December 2012

Hazelnut and Apricot Marble Cake

After trying the Lime Syrup Marble Cake, I felt the urge to make another marble cake. This time I adapted one of my favourite cake recipes, using ground hazelnuts in place of ground almonds and leaving out the lemon. Then I took out 1/3 of the batter and mixed 2 heaped tablespoons of Nutella (chocolate hazelnut spread) into it. To the plain portion of batter, I added 50g of finely chopped ready-to-eat dried apricots and a tablespoon or so of cocoa nibs.

I then layered the batters alternately into a loaf tin and left it to make the marble effect as the cake baked. I think my mistake was to use too large a loaf tin, as each layer of batter was very thin and didn't cover the alternately coloured batter beneath properly. Still, there were some interesting effects to be seen in the cake when it was cut!

The flavour was good too. The chocolate flavour was very subtle, but enhanced by the crunchy cocoa nibs, and the apricots added both flavour and texture. This is usually quite a moist cake, but using the Nutella made it even more so. The recipe can certainly be counted as a success, but the cake needs baking in a smaller tin in future.

Sunday, 16 September 2012

Thumbprint Cookies - for Random Tea Time Treats

I'm not usually a contributor to Dom's Random Recipes, over at Belleau Kitchen. It's often difficult to fit a randomly picked recipe into my cooking plans and the blog theme, without a lot of cheating fiddling which takes away the genuine randomness. This month, however, Dom has paired up with Tea Time Treats, which is more my cup of tea (pardon the pun!). The idea is to pick a random book containing recipes suitable for tea time goodies, then a random recipe from that book. For me, this turned up Bea's Thumprint Cookies, on page 66 of Green and Black's Chocolate Recipes (Unwrapped). I was pleased with this as Thumbprint Cookies were on my to-do list, but I keep setting them aside as too fiddly!

This particular recipe was for a plain cookie filled with Nutella, or a similar chocolate hazelnut spread. The only change I made to the recipe was to add some vanilla extract to the cookie dough. I also refrigerated the dough for the suggested 1 hour resting time, although the recipe didn't ask for this. The instructions in the recipe said to roll the rested dough into balls, then flatten before making an indentation to fill with Nutella. I did this but wasn't happy with how far the cookies then spread during baking - they became quite flat, with the later cookies spreading even further than the first ones shaped, perhaps because the dough was warming up by then.

I've since read other recipes and none of them flattened the balls of dough before making the hole and adding the filling, so this is an obvious change needed if I made the recipe again. I think I would also re-chill the cookies after shaping and filling, before baking them, in an effort to stop them spreading and give them a better shape.

The cookies took almost twice as long to bake as suggested in the recipe (20 minutes instead of 12), but part of that could be down to my failing oven - I've lost the fan function, and the instructions say that I should only use one tray at a time if using conventional cooking. Of course, I put in both trays of cookies and hoped that swapping positions at half time would be good enough - it wasn't!

However, there was nothing wrong with the flavour, which everyone enjoyed, although there were comments that more filling would be better! Again, I think this would be possible with the different shaping method. Now that I've tried these, I want to give them another go, with the shaping modifications, to see if I can improve the outcome, but otherwise they are a pretty fiddly way of making biscuits!

You can follow the links above to find out about Random Recipes; the other part of the challenge is Tea Time Treats, which is a monthly baking challenge to provide goodies for the tea table, hosted alternately by Karen from Lavender and Lovage and Kate from What Kate Baked. This month it is a joint venture with Random Recipes, as explained previously.

Wednesday, 30 November 2011

Hazelnut and Coffee Cake with Nutella Frosting

Phew! A successful cake after what seems like a stream of disappointments. It's not really that long since I baked something that I was (almost) completely happy with, but it seems like it when you're having to eat second-rate cakes!

This is my first attempt at adapting the Annie Bell recipe for a Lemon Drizzle Traybake, which I tried recently. I left out the lemon (obviously!), dissolved some coffee in the milk and substituted ground hazelnuts for some of the flour. The batter was baked in two sponge tins and then sandwiched and topped with a soft Nutella and plain chocolate frosting.

Ingredients - cake
180ml sunflower oil
270g caster sugar
3 large eggs
100ml milk
1 tablespoon instant coffee
50g chopped toasted hazelnuts
1 teaspoon cocoa (see note)
220g plain flour
2 teaspoons baking powder

Frosting
60g plain chocolate
30g butter
2 tablespoons golden syrup
3 tablespoons milk
roughly 100g Nutella*

Method
Pre-heat the oven to 190C, and prepare two 8"(20cm) sandwich tins.
Dissolve the coffee in the milk. Put the hazelnuts, cocoa and 20g of the flour into a food processor or mini-chopper and process until the nuts are very finely ground, but not turning greasy (the flour helps prevent this).
In a large bowl whisk the oil, sugar, milk and coffee, and eggs until emulsified. Sift in the plain flour and baking powder, then add the ground nut mixture; whisk together until just combined.
Divide the mixture between the two sandwich tins and bake for about 20 minutes, or until done when tested.
Cool in the tins for ten minutes then turn out onto a wire rack.
When cool, sandwich with half the frosting and top with the other half.

While the cakes are cooking make the frosting - melt the chocolate and butter in a bowl, over a pan of simmering water. Remove from the heat and beat in the other ingredients. Allow to cool to a spreading consistency before using.

* I tried to add an extra 50g of Nutella and the mixture started to split. I rescued it by adding a little extra milk, but this meant that the frosting didn't set as firm as I'd hoped. If you like thicker layers of filling and frosting, I suggest increasing all the ingredients by 50% (or even more!).

note - adding a little cocoa to cakes containing nuts is a tip from Dan Lepard to increase the nuttiness of the flavour.

This was a really well-flavoured and textured cake. The coffee flavour was a little overwhemed by the Nutella frosting, but I think the amount of coffee I used was enough - any more would have been bitter. The flavour of the nuts in both the cake and the frosting was very good.

With a differently flavoured  frosting - perhaps a vanilla or coffee buttercream - this would make a good coffee and nut cake with the coffee flavour more predominant. I'm really pleased that the recipe adapted as well as I'd hoped, and will be experimenting further with this.

Sunday, 3 July 2011

Caramel Hazelnut Layer Cake

I found a forgotten jar of Dulce de Leche at the back of the refrigerator last week. After a few days, I decided that the only way to stop me eating banana and caramel sandwiches for breakfast was to put the caramel into a cake. This Dan Lepard recipe has been on my mind a while, but it's not really the sort of cake CT should be eating. I decided though, that it would only last a couple of days with four of us eating it, so a little treat wouldn't hurt him too much. I didn't have enough caramel for the frosting, so decided to make a small amount of Nutella buttercream, just to fill the cake.


I made this cake when Dan first published it in the Guardian, before I started writing this blog, and really liked it - I think the only thing that's prevented me making it since is that light sponge layer cakes with filling and topping aren't really my thing. They don't last long, as people eat larger pieces, and I find it a bit too much of a fuss to wait until the cake has cooled before filling and assembling it. Once in a while, they fit the bill though, and a light cake on a hot weekend seemed just right.


The cake is hardly more difficult to make than a plain Victoria Sandwich, and the amount of batter rises to completely fills two sandwich tins when cooked, to give a good deep cake after assembly. The nut flavour is well pronounced, unlike many cakes using ground nuts.

The original caramel filling and frosting is gorgeous, but the cake was very good filled with Nutella buttercream too! I beat 60g softened butter with 120g icing sugar until light and fluffy, then beat in about 100g Nutella. After filling the cake, I dusted the top lightly with icing sugar.

Sunday, 10 October 2010

Gianduia Brownies

Unfortunately, by the time these Gianduia (Nutella and Hazelnut) Brownies  (recipe from Epicurious) were cooked, cooled and cut, the light conditions weren't right for a photograph. It was also the day before I went off to Cornwall for a week's holiday, so I never did get a photograph of them.

From what I remember of them, the flavour was excellent but the brownies were a little too cake-like and crumbly for my taste. However, here's the gripe - why do so many American brownie recipes produce such shallow brownies? I cooked these in a 8" square pan, rather than the 9" one stipulated in the recipe, and they were still shallower than I like. I think a shallow brownie looks so mean on a plate!

Here's what they should look like - carefully photographed to avoid showing any scale, I think!

Sunday, 12 September 2010

Nutella Cake with Cinnamon Crumble

An open jar of Nutella is a dangerous thing! The only way to prevent me eating it a spoonful at a time is to cook with it, to make sure the others share it. This cake was inspired by several online, including the 'self frosting' cake here, but I've taken elements from several and made something unique, I think. If I make it again I will increase the base layer by half as much again, to make a deeper cake.

Ingredients
110g unsalted butter
110g caster sugar
2 medium eggs
1/2 teaspoon vanilla extract
50g ground hazelnuts or almonds
100g SR flour
50g dark chocolate chips

roughly 100g Nutella

Topping
55g unsalted butter
50g demerara sugar
70g plain flour
1/2 teaspoon ground cinnamon

Method
Make the crumb topping first - melt the butter in the microwave and stir in the other ingredients with a fork. Allow to cool while making the cake batter.
Prepare a 20cm(8") diameter springform cake tin, and preheat the oven to 180C.
Cream the butter and sugar together until light and fluffy. Beat in the eggs one at a time, with a teaspoon of the flour and the vanilla extract. Lightly fold in the rest of the flour and ground nuts, then the chocolate chips.
Transfer the batter to the cake tin and level the surface.
Arrange heaped teaspoonsful of Nutella on top of the cake batter - I used six blobs around the sides and one in the middle - using roughly 100g of the spread (I weighed the jar before and after use). Use a skewer or cocktail stick to swirl the Nutella into the surface of the cake, trying not to go too deep into the batter.
Use your fingers to break up the topping into smaller pieces and crumble it over the surface of the cake.
Bake for 40 minutes until the top is golden brown and the cake batter is dry and cooked when tested with a probe.

This is a really good cake - moist base studded with chocolate chips, still gooey patches of Nutella peeking through the crumb topping, and a crunchy cinnamon flavoured topping. The Nutella rightly contributes the strongest flavour to the cake; the cinnamon is an added hint of flavour - just the right amount.

As I said earlier, my only change would be to make a deeper  base cake.

Friday, 27 August 2010

Chocolate Frangipane Tartlettes


Including Chocolate and Raspberry Frangipane Tartlettes,  my entry for the September "We Should Cocoa" Challenge, which is being run by Choclette at Chocolate Log Blog, and Chele at Chocolate Teapot. The idea is that the two chocoholics will take it in turn each month to suggest a compulsory added ingredient to be used in conjunction with chocolate products in our baking. It's no hardship for me to include a chocolate baked product every month, and the challenge of using new ingredients may expand my cooking into new areas. The full rules can be found here, and this month's challenge of using raspberries has been set by Chele.

It was actually the use of raspberries which was the hard part of the challenge, as my Chief Tester is famous within the family for showing his dislike of raspberries in a spectacular way (throwing up over Granny's tea table). However, that was more than 20 years ago, and he's too polite to do that now, I hope! But it does mean that I don't often include raspberries in things I want him to eat.  To get over the possibility of him not liking a tartlette with raspberries in, I decided to make half the tartlettes with Nutella instead of raspberry jam.


Raspberry Frangipane Tartlettes
Ingredients

Chocolate Pastry:
150g plain flour
100g butter at room temperature
25g icing sugar
25g cocoa 
1 egg yolk
cold water as needed

Frangipane Topping:
110g soft butter
110g caster sugar
1whole egg + 1 egg white
1 tablespoon plain flour
110g ground almonds or other nuts of choice (I used a mix of almonds, apricot kernels and hazlenuts)

To finish - raspberry jam, Nutella hazelnut chocolate spread, a few flaked almonds, 50g plain chocolate

Method

To make the pastry - Sift the cocoa and icing sugar into the flour, then rub in the butter until the mixture is like breadcrumbs. Mix in the egg yolk and enough water to make a soft but not sticky dough. Knead lightly, then wrap in cling film and chill for 20 minutes. After chilling roll out as thinly as possible and cut out fluted circles to line tartlette moulds (mincepie tray). (I got 18 tartlettes out of this amount of dough).

To make the frangipane topping - Cream the butter and sugar until light and fluffy, then beat in the egg, egg white and tablespoon of flour. Finally, fold in the ground nuts.

To assemble the tartlettes - Put a scant teaspoon of raspberry jam into half the pastry cases, and the same amount of Nutella into the rest, spreading it as much as possible. Top with the frangipane mixture, adding enough to almost fill the cases. Sprinkle the rasberry tartlettes with a few flaked almonds.

Bake at 200C for 10 minutes, then reduce the heat to 180C and cook until the frangipane is golden brown and feels set - roughly another 10 miuntes. Rest in the tin for 3 minutes then move to a wire rack to cool. The frangipane will puff up as it cooks, but fall back as it cools to give a level top.

Nutella  Frangipane Tartlettes
To finish, put 50g plain chocolate into a small plastic freezer bag and heat in a bowl of hot water until the chocolate has melted. Snip a corner off the bag to make a very small hole, then swing the bag about over the tartlettes to allow a free-form trail of chocolate to land on the tartlettes as it runs out of the bag.

Both tartlettes were delicious, the pastry was crisp and the frangipane moist and chewy. Those with the raspberry jam had a tart fruity flavour which went well with the frangipane topping, but those with Nutella were better - the added chocolate flavour really enhanced the flavour of the pastry.

Tuesday, 21 July 2009

Hazelnut Brownies, using Nutella

The thing about cakes filled with fresh cream is that they don't last very long - they just have to be eaten .....

..... so today the 'cake tin' is empty, and I'm baking again.

Today I decided that I needed something which incorporated Nutella, having found a half-used jar that I bought for another baking project. After searching online for recipes, and rejecting many because I didn't have all the ingredients, and others because they just didn't look 'right', I decided to adapt this recipe for Nutella brownies. First adaptation was to translate the American weights and volumes into metric measurements, as I just can't get on with using cups. Then I upped the chocolate a little, and decided to add some chopped toasted hazelnuts too.


The final list of ingredients was:

100g butter
100g plain chocolate (72% cocoa solids)
150g light brown muscovado sugar
2 large eggs
125g Nutella
75g plain flour
50g cocoa
50g hazelnuts, toasted and chopped

I followed my usual method for making brownies, melting the butter and chocolate together in a bowl over a pan of simmering water. This melted mixture was cooled slightly then the sugar was added and the mix stirred until smooth. Next, the eggs were added, one at a time, and mixed in well. After this I stirred in the Nutella, then sifted in the flour and cocoa and folded them into the mixture. Lastly the chopped nuts were folded in.

At this stage the mixture seemed very thick, and it was quite difficult to spread it into the prepared tin (8 x 8" tin, lined with baking parchment). This had me quite worried as other brownie batters I make are much runnier at this stage. The brownies were baked as suggested in the original recipe - at 180C for 20 minutes.
Once cooled and removed from the tin, I could see that they were too shallow. I prefer a deeper brownie which will stay moist in the centre. The flavour is good - the chocolate is very intense - and the texture is dense and chewy - which is good for a brownie. Perhaps the only adjutment I need to make is baking in a smaller tin next time, or increasing the quantities of ingredients a little - 25%, say, although adjusting the eggs by that much will be inconvenient.
This recipe is a 'keeper', although it needs more work!