Showing posts with label sesame seeds. Show all posts

Tuesday, 16 August 2016

Tahini Brownies with a Sesame Praline Crust

I recently bought both tahini and sesame snaps for a cake recipe which I then decided not to make, so I had to think of another use for them. This recipe for tahini brownies with a sesame praline crust was the result. None of the sesame/tahini brownie recipes I could find online were quite what I was looking for - many used tahini to make dairy-free brownies and even more were so-called 'healthy' brownies, using raw ingredients or unusual grains instead of wheat flour. All I wanted was brownies with the flavour of sesame seeds!

In the end, I took inspiration from my recipe for brownies with a hazelnut praline crust, substituting tahini for some of the butter, and grinding the sesame snaps to make a praline topping. The results were very good - the brownies were very soft and gooey, and although the tahini flavour in the brownies wasn't very strong, the topping more than made up for this, adding a sweetened sesame flavour and crunch..

Ingredients
100g sesame snaps
90g butter
140g 70% plain chocolate
50g tahini
300g light muscovado sugar
3 large eggs
160g plain flour
3 tablespoons cocoa

Method
Pre-heat the oven to 180C and line a 20cm/8" square brownie tin with baking parchment.
Melt the butter and chocolate together in a large mixing bowl, over a pan of simmering water.
While this is happening, use a food processor or pestle and mortar to grind the sesame snaps to a fine praline crumb.
When the butter and chocolate has melted, stir in the tahini, followed by the sugar. Stir until smooth and evenly blended, then beat in the eggs, one at a time.
Sieve the flour and cocoa over the chocolate mix, and fold in.
Transfer the batter to the prepared tin and level the mixture, then sprinkle the sesame praline evenly over the batter.
Bake for 25-30 minutes, until a probe comes out with just a few damp crumbs sticking to it.
Cool before cutting into pieces of the desired size.

As this is the only chocolate baking I've done this month, and I was so pleased with the result, I'm sending this to August's We Should Cocoa link-up, hosted this month by Choclette at Tin and Thyme. As for July, the theme is 'Anything Goes'

Wednesday, 27 January 2016

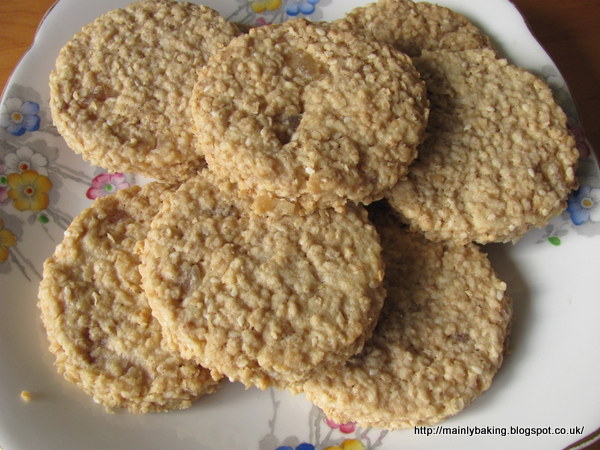
Sesame and Ginger Oat Biscuits

 - made from pastry scraps!

I've used this recipe before, when I've had a substantial amount of leftover shortcrust pastry. Last time I reduced the sugar in the original recipe and made savoury oat biscuits, this time I left in the suggested amount of sugar, added some sesame seeds and some crystallised ginger and made some fairly plain, not too sweet, biscuits which provided welcome relief from the excesses of rich food over the Christmas period.


It's more of a baking tip than a recipe - you weigh your pastry leftovers, then add the same weight of rolled oats and half that weight of butter and sugar. I started with 180g of shortcrust pastry, so added 180g of oats, 90g butter and 90g of soft brown sugar. I also added 2 tablespoons of sesame seeds and 50g of finely chopped crystallised ginger.

After leaving the bowl of ingredients for half an hour or so, for the pastry and butter to soften, everything is kneaded together either by hand or in a food processor. The dough is then rolled out to about 5mm thick and cut into shapes of your choice. These take about 15 minutes to bake at 180C - they need to be firm but not coloured too darkly.

The recipe I used, plus some other suggestions for using up leftover pastry, can be found on this link to the Guardian 'Readers' Recipe Swap'.

Thursday, 14 May 2015

Cauliflower Cake (Yotam Ottolenghi's recipe)

I noticed that there is a bloggers' celebration of cauliflower taking place, co-hosted by Karen at Lavender and Lovage and Choclette at Tin and Thyme.

I love cauliflower as it's extremely versatile and always tasty, however it's cooked. One of my favourite ways to eat it is gently fried with whole spice seeds, such as nigella, black mustard and cumin, and a few flakes of dried chilli. It then makes a delicious accompaniment, alongside rice or bread, to a curry.

Then there's cauliflower cheese, to which I often add pasta, to make a cross between cauliflower and macaroni cheese. And along with numerous others, I'm a fan of cauliflower 'rice' to reduce carbohydrate intake, although I do prefer to mix it with some Basmati rice, so that it will still absorb sauces.

The Cool Cauliflower Recipe Collection: Linky Party and Blog HopHowever, the recipe I want to add to this collection of cauliflower recipes is Yotam Ottolenghi's recipe for Cauliflower Cake. This is a delicious, well flavoured cake which is like a frittata. The addition of flour makes it lighter, yet sturdier, than a traditional frittata. The cake is flavoured with cheese, rosemary, onion, basil and sesame and kalonji seeds and can be eaten both hot and cold, which makes it ideal for picnics and parties.

I made and wrote about it back in September 2014, but rather than edit that post for the cauliflower link-up party, I thought it better to write a new post.


Friday, 17 April 2015

Date Cake with Middle Eastern Flavours

or Kaikat al Khaleej

I love the flavours used in Middle East desserts and sweets, so was quite confident of finding something to make for the Bahrain round of Formula 1 Foods, the new blog challenge from Caroline, at Caroline Makes. The idea is to follow the Grand Prix racing season and cook something inspired by the country in which each race is held.

My confidence lasted until I started searching, when I discovered that almost all recipes for cooked pastries from the Gulf States involve deep frying. It's understandable - a desert lifestyle isn't conducive to building or using ovens, so most traditional recipes, even for breads, are cooked over open fires (or on the hob for more modern cooks). Unfortunately, I have an uneasy relationship with deep frying, dating back to setting fire to the kitchen over 30 years ago, so didn't really want to deal with fried desserts.

However, on this great blog about Middle Eastern food, called Ya Salam Cooking, I found a recipe for a baked date cake in the Bahraini section. I'm not sure how authentic it is - it may be that the author is just combining Middle Eastern flavours with a Western style of cooking, but I found a few similar recipes, often called Arabic Date Cakes, on Google. That was good enough for me!

This cake combines dates with rose water, cardamom, saffron and sesame seeds to give a wonderfully fragrant and moist cake. The quality of the dates is important, and I found some delicious soft and sticky dates in the snack food section in Waitrose. I didn't need to pre-soak them, as suggested in the recipe. They were so sticky that I tossed them in a tablespoon of flour from the recipe quantity, to make sure the pieces didn't stick together or sink in the cake batter.

I followed the recipe almost exactly; the only difference was the amount of water I used. By the time I'd added 150mls of water I already had a batter with a soft dropping consistency. At this point I was worried that a sloppier batter wouldn't cook properly, or support the chopped dates, so decided not to add any more water. My loaf took quite a bit longer to cook than the recipe suggested, but the picture with the recipe suggests a much larger 'loaf' tin was used, as the cake looks much shallower than the one I produced in a 2lb loaf tin.

As the recipe only used 1 egg, a relatively small proportion of butter and only water to mix the batter, I wasn't sure how well it would turn out. I needn't have worried - it was light and moist, with a close crumb. The chewy, sweet dates, which stayed soft, made the cake seem rich to eat, and the rosewater and cardamom added fragrant and spicy notes. I really love the flavour of rose in cakes and desserts but even small quantities can be quite strong, so use with caution! The only thing I wasn't sure about was the saffron - it didn't seem to add anything to either the colour or the flavour of this cake (and my saffron was new, so I can't blame old stock that had lost it's quality). As it's so expensive, I don't think I'd use it, if I made this cake again.

Thursday, 11 September 2014

Yotam Ottolenghi's Cauliflower Cake

Yotam Ottolenghi is a chef I admire greatly; his recipes often have Mediterranean or middle Eastern influences and he's perhaps best known for recipes based on vegetables - perhaps not 100% vegetarian, but where vegetables take the starring role.

This cauliflower recipe, which comes from his new book 'Plenty More'; is called a cake, but the texture is more like a frittata; flour and baking powder are added to a lot of eggs to give a lighter, but somehow also sturdier, texture than the traditional frittata.

The picture of the cake, which was published in the Guardian Weekend magazine, along with a few others from the book, instantly attracted both of us. My husband liked the pattern of onion rings on the top and I liked the description of something more appealing than a cauliflower cheese! I followed the recipe exactly, although I was slightly short of basil - the plant on the patio didn't really recover from the last harvesting; I suspect it hasn't had enough sun this year. The tin I used was slightly larger than the tin specified - I had the choice of using either a larger tin or a smaller one, and went with the larger one - but the cake still needed the full cooking time to get enough colour on top.

There are lots of big flavours in this cake - cheese, rosemary, onion, basil, sesame and kalonji seeds - and they do rather overwhelm the cauliflower, but nevertheless this is a really delicious and unusual way to use the vegetable. This makes a good dish to eat at room temperature, with a salad or hot vegetables, but is also something suitable for a picnic or buffet table. It's sturdy enough to withstand transportation, especially if it's left in the tin until required, and can be eaten as a finger food.


I can't resist adding this last photo - just to prove that this recipe turned out looking as it should!

Monday, 17 February 2014

Cheese Scones with Za'atar

The AlphaBakes baking challenge has reached one of the more difficult letters of the alphabet this month - the letter Z! I could have gone the easy route, with a zebra cake, or used a zucchini, but I wanted something a bit more unusual. I often get inspiration from my spice cupboard, when looking for unusual flavour combinations, so was happy to come across a jar of Za'atar spice mix hiding at the back.

Za'ater is a variable mix of herbs, spices and sesame seeds (mine contains wild majoram, sumac and sesame seeds - some varieties use thyme and/or oregano) and is quite bitter, so isn't really suitable for sweet baking. After some experimentation, which is best forgotten, I finally decided on the savoury option of cheese scones filled with a swirl of the za'atar mix.

I made a standard scone mix of 50g of butter rubbed into 200g SR flour, to which I added 50g of grated cheese - a mixture of mature dry cheddar and parmesan. I mixed in half a teaspoon each of dry mustard powder, white pepper and cayenne powder for flavour, then added half a beaten egg and enough milk to make a soft dough. After a brief knead, I patted out the dough, on a floured board, to make a square about 1cm deep. I sprinkled about 2 tablespoons of za'atar over the dough, leaving a cm margin along one edge, which was wetted with milk. The dough was then rolled up tightly from the edge opposite the wet edge, so that the wet edge stuck and held the roll in place. The roll of dough was cut into pieces 2.5cm long and the pieces were placed on a baking tray with the swirl of za'atar facing upwards. The top of each scone was brushed with beaten egg and sprinkled with sesame seeds before baking at 220C for about 15 minutes, until risen and golden brown.

The bitter flavour of za'atar means it needs to be used with caution - I think these scones might have been better with a bit less za'atar mix, as the flavour quite overwhelmed that of the cheese and other spices used. I also think a scone might not be the best vehicle for the za'atar - small cocktail biscuits or puff pastry whirls which could be eaten in just a mouthful might have been more suitable. However it was an interesting way of getting to use the za'atar, which had been lingering unused in my cupboard for far too long.

AlphaBakes (rules here) is a challenge based on a randomly chosen letter of the alphabet. The dish made must feature something beginning with that letter as one of the main ingredients or part of the name. It is hosted jointly by Ros at The More Than Occasional Baker and Caroline at Caroline Makes. Caroline is this month's host, with the letter Z, and will feature a round-up of entries at the end of the month.

Wednesday, 27 April 2011

Cranberry and Apricot Flapjacks

This is another variation of my basic flapjack recipe, featuring my favourite combination of dried fruit - cranberries and apricots.

This time I cut down the butter to see what effect it has. The flapjacks were crisper than usual and had a slight tendency to crumble at the edges, but overall it was an acceptable change. CT doesn't eat flapjacks, so I had no concerns about using butter in the first place. These were made primarily for FB's lunchbox - she's quite happy to make up a batch of Dan Lepard's marmalade flapjacks, when she has time, but although they are very tasty I find them a little too soft and crumbly for my taste.

Ingredients:
200g butter, 100g golden syrup, 150g light muscovado sugar; 350g rolled oats, approx. 150g dried fruit, nuts and seeds*.

Method:
Melt the butter, sugar and syrup together, either in a bowl in the microwave or a pan on the hob. Remove from the heat when the butter has melted. Stir in the other ingredients. Press the mixture into a 12 x 8" tin lined with baking parchment and bake at 180C for 25 minutes. Cool for 15 minutes before marking into bars, but cool completely before removing from tin.

* I used 50g each of dried cranberries and chopped apricots, 20g each of chopped toasted hazelnuts and pumpkin seeds and two tablespoons of sesame seeds.

Sunday, 19 December 2010

Flapjacks with Apricots and Sultanas

This was probably the last routine baking session before Christmas - something to keep the cake tin full - and I chose something that could be prepared and mixed up in less than 5 minutes, and cooked while I was working on other things in the kitchen. Flapjack is so quick to make and satisfying to eat - I think the only reason I don't make it more often is that it is packed with butter and sugar and seems less healthy than other  baked goods. This is probably a fallacy though - this recipe is 50% fat and sugar by weight, which is no different to a standard Victoria Sandwich cake, before you fill it with buttercream or jam. Plus, it has oats in, which may reduce cholesterol levels, and you can add a healthy selection of dried fruit and seeds of your choice.

So - don't feel guilty about flapjacks - sounds like a good New Year's resolution to me!


Ingredients

250g salted butter
100g golden syrup
150g light muscovado sugar
350g rolled or porridge oats
150g dried fruit, seeds, or nuts of your choice - in this batch I used 55g dried apricots, 50g sultanas, 25g pumpkin seeds and 20g sesame seeds - chop any large fruit to the size of sultanas

Method

Preheat oven to 180C. Line a 12 x 8 x 1" deep (30 x 20 x 2.5cm deep) baking tray with one piece of baking parchment, folding it into the corners, so that it comes up the sides of the tin. (You don't want any of the flapjack mix in contact with the tin.)

Melt the butter, syrup and sugar together, either in a large microwaveable bowl or a saucepan on the hob. Once the butter has melted, stop heating and mix together until the sugar has dissolved.

Tip in all the other ingredients and mix together thoroughly. When there are no dry patches of oats, transfer everything to the baking tray and press down firmly into an even layer.

Bake for about 25 minutes, until the flapjack is just turning golden. This makes a chewy flapjack - if you like it crisper, bake for a few minutes longer until a deep golden in colour.

Cool for 10 minutes, then mark the flapjack into squares. Cool completely before trying to remove from the tin.