Showing posts with label apricot jam. Show all posts

Monday, 2 December 2019

Shortbread Squares (Again!) with Mincemeat and Hazelnuts

I make these shortbread squares so often these days that I feel guilty about writing a blog post about them again!

However they are so delicious and so quick to make that reminding you about them in the run-up to Christmas is probably doing you a favour. Don't bother with pastry and individual mince pies, especially if you're feeding a crowd - make these instead!

The basic shortbread recipe, and general idea, comes from Sue Lawrence's book 'On Baking'. Over time I have experimented with many fillings based on jam, mincemeat and dried fruits.  This time the filling was mincemeat mixed with apricot jam, and I also added chopped toasted hazelnuts to the portion of dough put aside for the topping.

Dough Ingredients:
170g SR flour
170g semolina
170g butter
85g caster sugar
30g finely chopped toasted hazelnuts

Filling:
250g mincemeat and 100g apricot jam, mixed together well (or use all mincemeat).

Method
Preheat the oven to 190C and line a 20cm (8") square baking tin with parchment.
Mix the flour and semolina in a large mixing bowl.
Melt the butter and sugar together gently, until the sugar has dissolved, and add to the flour mixture. Stir until well combined.
Take 2/3 of the dough and press firmly and evenly into the base of the baking tin.
Spread the filling over the base, leaving a small margin around the edges.
Mix the chopped hazelnuts into the remaining dough and crumble the mixture over the filling layer. Press down lightly with the palm of the hand.
Bake for 25 minutes, by which time the shortbread should be a light golden brown in colour.

Cut into pieces of the desired size (I make 16 squares) as soon as the tray is removed from the oven, but don't try to take the pieces out of the baking tin until they are completely cold - they are too fragile while warm, and will break up.

The shortbread layers of these squares are perfect - crisp but a little crumbly, and they just melt in the mouth. Curiously,  adding apricot jam seemed to reduce the sweetness of the mincemeat - it must just be down to the natural tartness of apricots because the sugar content of jam and mincemeat are very similar.


Wednesday, 22 November 2017

Apricot and Lemon Bread and Butter Pudding

I made this 2-portion pudding in individual dishes, but if it was made in one dish it could easily feed three people; I was a little too greedy! The ingredients list is a bit vague, because the only thing I measured accurately was the milk.

Ingredients
*4 thick slices of brioche, each about 10cm square
butter, softened
apricot jam
a handful of soft dried apricots, chopped
a small chunk of glacé lemon peel chopped finely (optional)
2 medium eggs
225mls semi-skimmed milk
zest of half a lemon
1 tablespoon caster sugar, plus a little more for sprinkling on top
freshly grated nutmeg

*or use plain white bread from a small loaf  - slightly stale bread can be used for this sort of pudding

Method
Thickly butter two individual baking dishes, which have roughly 350mls capacity each (or use one larger dish).
Mix the apricots and peel together, if using.
Use more butter and some apricot jam (fairly thinly spread), to make two sandwiches with the brioche.
Cut the sandwiches into suitably sized pieces to fit into your chosen dishes - I cut mine into 8 tiny triangles to get a tight fit.
Share half the pieces of sandwich between each dish and sprinkle with 2/3 of the fruit.
Arrange the rest of sandwiches on top, trying to keep the top fairly level and sprinkle over the rest of the fruit.
Mix the eggs, milk, lemon zest and caster sugar together in a jug and divide equally between the two dishes. Leave to stand for up to an hour to allow the custard mixture to soak into the bread.
When ready to cook, preheat the oven to 180C (160 fan). Sprinkle a little more sugar over each pudding and then grate over some nutmeg.
Cook for 25-30 minutes, until golden brown and crisp on top. One large pudding might take a few minutes longer.

This was a tasty version of the standard B & B pudding - the touch of lemon, and the tartness of the dried apricots, cut through the sweetness added by the jam.

I apologise for the awful photo - I wanted to get the puddings fresh from the oven, as they deflate as they cool and don't look so attractive, so had to use flash.


Friday, 17 July 2015

Gerbeaud Slices

I know it seems contradictory to say that I don't like layer cakes but that I love layered bars or slices, but there is one big difference between the two. Layer cakes are often assembled with fillings that aren't essential to the flavour of the cake, but just pile on the fat and sugar; with layered slices, the filling between the layers of dough is often where the main flavour lies, and the whole thing is assembled before baking is complete (with the exception of a frosting, if added). With layered slices, the base or layers of biscuit act as a carrier for the main flavour ingredients.

These Gerbeaud Slices (scroll down for a photo of the real thing!) are a typical example - the layers of dough are simple, almost unsweetened, flavoured only with a little lemon zest, whereas all the flavour and sweetness is in the two layers of walnut and apricot jam filling and the chocolate on top. This recipe originated in Hungary, from the famous House of Gerbeaud in Budapest, which now comprises a patisserie, a bistro and a smarter restaurant. The pastry is typical of Eastern European baking, with it's use of yeasted dough, nuts and fruit preserves. There are several, slightly different, recipes online, as you'd expect from something that has become a traditional cake of the country, and has passed from a patisserie into household use. I eventually chose this one, from the Good Things website, because of the detailed instructions and the fact that it was very similar to the recipe in a Hungarian cookery book I have.

I made half the recipe from the Good Things site, as there were only two of us to eat it. This meant I had to adjust the recipe a little - I still added a whole egg yolk (who wants to divide an egg yolk in half?) and used a little less liquid in the dough to compensate. I used natural yogurt instead of sour cream, and found that I didn't need to add more than 1 tablespoon to get a nice soft dough. I baked the slice in a 20cm square cake tin, which was perhaps a fraction too large;  the dough had to be rolled quite thinly to fit the tin, but the rest of the ingredients seemed in the right proportions.

When I first discovered the recipe it was difficult to imagine what the layers of dough were going to be like after baking. The dough contained yeast, but wasn't left to rise as long as most yeast doughs, and also contained a little bicarbonate of soda and acidic sour cream which would also act as a raising agent. Was I making bread or biscuit? The dough had the elasticity of bread dough, which helped when fitting it to the baking tin, but after baking the layers were more like a soft, but firm, biscuit with an open texture.

I thought these bars were really delicious; the sweet nutty filling was balanced by the plainer biscuit layers and both were complimented by the chocolate topping. My husband wasn't as impressed - he said he could only taste the chocolate on top! I suppose that's probably an example of the fact that people's taste buds makes their eating experiences unique!

These bars would look very impressive as part of a special tea, especially when the edges are trimmed off before cutting the main part of the slice into bars. Although they were a little more fiddly to make than some bars, the dough was very easy to work with and the finished slices really made the effort seem worthwhile.

I'm sending these to Caroline Makes, for the Formula 1 Foods Challenge - food inspired by each round of the Formula 1 Grand Prix. I'm a little early with my entry, as the Hungarian Grand Prix isn't until the end of the month, but who knows, I might find something else Hungarian to bake by then!

Wednesday, 6 May 2015

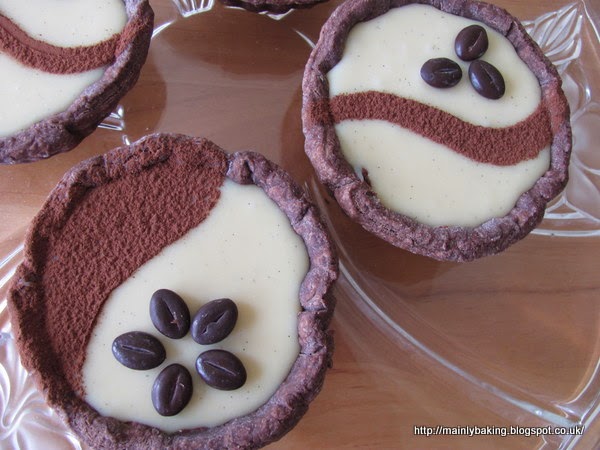
Chocolate Tarts x 2

1) chocolate tarts with Nutella and white chocolate/vanilla ganache
2) chocolate and marzipan tarts.

These chocolate tarts with Nutella and white chocolate/vanilla ganache filling were made our Bank Holiday dessert, but also fit the bill for for this month's We Should Cocoa Challenge. Karen, at Lavender and Lovage, is the guest host for the challenge started by Choclette at Tin and Thyme (formerly Chocolate Log Blog) and has asked us to use vanilla and chocolate together.

I decided to make extra chocolate pastry when making these ganache filled tarts, and used it to make smaller tarts filled with a disc of marzipan and a chocolate frangipane topping.

The recipes for both were just cobbled together as I went along, and I didn't take careful notes, but here's more or less what happened:

I made an unsweetened shortcrust pastry, from 270g plain flour, 30g cocoa, 75g butter and 75g lard. After rubbing the fats into the flour and cocoa, I added 1 teaspoon of instant coffee dissolved in a tablespoon of hot water, followed by enough cold water to make a firm dough. After resting in the fridge, I lined 12 jam tart moulds and four 9cm diameter individual tart moulds with pastry, and baked blind.

I originally intended just to fill the larger tart cases with white chocolate ganache but thought this might not have quite enough flavour, so before pouring in the ganache I spread a tablespoon of Nutella over the base of the pastry. I then chilled the cases for 10 minutes, so that the ganache didn't disturb the Nutella when it was poured on. The ganache was made by heating 125ml of double cream until just at boiling point, then stirring in 170g of good quality white chocolate and a teaspoon of vanilla bean paste with seeds. I allowed this to cool a little before pouring into the pastry cases, then cooled to room temperature before refrigerating. Once cold, the tarts were decorated with cocoa sifted through stencils, and chocolate coffee beans. I  brought the tarts up to room temperature before serving.

For the chocolate and marzipan tarts I put a quarter of a teaspoon of apricot jam into each case, with a small disc of marzipan (made from a pea-sized piece) on top. I made the frangipane mixture by beating together 40g ground almonds, 25g SR flour, a heaped teaspoon of cocoa, 50g caster sugar, 1 egg, 50g softened butter and a few drops of almond extract until smooth. This was just enough batter to put a heaped teaspoonful into each tart case. I sprinkled a few flaked almonds on top before baking at 160C until the frangipane felt solid - about 15 minutes.

I was right about the white chocolate tarts needing more flavour than just vanilla. Adding the chocolate  hazelnut spread gave them just that bit more interest, but afterwards I wondered if peanut butter might have been even better, as it would have counteracted the sweetness of the ganache too.

I had been a little worried about the ratio of cream to chocolate for the ganache, as recipes I looked at ranged from equal amounts of each (200ml cream to 200g chocolate) down to only adding 50ml of cream to 200g chocolate. The ganache I made was about right for a tart filling - holding it's shape, but not too hard, at room temperature.


The smaller chocolate and marzipan tarts were delicious too, but it's hard to go wrong when combining chocolate and marzipan!


Tuesday, 9 September 2014

Hazelnut, Apricot and Chocolate Tart


It might not look like it, but the inspiration for this tart was the Bakewell tart. The first step in a gradual change was to add cocoa to the usual frangipane filling to make a chocolate version. After a while, I changed the jam used, because apricot seemed to be a better partner for the chocolate and almond combination than the traditional raspberry. That version, sometimes topped with flaked almonds, and sometimes with a glacé icing, has been a family favourite for many years, and has also helped to stock many fund-raising cake stalls, when made in small foil cases.

This time, I decided to use some of the foraged hazelnuts, instead of almonds, and to up the chocolate content by adding 100% cacao to the filling, as well as cocoa powder. This gave the filling extra richness and depth of flavour which contrasted well with the sweet, yet tart, apricot jam. I was fortunate that although my choice of jam (Aldi's own brand conserve) had quite a soft set, it contained large pieces of fruit which improved the texture.

I'm entering this tart into this month's We Should Cocoa challenge, which is to use jam and chocolate together. We Should Cocoa was the brainchild of Choclette, over at Chocolate Log Blog, and the rules for the challenge can be found on this link. Choclette alternates her hosting duties with guest hosts, but it is fitting that she should be the host for this month's challenge, as it is entering it's 5th year. I think that's a fine testament to the universal appeal of chocolate!


Ingredients
A loose-bottomed flan dish (about 20-22cm in diameter) lined with shortcrust pastry (no need to bake blind).

200g apricot jam

Filling: 60g ground hazelnuts, 40g SR flour, 100g caster sugar, 100g baking spread or softened butter, 1/2 teaspoon baking powder, 2 large eggs, 25g cocoa, 25g 100% cacao (finely grated), milk to mix.

To finish: 50g coarsely chopped hazelnuts, blanched if necessary.

Method
Preheat the oven to 200C and put in a baking sheet to heat, too.
Spread the jam into the pastry case, and chill while making the filling.
Put all the filling ingredients, except the milk, into a bowl and beat with an electric mixer until the batter is well blended. Add a little milk, if necessary, to give a soft dropping consistency - you shouldn't need more than a couple of tablespoons.
Fold in half of the chopped hazelnuts, then spread the batter into the pastry case, being careful not to leave any gaps around the edge where the jam might bubble up during cooking. Scatter over the remaining hazelnuts.
Put the tart on the heated baking sheet and bake for 15 minutes, then lower the temperature to 180C and cook until the filling is firm - roughly another 30 minutes. Serve at room temperature.

Thursday, 31 May 2012

Chocolate Fudge Cake with Apricot and Almond Filling

When will I learn to check the store cupboard before starting out on a baking session? I was sure there was still a packet of marzipan left over from Christmas, but no - there was only a measly 50g, wrapped in foil in the fridge (there would have been more, but for the thin slices I keep sneaking off leftover marzipan stored this way!)

So let me start by saying, the thicker the slice of marzipan you can put in the filling of this cake, the better it will be. I carried on with just the 50g that I had, but usually I would use half a pack - around 125g.

I saw a new chocolate cake recipe by Annie Bell recently, again, using oil insted of butter. I really wanted to try the cake, but didn't want fresh cream and fruit in the middle nor a marshmallow frosting. I decided to top the cake with chocolate fudge frosting and fill it with a family favourite - layers of apricot jam, marzipan and chocolate frosting. After 24 hours or so, the layers meld together as the marzipan dissolves, resulting in a sticky almond flavoured filling. Of course, we never wait for 24 hours before cutting the cake, so it tastes different on the first day, with each different flavour being noticeable.

The chocolate fudge frosting is made by melting 175g plain chocolate and 30g of butter together, then whisking in 2 tablespoons of golden syrup and 3 tablespoons milk. This is left to cool until it just holds it's shape - just under half is used in the filling and the rest spread on top of the cake.

I assemble the cake with a thick layer of apricot jam on the bottom layer of cake, then a circle of marzipan rolled to fit the cake, then the chocolate frosting, before putting on the top layer of cake.

This was a really delicious cake - the large amount of sugar did not make the cake over-sweet, but gave it a dense, moist texture, and counteracted the bitterness of the large amount of cocoa used. I'm sure this is good enough to use as the basis of a gateau, or a celebration cake - it tastes much richer than the ingredients would suggest. I'm certainly pleased to have had this recipe pointed out to me - it's a good companion to the lighter sponge recipe, also by Annie Bell, that I already use! Thanks to my friend, Jude, who searches out likely looking recipes.